The Ski3piners and the Barking Spiders undertook the project of building our own Arctic – Cold Weather Packs.
Much information we got through searching the forum posts here although photos of the finished product were hard to come by. I found four small photos on FWC’s website which I cannot find now to provide a link for you.
Many thanks to Marty at ATC for answering my questions and happily providing much helpful information. As always, the guys at ATC are great! I will provide photos and details here but not a complete set of directions. You will have to do your own measurements, layout, and assessment of your own abilities to tackle this project. This post is meant only as an aid and all the possible disclaimers we can all think of apply.
As with other projects posted here, I expect that many will come up with suggestions for improvements both in materials and designs - great!
Car cover fabric is used to create an insulating dead air space between the interior of the side liner and the interior of your camper.
Here is the materials list and cost. This is the same for our old Ranger II and the Spiders’ Hawk.
You will need a long straight edge, and backing board, and a proper rotary cutter.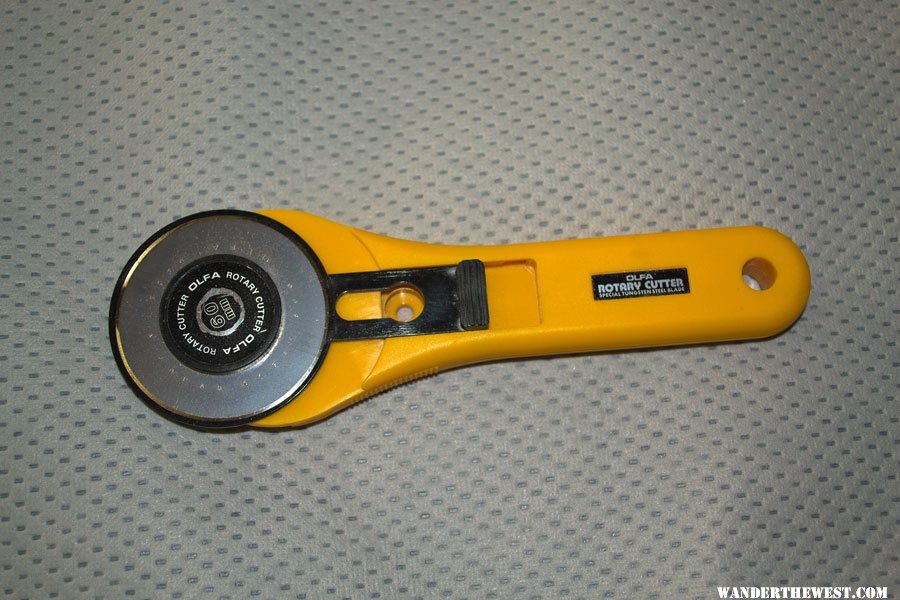
Mrs. Spider is the experienced sew machine operator in our group. It had been a long time since I had seen one in service!
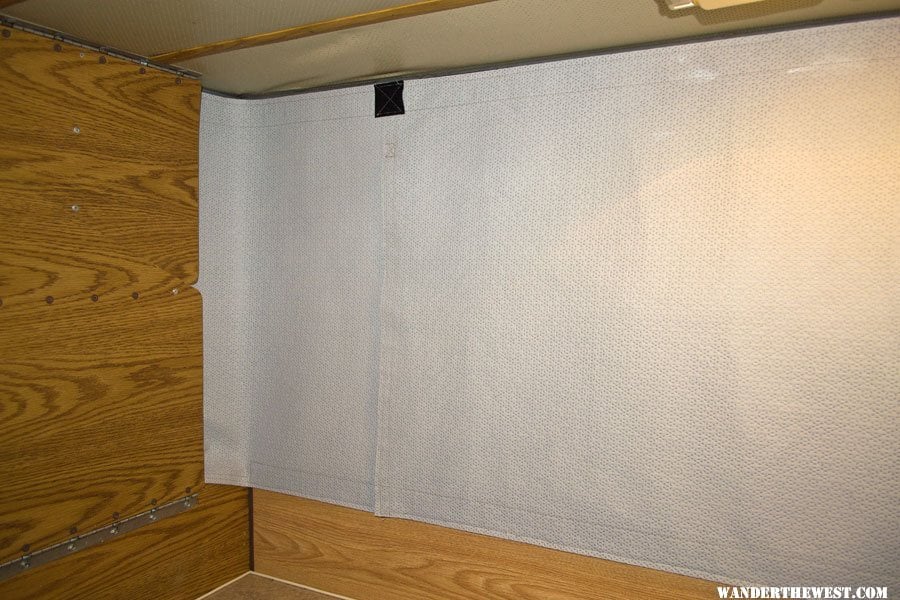
The material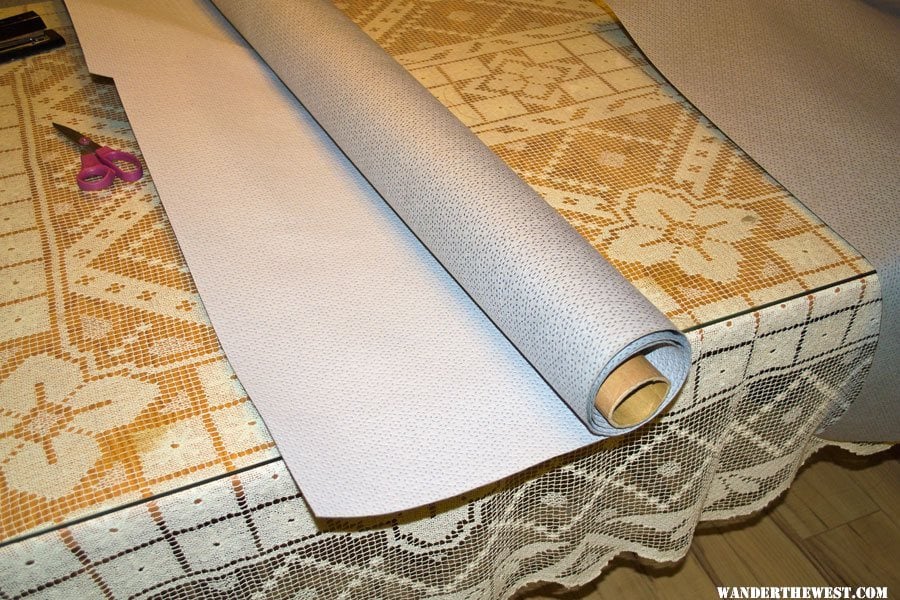
Although the info at Seattle Fabrics states 54” wide, it came 55” wide. This allowed a ¾” wide hem on both the top and bottom edges leaving an overall finished width of 26”, perfect! The vertical edges are not hemmed. The fabric has two sides, a brushed and one slightly smoother side. We put the smother side to the living space of the camper.
I should cover some terminology so we have a common language here.
Interior will be the fabric side to the camper side liner.
Front will be the overhead cab side of the camper.
Back will be to the entry door of the camper.
Center panel will be the space between your windows
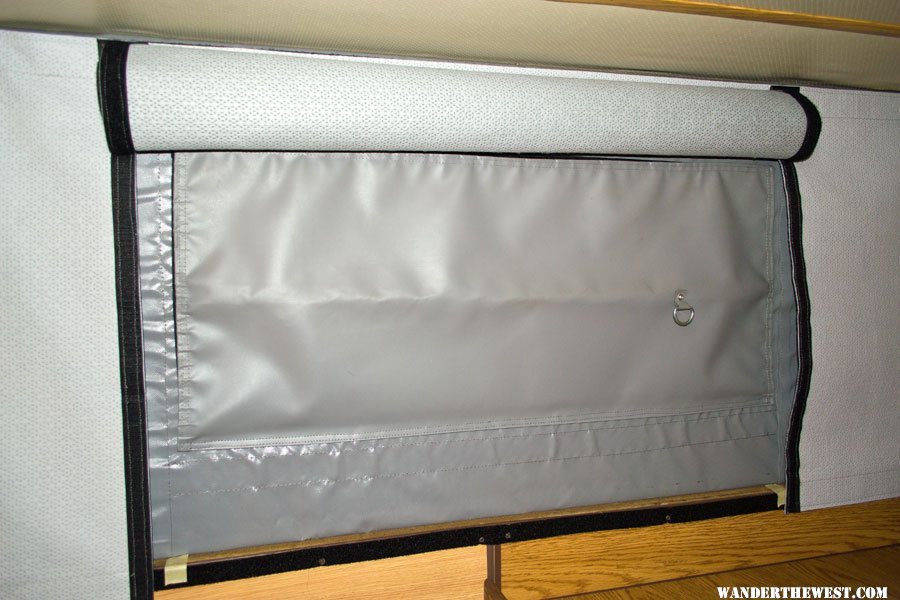
Window panels will be the covers over your sideliner windows.
Fuzzy Velcro is loop and hard Velcro is hook.
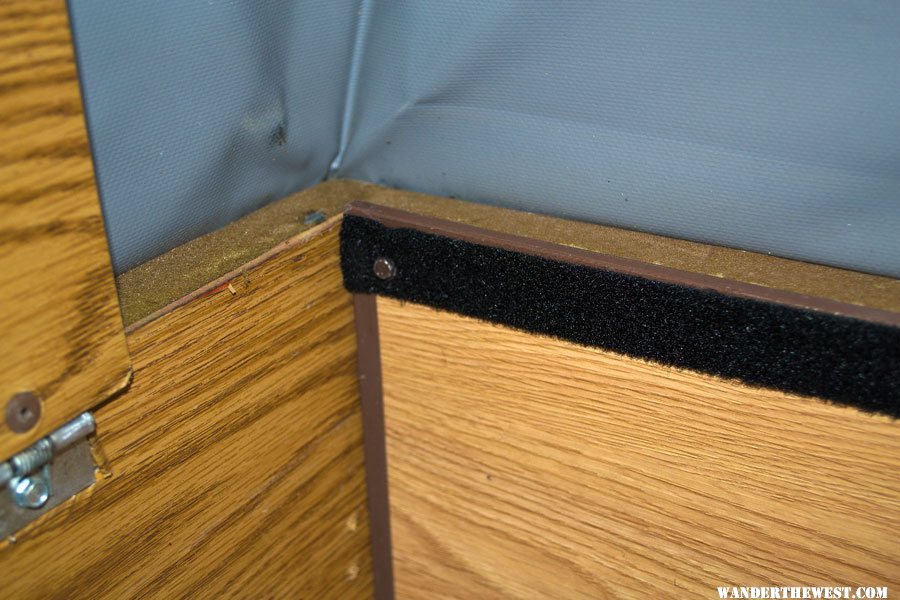
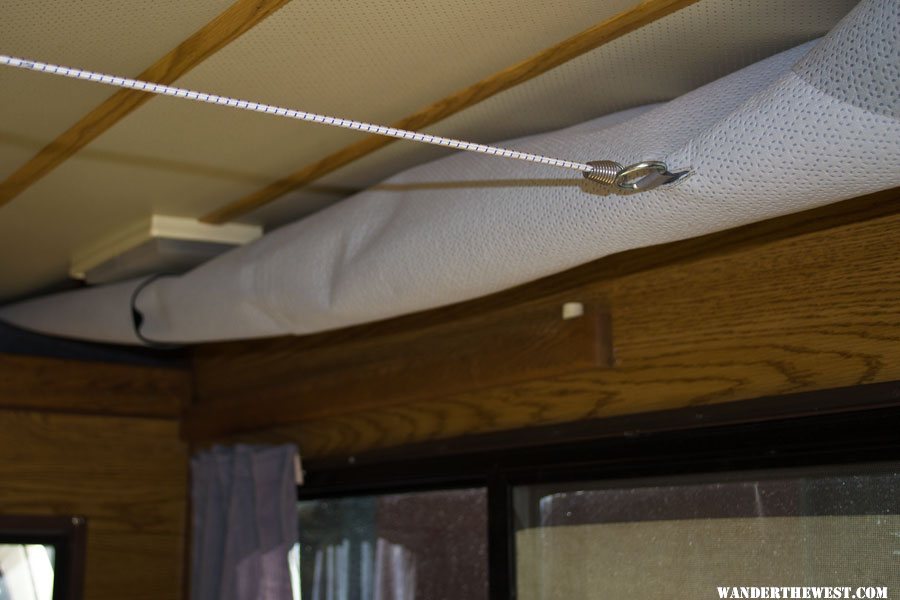
The sideliner attaches on the top to the 2” loop Velcro strip sewn along the top of most sideliners. I believe most newer ATCs and FWCs come this way. Our sideliner was replaced by ATC and has the strip. The bottom of the sideliner attaches to a strip of 1” loop adhesive backed Velcro that must be added to the top of the hard edge of your camper interior.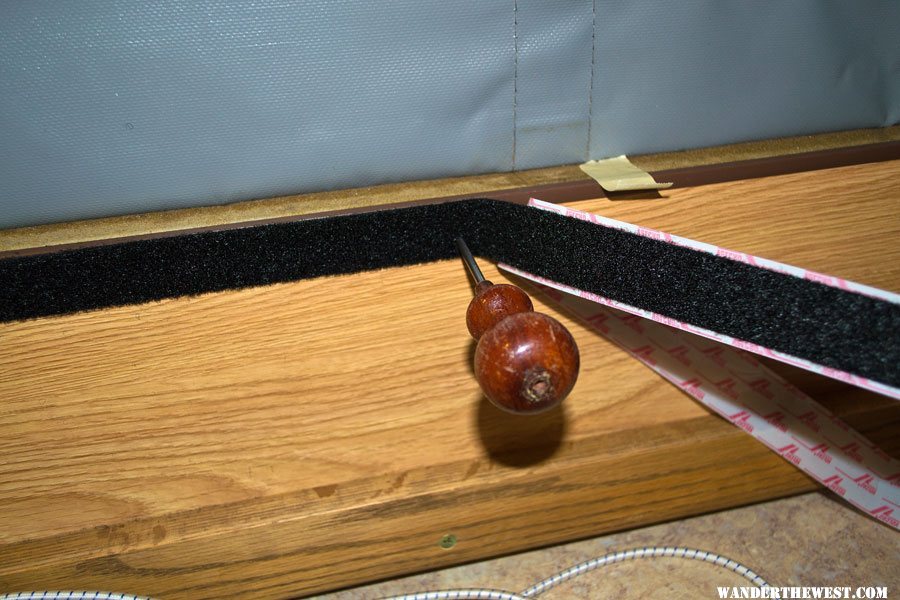
I elected to move along the edge and individually remove the hex head screws, find their hole with an awl, and then replace the screw.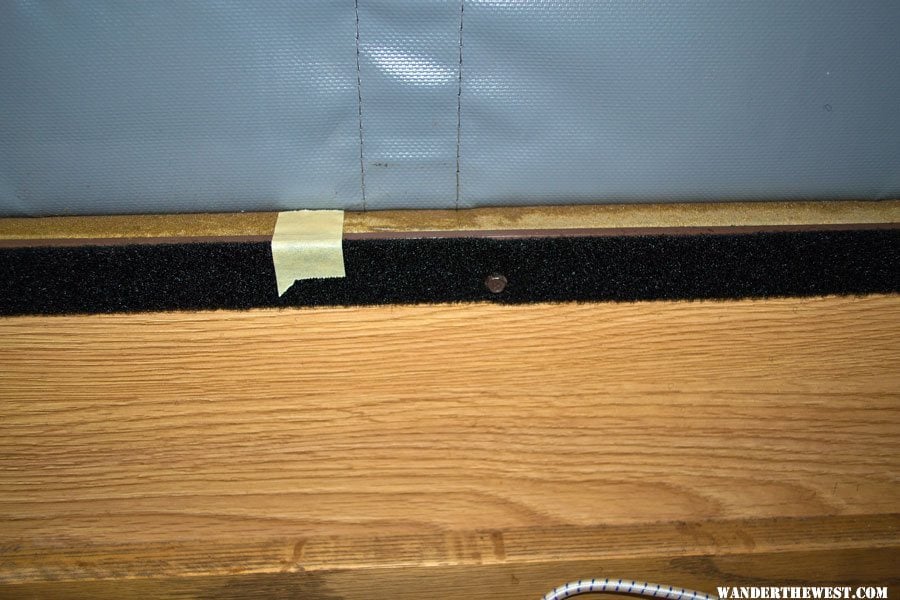
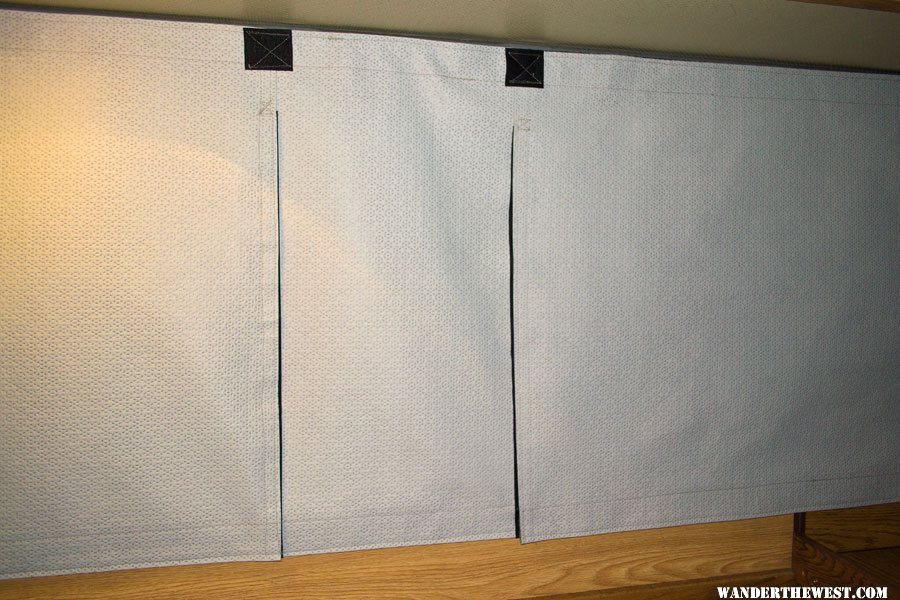
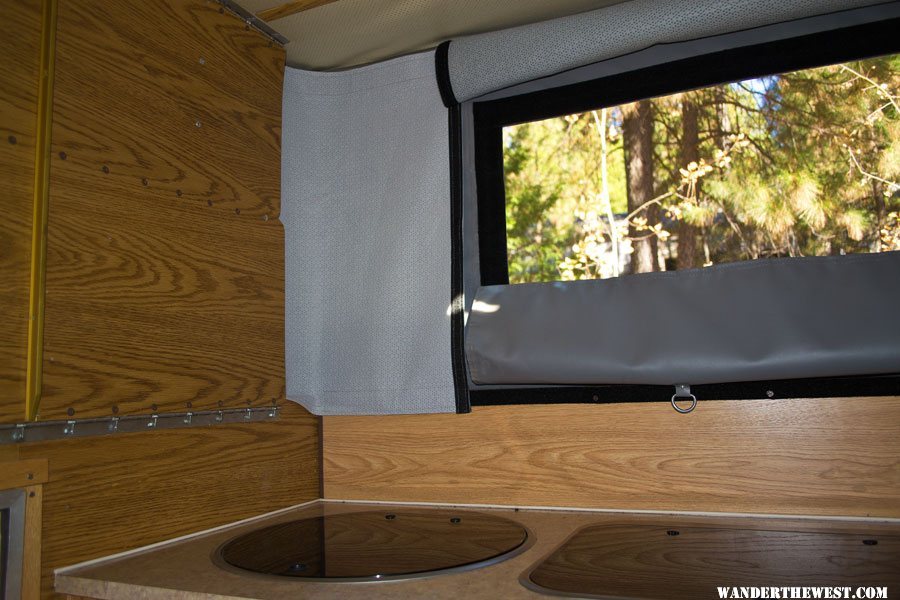
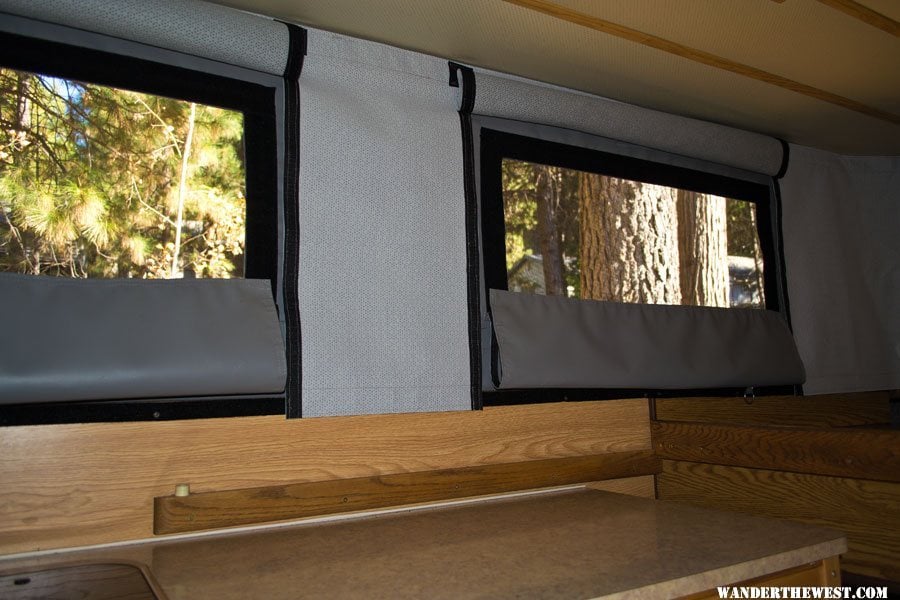
The arctic – cold weather pack is build in five panels, the center panel between the windows, the two window panels, and the back panel and the front panel. The front and back panels tuck behind your lift panel assemblies for the roof, but not too much to interfere with your sideliner attachment points behind the lift assemblies.
Our building process was cutting the fabric length wise down the center, cutting the individual panels, folding the hem and sewing on 2” hook Velcro along the interior bottom of each panel, sewing hook 1” hook Velcro to both outside vertical edges (length based on your needs) of the center panel and window sides of both the back and front panels, sewing 1” loop Velcro strips to the inside edges of all window panels, sewing the five panels together, folding the hem and sewing on 2”wide hook Velcro to interior top edge of assembled side, sewing on four 2” Velcro hook squares to outside top edge to hold window panels up in rolled position, and doing button holes for the four d rings on side liner window flaps.
This is probably getting confusing. Pictures will help.
Sewing on the bottom 2” wide Velcro hook strip. We folded over and pinned the ¾” hem, stapled the Velcro in place, sewed the bottom seam pulling pins along the way, sewed the top seam, and then pulled the staples.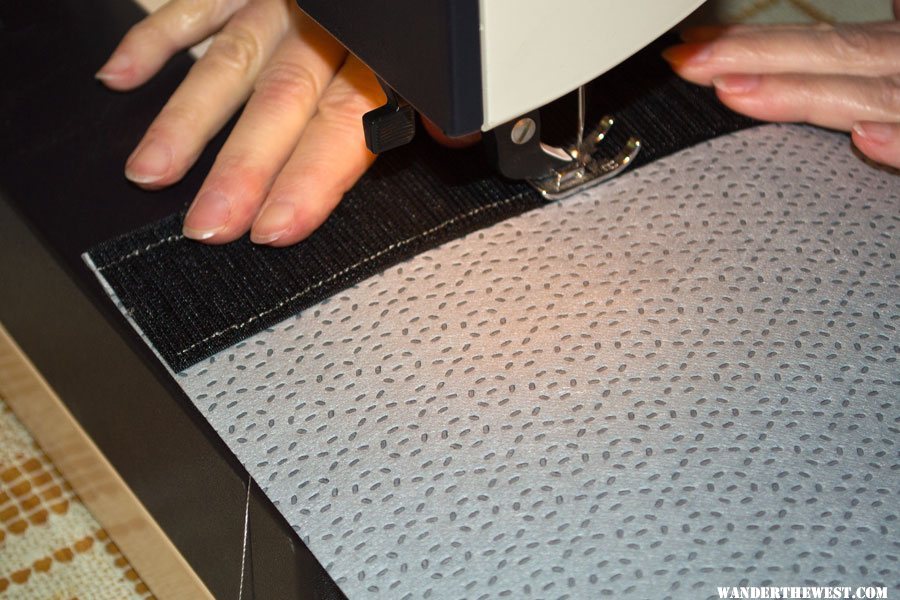
Here the panels are completed.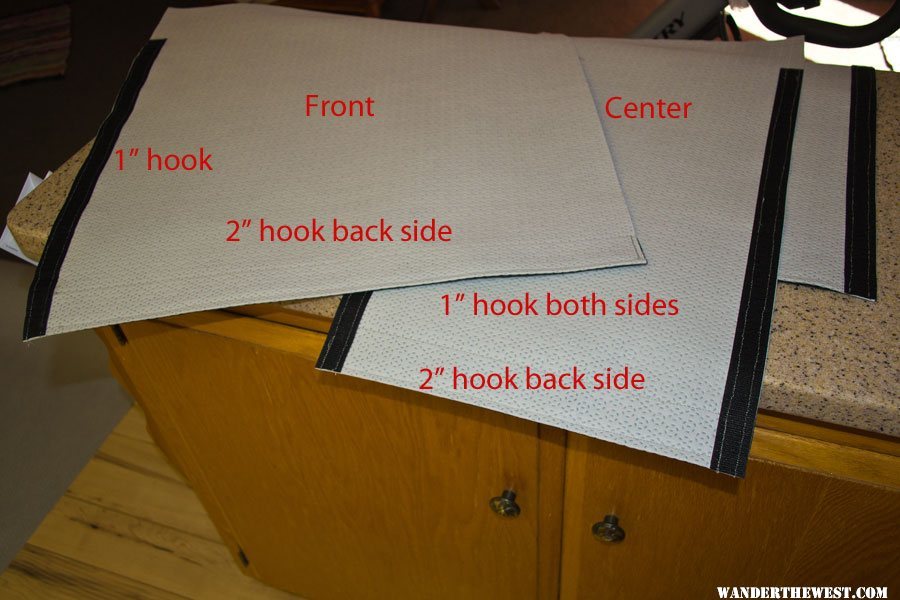
The hard part was sewing the panels together.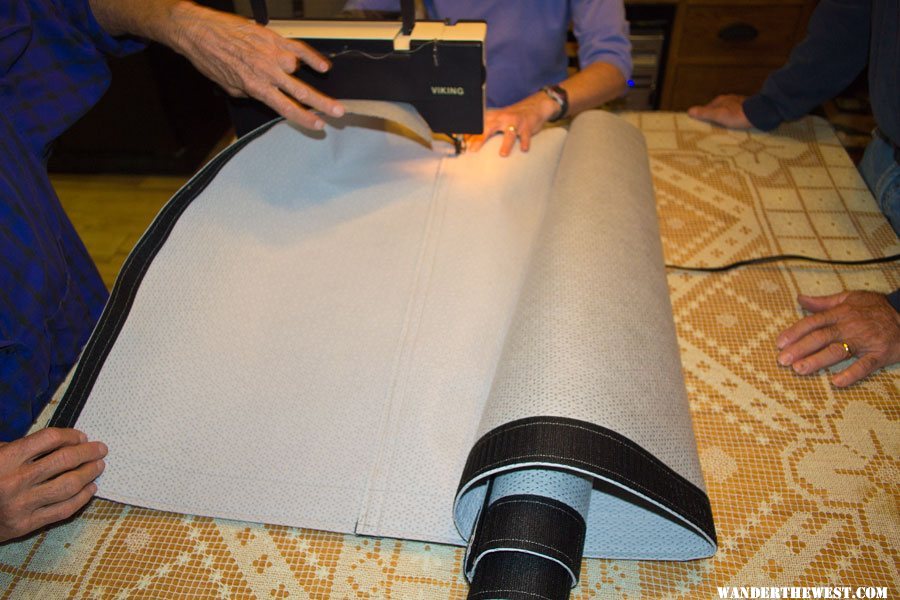
We kept the assembly square by lining the panel bottom edges up along the edge of our table top, overlapping the Velcro, and then sewing down from the top with the seam end across the top of both vertical Velcro strips.
Here is the assembled panels (interior view). The top edge hem is being folded and pinned with 2” hook Velcro strip ready to be temporarily stapled in place.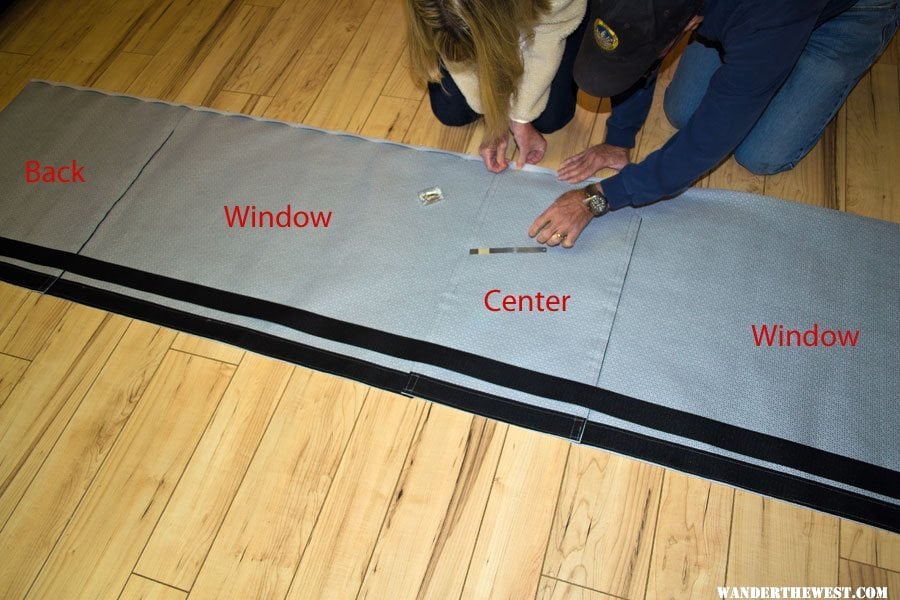
Here is a finished button hole.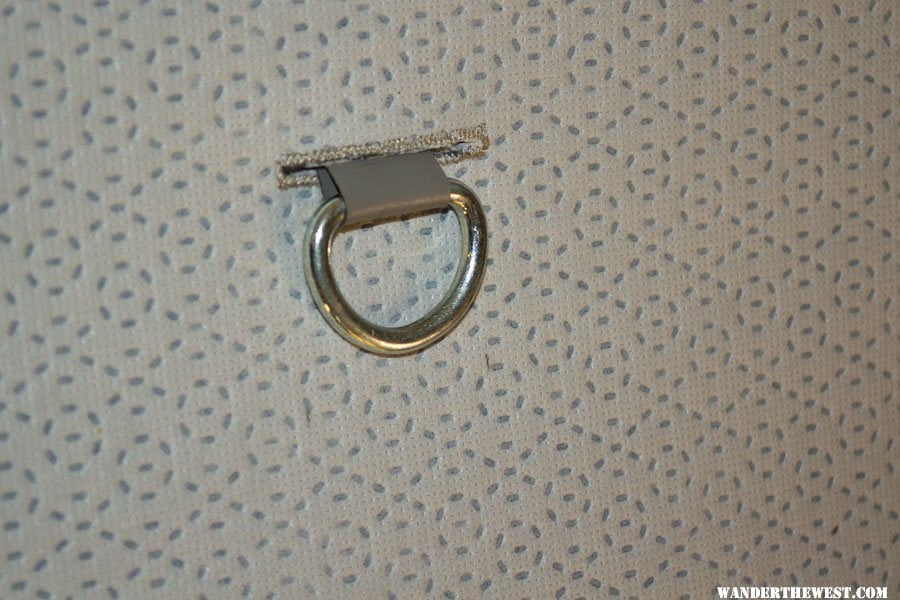

Building an Arctic - Cold Weather Pack
#1

-
- Site Team
- 15,316 posts
Belay On
- LocationSierra Nevada Range
Posted 01 November 2011 - 05:32 PM
2003 Ford Ranger FX4 Level II 2013 ATC Bobcat SE "And in the end, it's not the years in your life that count. It's the life in your years."- Abraham Lincoln http://ski3pin.blogspot.com/
#2
-
- Site Team
- 15,316 posts
Belay On
- LocationSierra Nevada Range
Posted 01 November 2011 - 05:51 PM
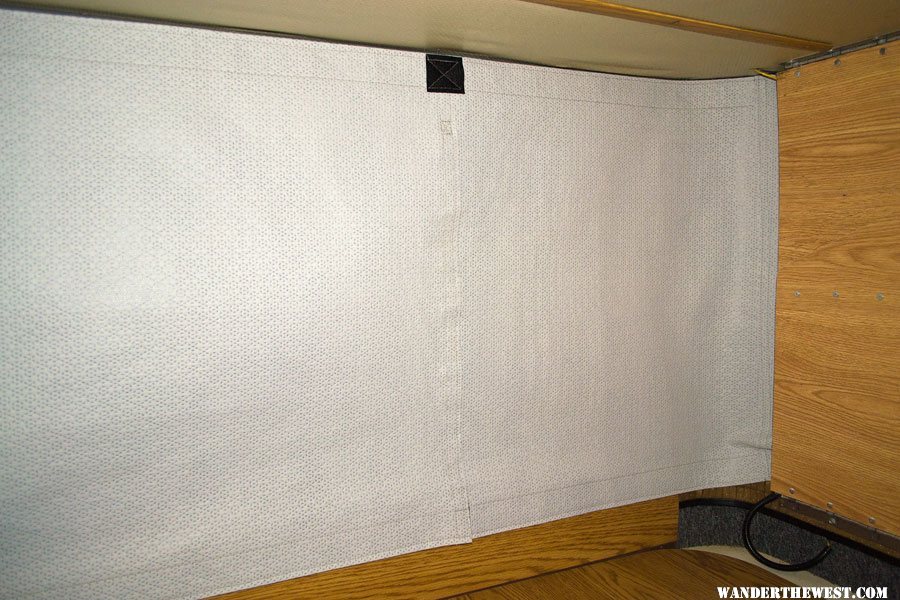
Here is the center panel with the window panels to both sides along with the 2” square hook Velcro patches to hold the window panels up in a rolled position.
View to the front
And view to the back
Window panel rolled and held up
Arctic- Cold Weather Pack in place with all windows open
We decided on doing a more traditional cold weather pack as opposed to using reflectix as many here are using with good success because this pack can remain in place with the top lowered.
Here is the pack in place with the top lowered.
This did add a bit more bulk to the overall side liner assembly on the camper so I had to loosen up the latches a bit so as to not be too tight.
Time involved was starting just before noon on Saturday. This involved lots of thought along the lines of “how in the heck do we do this?!”One side was completed around 5:30. We broke for dinner and started around 6:15 and had the second side completed at 8:30, much less time. We had 4 people working and we organized an efficient assembly line.
We will be finishing up the Spiders arctic - cold weather pack this weekend.
Hope this information helps.
2003 Ford Ranger FX4 Level II 2013 ATC Bobcat SE "And in the end, it's not the years in your life that count. It's the life in your years."- Abraham Lincoln http://ski3pin.blogspot.com/
#3
-

- Site Team
- 6,599 posts
The Weatherman
- LocationBend, Oregon
Posted 01 November 2011 - 06:00 PM
I'm going to consider this, or a version of this, for myself. I always camp in the winter in cold places, so a better way to insulate is something I'm interested in.
My current insulating solution, Reflectix, is OK...but because I only have it attached at the top of the wall -- and because it's semi-rigid -- if the walls flex then gaps open between the bottom of the Reflectix allowing cold air to leak down from behind the Reflectix into the cabin.
I suppose construction would be considerably simpler if I didn't care about being able to open the windows with insulation in place...I may do a lazy-man's version.

FWC Hawk (2005) on a Ford F250 Supercab, 6.8L V10 gas (2000)
#4
-
- Members
- 3,811 posts
Post Master
- LocationThe Old Pueblo
Posted 01 November 2011 - 06:55 PM
Special Engel Pricing For WTW Members
Click here to see my ATC Cougar
JayAronowSales.com
(520)579-9610
jayaronow@gmail.com
#5
-
- Members
- 989 posts
Elder Statesman
- LocationPacific Ocean
Posted 01 November 2011 - 07:21 PM
Looks like an exact match to mine from ATC.
If I may, my first time experience with the artic cold pack...
I was pleasantly surprised on our first Winter trip (before I had any interior components built into our Bobcat shell), how well that artic cold pack worked.
First night I forgot I stashed it in the back of the truck cab as an after thought on the way out of the garage. No heater and 27 F overnight (both inside and outside) in the shell brought back the memory of bringing the artic cold pack. I was glad Kathy, Penny the min-pin, and Pip the jack russell were under the covers with me (it was a wife & two small dog night). So, later in the morning I retrieved it from the truck cab and stowed, still in it's bag, in the camper for tonight (probably should have checked out how to install it in the daylight).
Around 9pm that night, as I put it up, Kathy asked what those black square patches at the top were for and, she being a quilter, why was the thing made in panels, instead of one long horizontal piece? Of course she was already snug and warm in the sleeping bag with the dogs and I was cold, so I said we'd figure it out in the morning and I jumped in.
Mucho better the next AM, still a low of 27 F outside when we got up, before the sun hit the camper, however, inside was just in the mid 50's, almost right for us. We did have the roof vents closed this time too.
Before we removed the artic cold pack, we discovered the interior window flaps and the method of rolling them up.
After we removed and stowed the artic cold pack, and after the sun has started to hit the fabric sides, Kathy asked if I had turned on the heater? What heater, I said? I was amazed again... that the fabric side walls when heated by the morning sun, actually heated the rest of the camper up. Glad I removed the artic cold pack when I did. Within about 40 minutes the inside was 70 F, warmer than outside.
I did experience a lot of moisture in the dead air space, without a heater, however, our extra towel took care of that before I dropped the top.
#6
-
- Members
- 2,552 posts
Senior Member
- LocationThornton, CO
Posted 01 November 2011 - 07:38 PM

2022 F350 7.3L; family trailer at the moment and some aluminum stuck together to eventually form another truck camper
#7
-
- Members
- 2,362 posts
King Taco
- LocationOxnard, CA.
Posted 01 November 2011 - 08:35 PM
Sunman2003 Four Wheel Camper -Hawk
2023 All Terrain Camper - Panther 2006 Toyota Tundra Double Cab Limited 4WD
2017 Toyota Tundra Double Cab Limited 4WD
#8
-

- Members
- 1,365 posts
Senior Member
- LocationLake Superior North
Posted 02 November 2011 - 01:41 AM
www.KuenzliPhotography.com
2012 Four Wheel Camper - The FWC Build
"If life was fair, Utah would be closer to home" DD
#9
-
- Members
- 1,365 posts
Senior Member
- LocationLake Superior North
Posted 02 November 2011 - 01:52 AM
If I may, my first time experience with the artic cold pack...
Thanks for your arctic-pack impressions. I am trying to decide between ordering the factory setup or making my own insulation system.
www.KuenzliPhotography.com
2012 Four Wheel Camper - The FWC Build
"If life was fair, Utah would be closer to home" DD
#10
-

- Members
- 3,319 posts
Weekend warrior
- LocationNevada City, CA
Posted 02 November 2011 - 03:00 AM
We're of the reflectix tribe and have found condensation, sometimes ice, between our 'pack and the sideliner. We need to remove the reflectix to drop the top, but it's helpful to dry and ventilate. Sometimes we use a towel as mentioned above.
2021 RAM 3500 Crew 4x4, 6.4 hemi/8 speed trans with 4.10 gears, Timber Grove bags, Falken Wildpeak 35" tires.
OEV Aluma 6.75 flatbed, Bundutec Odyssey camper on order for 2024
For this year we're still using our 2008 FWC Hawk with victron DC-DC charger, 130w solar, MPPT controler
with 2000w inverter and external 120v output and 12v solar input with 100w portable solar. http://lighthawkphoto.com


0 user(s) are reading this topic
0 members, 0 guests, 0 anonymous users

