Jump to content


Photo
- - - - -

Stripping and painting the exterior trim pieces


  • Please log in to reply
6 replies to this topic

#1 Old Crow

Old Crow

    Searching....

  • Members
  • 1,059 posts
  • LocationSouth Central PA

Posted 04 August 2015 - 03:30 PM

Hi, all-


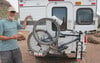
When I bought my 01 Hawk this past winter, an obvious defect was the piece of aluminum trim under the door.  Here's a somewhat-confusing cropped photo of it as it sat on my work table.


HawkTrimProblemCropped.jpg


The piece of wood behind it is what it was attached to on the camper. When I removed the vertical trim pieces on each side of this one, the wood and trim piece fell off.  Not a great start.


As it turns out, though, the plywood was in decent condition and I was able to re-use it.


Here's a photo of some of the other trim pieces and my supplies:


HawkAlumPaintingSupplies.jpg


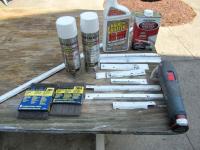
For the first batch of trim I only had the sander and found the going very slow.  The Aircraft Remover sped things up wonderfully, easily removing the paint on both sides of the trim. I spent quite a bit of time with the sander trying to get as much of the oxidation off as possible.  The sandpaper gave the bare aluminum a pretty aggressive 'etch'. At first I thought that would be good for paint adhesion but then chickened out and used the 3M stripping pads to smooth it out a bit.


Aluminum oxidizes very quickly so I also used the stripping pads to clean off the oxidation that accumulated from the time I stripped the pieces until I was just about to paint them.


Before painting I also bathed the pieces in Krud Kutter Rust Remover for a half hour before washing and drying them just prior to painting.


The Rustoleum Aluminum Primer went on quite well as did the follow-up top-coats of Rustoleum Professional white.  I painted them hanging from short lengths of coat-hanger wire, holding them up to paint and then hanging them from the edge of my work table to dry.  Drying and re-coating times are short and one requirement is that you re-coat within an hour or wait 48 hours before re-coating.


HawkRearTrimFinalCropped.jpg  HawkLowerTrimFrontFinalCropped.jpg


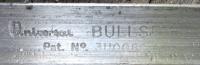
At one point I considered replacing the trim rather than repainting it (before I found the Aircraft Remover).  The trim is a product of Universal Molding. Their logo is stamped into the back of it and it's called a Bullseye trim. I wasn't able to find the right size online and saw reviews of frustrations with the long pieces of it arriving bent up in shipping.  Also, I don't know how to go about matching up the screw-holes. By that time I was far enough along with mine to just keep going. 


HawkTrimUniversalLogo.jpg


-OC


  • 0

'01 FWC Hawk shell on a '13 Tundra Double-Cab  + '19 Ford Transit van with Quigley 4x4 option


#2 RicoV

RicoV

    Senior Member

  • Members
  • 289 posts
  • LocationVail, AZ

Posted 04 August 2015 - 04:19 PM

Nicely done, looks better than new.


  • 0
RicoV
2011 FWC Grandby Shell on a 2011 Nissan Titan King Cab SV 4WD

#3 Basin Deranged

Basin Deranged

    Senior Member

  • Members
  • 166 posts
  • LocationPoint Reyes Station, California

Posted 04 August 2015 - 04:45 PM

Very nice!
  • 0

#4 takesiteasy

takesiteasy

    Senior Member

  • Members
  • 2,588 posts
  • LocationMinnesota

Posted 04 August 2015 - 05:37 PM

Nice work!


  • 0
2011 Tacoma AC TRD
ATC Custom Shell

travelswithrockythedog.blogspot.com

#5 EDR

EDR

    Senior Member

  • Members
  • 177 posts
  • LocationSE WA

Posted 04 August 2015 - 07:53 PM

Looks great.
Some of the trim screws on my camper are discolored or possibly rusting for some unknown reason, and I was going to replace them.
If you don't mind me asking, what type of screw does FWC use, and how long are they?
  • 0
2007 FWC Hawk

#6 Old Crow

Old Crow

    Searching....

  • Members
  • 1,059 posts
  • LocationSouth Central PA

Posted 05 August 2015 - 01:27 AM

EDC-


The screws are generally #8 and 3/4" in length.   I've not had much luck finding white ones with the unslotted hex-washer head locally. But they can of course be gotten from FWC or ATC. 


I've seen a number of posts here on WTW about the screws breaking off as owners try to take the old ones out.  And that's not easy to fix. For that reason I chose to repaint rather than replace the rusty ones around my Hawk's roof edge and under the cabover.


-OC


  • 0

'01 FWC Hawk shell on a '13 Tundra Double-Cab  + '19 Ford Transit van with Quigley 4x4 option


#7 EDR

EDR

    Senior Member

  • Members
  • 177 posts
  • LocationSE WA

Posted 05 August 2015 - 05:43 AM

Thanks Old Crow. That gives me an idea what to look for.
Hopefully being out here in the Desert, I won't have issues, but I've also dealt with broken screw heads, so I appreciate what you're saying.
  • 0
2007 FWC Hawk


0 user(s) are reading this topic

0 members, 0 guests, 0 anonymous users