Jump to content


Photo
- - - - -

Tech Tip: Auto-Relighter for Propane Refrigerators


  • Please log in to reply
69 replies to this topic

#31 pods8

pods8

    Senior Member

  • Members
  • 2,552 posts
  • LocationThornton, CO

Posted 02 July 2009 - 02:22 PM

That sucks. Clearly this isn't so simple?! I usually have a few seconds of clicking -- maybe 5? -- while it warms up. Longer on low or medium, but I think my valve needs adjusting as high is the only setting for a reasonable temp.


I was thinking about it this morning and its likely that my stock probe isn't positioned the same as yours (ie if mine isn't getting flame contact it won't work right) so maybe I just need to play with that a bit.
  • 0

2022 F350 7.3L; family trailer at the moment and some aluminum stuck together to eventually form another truck camper


#32 ScottBailey

ScottBailey

    Senior Member

  • Members
  • 649 posts
  • LocationMesa, AZ

Posted 02 July 2009 - 05:00 PM

I was thinking about it this morning and its likely that my stock probe isn't positioned the same as yours (ie if mine isn't getting flame contact it won't work right) so maybe I just need to play with that a bit.


I think you can take the metal screen off with one or two screws and some fiddling. I remember it was looking like a huge PITA to make Patrick's mod clean. Regardless of what you do, post a picture of the inside of the box, please.
  • 0

Scott Bailey -- W7SEB
2007 F350 XLT Diesel CC SRW SB 4x4
Cheap tent and a Partner Steel stove. 
Future? Really like the Hiatus, but I'm broke AF, so dreaming about a DIY.
SOLD: 2008 ATC Panther:dinette, 5th wheel


#33 Jack

Jack

    Senior Member

  • Members
  • 408 posts
  • LocationPortland OR

Posted 02 July 2009 - 05:53 PM

Positioning the relighter probe is critical. It needs to be in a hot part of the flame. My first attempt failed completely (continuous clicking). The second attempt mostly worked, and the third attempt has worked for the last 3 trips.
  • 0

2015 Fleet on 2019 Ranger


#34 ScottBailey

ScottBailey

    Senior Member

  • Members
  • 649 posts
  • LocationMesa, AZ

Posted 02 July 2009 - 06:53 PM

Positioning the relighter probe is critical. It needs to be in a hot part of the flame. My first attempt failed completely (continuous clicking). The second attempt mostly worked, and the third attempt has worked for the last 3 trips.


Jack,

Did you use the factory probe (Dometic/Norcold) or the Atwood re-lighter probe?

SB
  • 0

Scott Bailey -- W7SEB
2007 F350 XLT Diesel CC SRW SB 4x4
Cheap tent and a Partner Steel stove. 
Future? Really like the Hiatus, but I'm broke AF, so dreaming about a DIY.
SOLD: 2008 ATC Panther:dinette, 5th wheel


#35 pods8

pods8

    Senior Member

  • Members
  • 2,552 posts
  • LocationThornton, CO

Posted 02 July 2009 - 07:54 PM

I think you can take the metal screen off with one or two screws and some fiddling. I remember it was looking like a huge PITA to make Patrick's mod clean. Regardless of what you do, post a picture of the inside of the box, please.


I took the square screen of last night while working on it to ensure the flame was going but didn't remove the upper metal portion of the nozzle to see the actual tip of the probe yet. I was just seeing if I could do the quick version of the install as I was wrapping up some plumbing work.
  • 0

2022 F350 7.3L; family trailer at the moment and some aluminum stuck together to eventually form another truck camper


#36 pods8

pods8

    Senior Member

  • Members
  • 2,552 posts
  • LocationThornton, CO

Posted 03 July 2009 - 02:43 AM

Update: Got back into it this evening and it took about 45min to get it setup like pvstoy's directions. Upon initial firing it'll burp the flame once or twice but then its good to go. The clicking stops within a second of the flame relight and starts as soon as it goes out (not sure how it works but it does for anyone wondering). I tested it out by blowing the flame out multiple times with my compressor air nozzle.

Edit: I should note this one will take a bit of work working with both hands at the same time (the fridge compression area needed to get lifted slightly with a pry bar to remove the burner from under it, screwing down the clap holding the two probes in place while holding the probes in place, etc.) so keep that in mind when budgeting time/frustration if these types of things get to you. Don't want to mislead someone that its as simple as changing a car battery or such but at the same time if you just work though it shouldn't be too bad either. Tinker on!


Here is a pic of the stock probe, as can be seen it didn't really even have an electrode sticking out to get heated up by the flame. Newer models like Scott's might be different.
Posted Image

Here is a view of the combustion chamber pulled out from under the exhaust to install the probe and the probe installed. The flame heats it up fine and it sparks well in this postion, just took a minute or two on the pliers to bend it around. I removed the bracket that comes on the probe with a dremel disk.
Posted Image

Reinstalled under the exhaust without the windshield in place yet.
Posted Image

All wrapped up
Posted Image

Edited by pods8, 03 July 2009 - 03:25 AM.

  • 0

2022 F350 7.3L; family trailer at the moment and some aluminum stuck together to eventually form another truck camper


#37 Jack

Jack

    Senior Member

  • Members
  • 408 posts
  • LocationPortland OR

Posted 04 July 2009 - 01:33 AM

Jack,

Did you use the factory probe (Dometic/Norcold) or the Atwood re-lighter probe?

SB


I installed the Atwood re-lighter. The probe bracket is spot welded to the probe, so it was a real bitch to position it. I ended up making an aluminum bracket that is bolted onto the probe bracket and then screwed into the hole that held the original igighter.
  • 0

2015 Fleet on 2019 Ranger


#38 Stan@FourWheel

Stan@FourWheel

    Senior Member

  • Members
  • 2,376 posts
  • LocationWoodland, CA

Posted 31 July 2009 - 09:55 PM

I finally added the re-lighter to my Norcold refrigerator (I have the smaller, refrigerator only model).

I looked at Patrick's install pictures, and it looked so easy & clean in his pictures.

But when I actually got in there to make the part fit & line up over the flame, I had to make a little attachment bracket ("L Bracket" from the hardware store) and bend it just a little.

The re-lighter is designed for a hot water heater, so it wasn't just a "plug & play" installation like the directions stated.

Once I put the little wind shield cover back on, it looked great and it seems to be working great !

But I have to admit, when you see the inside it doesn't look as nice as Particks install (lol).

I wish I had his patience & skills for details.

I was in the "get it done" somehow, someway mode that day.

Over-all I am very happy with the results !

The total install time was probably 2 hours.


.
  • 0

Stan Kennedy --- Four Wheel Pop-up Campers
1400 Churchill Downs Avenue, Suite A

Woodland, CA 95776
(800) 242-1442 or (530) 666-1442
www.fourwh.com  ---  e-mail = stan@fourwh.com


#39 ScottBailey

ScottBailey

    Senior Member

  • Members
  • 649 posts
  • LocationMesa, AZ

Posted 13 September 2009 - 11:33 PM

EDIT: I found the Dometic electrode fails after a number of uses. Install the Atwood electrode.

Well, looks like it didn't work out so easy after all... <sigh>
  • 0

Scott Bailey -- W7SEB
2007 F350 XLT Diesel CC SRW SB 4x4
Cheap tent and a Partner Steel stove. 
Future? Really like the Hiatus, but I'm broke AF, so dreaming about a DIY.
SOLD: 2008 ATC Panther:dinette, 5th wheel


#40 Kodachrome

Kodachrome

    Senior Member

  • Members
  • 369 posts
  • LocationColorado Rockies

Posted 14 October 2009 - 07:45 AM

Insomnia makes you do searches on WTW.. :rolleyes:

I just ordered this re-light kit, should be here when I get back from my trip, hope it goes well as far as the install goes, I am usually pretty adept at this kind of thing. I am fairly strict on my leveling, I use a combo of two inclinometers mounted to the outside, plus one loose that sits on the counter, floor or my center console and finally my iPhone app. I won't be driving using propane, just when parked. I also strongly consider wind direction and velocity, even go as far as check the weather to help plan it.

On another note, I was trying to figure out what output or cooling is being done on 12V DC while driving. The manual says that the fridge works on continuous, not via the thermostat like on AC. This is for the Dometic 3-way ( RM-2193 ). So is the thermostat knob ( 0-7 ) non-applicable when using 12 V DC?

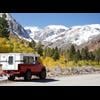
By the way, I had no problem lighting and using the propane setting on the fridge while parked at the top of Imogene Pass for 24 hours at over 13,000 feet for what that is worth.

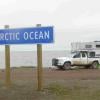
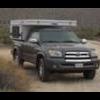
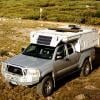
I have had my new pop-up for a month and 4 days now, have slept in and used it for 18 days, it is getting close to being fully dialed. Folks like you and threads like these really help me cut to the chase in terms of getting the most out of this new tool for my work, thanks!
  • 0

Instagram


407 HP Supercharged 2005 Tacoma / 550W Solarcharged 2009 ATC Bobcat.


0 user(s) are reading this topic

0 members, 0 guests, 0 anonymous users