Jump to content


Photo
- - - - -

1979 Granby


  • Please log in to reply
112 replies to this topic

#21 Boonie

Boonie

    Senior Member

  • Members
  • 193 posts
  • LocationBrighton, Colorado

Posted 12 April 2017 - 05:39 PM

shellback,


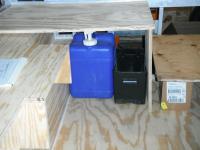
Although I will be keeping my absorption refrig, I will also be using a 10# bottle and to save inside space, I'll be mounting it outside on the back wall! (What mount are you using?) I have a Primus 200 propane stove that will replace the permanently mounted stove, but also allow me to take it outside via a quick disconnect to cook when the weather is cooperating. Seems we have a similar train of thought. Please keep the details and ideas coming. Good Luck.


Boonie


P.S. I hold a Shellback card. USS Tripoli Feb 9, 1972


  • 0

#22 shellback

shellback

    Senior Member

  • Members
  • 336 posts
  • LocationWagontown,PA

Posted 13 April 2017 - 09:09 PM

I haven't decide on a factory built bracket, or coming up with something on my own.  That Primus stove you have might be what I'll look for. My old Coleman has seen better days, I crossed the line July of 67 onboard the Forrestal. I was an AO in a Phantom squadron.

 I hope to get everything prepared to start the actual siding around the 22nd. Once the siding is on, I want to be able to mount the windows, jack brackets, trim etc on the camper body, so the exterior will be mostly finished with exception to the upper trim holding the fabric on.  


  • 0

#23 shellback

shellback

    Senior Member

  • Members
  • 336 posts
  • LocationWagontown,PA

Posted 22 April 2017 - 08:45 PM

Well I've been busy making jack brackets, plates for thru wall fittings, painting stuff and other odds and ends. Picked up the aluminum siding today and sheared it to rectangular sizes. Tomorrow we clamp it to the camper body and mark all the cuts that have to be made. Hopefully we will get that done tomorrow and start fastening Monday with the 3M tape and install the windows and jack brackets. I have narrowed the door opening, and will have a spot for a porta potty in the right rear corner. There will be a couch that slides out to a 75"x32" bed also on the right. On the front wall left of the bed there will be a compartment for water, battery and inverter. I plan on using Reliant 7 gallon portable containers. They have a threaded fitting for the spout, and I'll make up a fitting and tube to use with an electric pump. I think it will be much easier to swap out 7 gallon jugs than trying to fill a permanent tank with a hose or gravity feed. The original tank was under the counter just taking up space. I also did away with the propane compartment to get more space inside the camper. I'm thinking the lid which will cover the water tank and battery compartment may do double duty as the table top. Beats finding a place to store a top.

Attached Thumbnails

  • lower bed.jpg
  • water & battery.jpg

  • 0

#24 Vic Harder

Vic Harder

    Doctor Electric

  • Site Team
  • 4,948 posts
  • LocationCalgary, Alberta

Posted 23 April 2017 - 04:32 AM

are you concerned about weight?  If so, consider using 3/8" baltic birch plywood.  thinner, and stronger... 


  • 0

#25 shellback

shellback

    Senior Member

  • Members
  • 336 posts
  • LocationWagontown,PA

Posted 23 April 2017 - 11:34 AM

Weight is an issue, that's one of the main reasons for the build. So far I'm keeping the weight as close to the original build as possible. 5/8's plywood for the floor pack. Do you suggest using the Baltic birch for cabinetry? Not sure how much of that I'll have. Some of the wood you see in the pictures is just scrap I used to get an idea how it will go together. I wanted the water and battery as far forward as possible to keep the weight in front of the rear axle. Probably the biggest weight gain I'll be adding is electric jacks. My wife has MS, so anything other than 1 overnite, the camper comes off the truck. We camp to fish mostly, so a boat is always in tow.  I tend to load the boat with all the extras.  I have a 2016 Silverado 1500. Glovebox sticker recommends a 1000# camper. I'm hoping to come in at that number. After the siding is on, and I install and wire the jacks, I may load it up and take it to a scale. From that point on, I can pretty much weigh everything else I'm adding. 


  • 0

#26 cwdtmmrs

cwdtmmrs

    Senior Member

  • Members
  • 610 posts

Posted 23 April 2017 - 03:46 PM

I just read this thread. Very interesting. I would suggest 3M 4229 tape from the automotive division to attached the siding to the frame. Not sure an individual can buy it and is expensive. I pay over 1k for a roll 24" x 60yds x .030". .060" would be 2x the cost and .090 would be 3x the cost. It was developed for body side moldings and the aftermarket dashboard industry. Waterproof and good for 300* and will elongate to compensated for surface irregularities. I may have some 60yd rolls of  1/2" x .060" that I would sell if interested. I would also strongly suggest using an adhesion promoter/primer like 3m's 4298 as well. It will almost double the bond strength in real life applications. The only problem is that once you touch the parts together, there is no moving or adjusting them.


cwd


  • 0
CWDT

#27 Vic Harder

Vic Harder

    Doctor Electric

  • Site Team
  • 4,948 posts
  • LocationCalgary, Alberta

Posted 23 April 2017 - 11:06 PM

Weight is an issue, that's one of the main reasons for the build. So far I'm keeping the weight as close to the original build as possible. 5/8's plywood for the floor pack. Do you suggest using the Baltic birch for cabinetry? Not sure how much of that I'll have. Some of the wood you see in the pictures is just scrap I used to get an idea how it will go together. I wanted the water and battery as far forward as possible to keep the weight in front of the rear axle. Probably the biggest weight gain I'll be adding is electric jacks. My wife has MS, so anything other than 1 overnite, the camper comes off the truck. We camp to fish mostly, so a boat is always in tow.  I tend to load the boat with all the extras.  I have a 2016 Silverado 1500. Glovebox sticker recommends a 1000# camper. I'm hoping to come in at that number. After the siding is on, and I install and wire the jacks, I may load it up and take it to a scale. From that point on, I can pretty much weigh everything else I'm adding. 

I did my cabinets and all inside wood except the floor pack with Baltic.  3/8" for most, and the wall paneling is 1/8"


  • 0

#28 shellback

shellback

    Senior Member

  • Members
  • 336 posts
  • LocationWagontown,PA

Posted 24 April 2017 - 12:20 AM

I just read this thread. Very interesting. I would suggest 3M 4229 tape from the automotive division to attached the siding to the frame. Not sure an individual can buy it and is expensive. I pay over 1k for a roll 24" x 60yds x .030". .060" would be 2x the cost and .090 would be 3x the cost. It was developed for body side moldings and the aftermarket dashboard industry. Waterproof and good for 300* and will elongate to compensated for surface irregularities. I may have some 60yd rolls of  1/2" x .060" that I would sell if interested. I would also strongly suggest using an adhesion promoter/primer like 3m's 4298 as well. It will almost double the bond strength in real life applications. The only problem is that once you touch the parts together, there is no moving or adjusting them.


cwd

I put the aluminum panels on today, hope to get pictures up tomorrow. I used the 4991 tape as there were a lot of irregularities with the welds and some studs not even with each other. Didn't know about the primer. With the windows, door, jack brackets and trim, there's not much surface area that is mechanically fastened. The aluminum cost me $288.00, and the tape was $240.00 ! 


  • 0

#29 shellback

shellback

    Senior Member

  • Members
  • 336 posts
  • LocationWagontown,PA

Posted 24 April 2017 - 12:25 AM

I did my cabinets and all inside wood except the floor pack with Baltic.  3/8" for most, and the wall paneling is 1/8"

I'll have to see if the baltic is available in my area. No sure if my next step is the interior, or the roof, canvas and lift panels. I won't be installing the roof before the interior. But if by chance I get behind the 8 ball, I want that option. Have a trip planned to NW Ontario in July, 


  • 0

#30 Boonie

Boonie

    Senior Member

  • Members
  • 193 posts
  • LocationBrighton, Colorado

Posted 24 April 2017 - 05:59 PM

Shellback


Waiting for pictures! How are you remaking the rear door? Since my camper is narrowed 11", I have taken most of that out of the rear door and will also be remaking my rear door.


  • 0


0 user(s) are reading this topic

0 members, 0 guests, 0 anonymous users