The woodworking is looking great. What kind of plywood are you using? - Tim


1979 Granby
Started by
shellback
, Feb 05 2017 01:41 AM
112 replies to this topic
#71

Living The Dream
-

- Members
- 464 posts
Senior Member
- LocationFront Range, Colorado
Posted 18 August 2017 - 09:32 PM
My youtube channel about my Four Wheel Camper - https://www.youtube.com/c/timmorrissey
All about my camper - https://www.tgmorrissey.com/camper
Item I used in my build- http://bit.ly/TGMorrisseyParts
#72
Vic Harder
-

- Site Team
- 4,948 posts
Doctor Electric
- LocationCalgary, Alberta
Posted 18 August 2017 - 09:43 PM
That wood does look nice. I used baltic birch for mine, and chose NOT to use framing at all, just small joining blocks or L brackets. It has proven to be plenty strong so far.
2015 Silverado 3500 crew cab 8' bed Diesel
2012 ATC Puma Shell build - https://www.wanderth...012-puma-build/
Power considerations thread - https://www.wanderth...e-power-scotty/
Building out an electrical system - So, you want to setup a good electrical system in your camper? - Electrical, Charging, Solar, Batteries and Generators - Wander the West
#73
shellback
-
- Members
- 336 posts
Senior Member
- LocationWagontown,PA
Posted 18 August 2017 - 10:07 PM
About the plywood, not really sure? Most of the vertical surfaces you see will be covered with the 1/8" paneling. and the horizontal surfaces will have the cushions, upholstery or carpet on them. Fridge top and counter top will be formica I guess. I wish I was a better craftsman, but my next birthday will be my 70th, and my skills are lacking. I think I really bit off more than I could chew with this project. It's slowing coming together, after some doubts. Without the help from many fine folks on this site and another, it might not have happened.
#74
longhorn1
-

- Members
- 2,826 posts
Ouch, that stings!
- LocationCarmel, Indiana
Posted 18 August 2017 - 10:54 PM
Rock and roll. It looks great. Keep the pictures coming. jd
#75
Vic Harder
-
- Site Team
- 4,948 posts
Doctor Electric
- LocationCalgary, Alberta
Posted 19 August 2017 - 12:47 AM
hey, enjoy the process... it will make the results even sweeter!
2015 Silverado 3500 crew cab 8' bed Diesel
2012 ATC Puma Shell build - https://www.wanderth...012-puma-build/
Power considerations thread - https://www.wanderth...e-power-scotty/
Building out an electrical system - So, you want to setup a good electrical system in your camper? - Electrical, Charging, Solar, Batteries and Generators - Wander the West
2012 ATC Puma Shell build - https://www.wanderth...012-puma-build/
Power considerations thread - https://www.wanderth...e-power-scotty/
Building out an electrical system - So, you want to setup a good electrical system in your camper? - Electrical, Charging, Solar, Batteries and Generators - Wander the West
#76
shellback
-
- Members
- 336 posts
Senior Member
- LocationWagontown,PA
Posted 22 August 2017 - 06:32 PM
I was going to make up the cushions and staple them to the plywood, but after viewing a video on Sailrite's website, I think I'll make them with zippers. Seems like a fairly easy process. http://www.sailrite....x-Cushion-Video Now to find an outdoor themed fabric at a reasonable price!
#77
shellback
-
- Members
- 336 posts
Senior Member
- LocationWagontown,PA
Posted 01 September 2017 - 11:29 PM
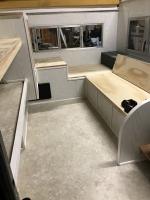
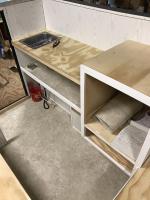
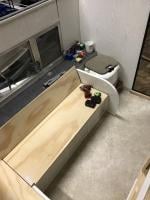
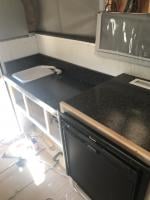
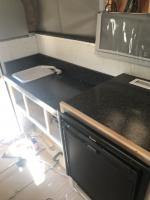
Plugging away, getting the interior trimmed. Cut out the plywood for the counter top and fridge top. Heading to Canada on Tues for a couple weeks. When I returned I'll finish the counter tops then start on the roof install.
Attached Thumbnails
#78
dweb
-

- Members
-

- 2 posts
Newbie
Posted 01 September 2017 - 11:52 PM
Hey, thanks for the early help and advice on the camper. I asked a lot of questions. It helped out. I built mine late april - early july 2017.
Sits beautifully on the truck, handles great on rough roads.
Shell only (panelled, carpeted, all trim completed), with only a couch/bench inside. Came in at about 600 lbs. I will eventually add a heat source (thinking a wood stove, but still considering all the options - yes I am considering propane too) along with a small sink, propane stove (thinking a combined stainless steel SMEV unit). it's got a queen bed dimensions above the cab, and the couch/bench folds down
I will do a build thread of my own - but thanks for being willing to share information!


Edited by dweb, 01 September 2017 - 11:55 PM.
#79
GoinBoardin
-

- Members
-
- 19 posts
Member
- LocationWY
Posted 02 September 2017 - 05:40 PM
Looking good Shellback! You're making progress and doing a fine job. As my build went on I realized there's no right or wrong way to go about bringing a 35 year old camper back to life. They do take a lot of time though.
Thanks for sharing.
Thanks for sharing.
#80
shellback
-
- Members
- 336 posts
Senior Member
- LocationWagontown,PA
Posted 29 September 2017 - 10:02 PM
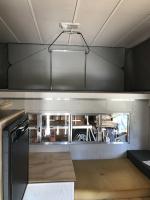
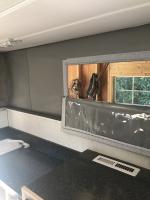
Another milestone today. Got the canvas half installed, the tough part, stretching around the roof and body! It took some pulling and tugging to get it around the roof, but my brother and I did it and have the top trim in place. I didn't fasten it at the bottom. I wasn't sure where to place the D ring tabs I made for the bungee pulls for the lift panels. I didn't want to try and raise the roof for a measurement without the canvas. The whole thing can flip forward or backward without the canvas. Now that the canvas is on I can get the right placement for them on the lift panels. I may have to block the roof up and unscrew the bottom hinge to drill the holes in the lift panels and glue the D ring tabs onto the canvas. Such a real PIA when you have none of the original stuff to check measurements against! I guess you pull the bungees pretty tight against the lift panels so the fabric pulls into the fold of the panels? Once that's done, the bottom trim should be a piece of cake. I also got the counter tops done with a granite style formica. Here's a few pics, couldn't get the outside of the canvas as I have a tight working area. Hopefully by midweek it may be done enough to load up and take to a scale. I'm really curious as to what it will weigh. The electric jacks and the battery added quite a bit.
Attached Thumbnails


0 user(s) are reading this topic
0 members, 0 guests, 0 anonymous users

