Jump to content


Photo
* * * * * 2 votes

Flexible Solar Panel Installation

Solar panel flexible

  • Please log in to reply
39 replies to this topic

#1 Zirdu

Zirdu

    Senior Member

  • Members
  • 110 posts
  • LocationSt. George, UT

Posted 17 July 2017 - 02:24 AM

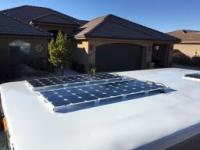
About 8 months ago I installed flexible solar panels on the roof of my new 2016 Grandby.  My mounting was a bit unique, so I thought I would post it.  Thanks to all the others who have gone before in posting their issues with flexible panels.  My installation was an attempt to solve some of the issues others have had.


Many have had issues with gluing the panels directly to the roof.  It apparently can cause overheating and failure of the flexible panels, also possibly raising the temperature of the interior, and making it difficult to remove any failed panel.


My solution was to (1) reinforce the flexible panel with 1 inch by 1/20 inch aluminum strip attached to the panel along the edges with VHB tape.  Then (2) screw or bolt the panel to small pieces of 1 inch by 1 inch by 1/20th inch square tubing.  The tubing was, in turn, attached to the roof with VHB tape.  The result is a 1 inch air gap between the panel and the roof, and the panel reinforced somewhat on the edges to prevent fluttering in the wind.


The flexible panel I choose was the Solar Cenergy 120 Watt panel purchased from SolarBlvd. (I think I paid $119 per panel - now listed at $149, but out of stock.)  Here is the info listed on the back:


 I wired the two in series, making the supposed maximum voltage of 45.6 volts.  These are wired into a Victron 100/300 MPPT controller. The 100 means it can take up to 100 volts max input, and the 30 means it can output up to 30 amps.  


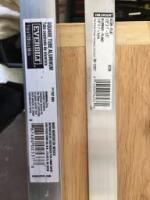
Here are the aluminum stock I used to make the base, purchased at Home Depot and/or Loews.

3 - 1.jpg


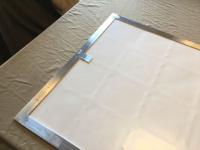
I used VHB tape to attach the 1 x 1/20 aluminum strip to the edges of the back of the panel.

1.jpg


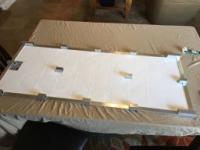
I cut the 1 inch square tubing into small pieces and lightly glued them with a drop of silicon caulk to the aluminum strips.

3 - 1 (1).jpg


Then I turned the whole thing over and screwed the panel to the 1/1 supports with flat head sheet metal screws.  (The first one I attached with little stainless steel bolts, but this was too tedious, and the sheet metal screws worked just as well.) 

5 - 1.jpg


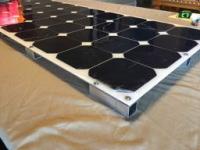
 I then placed VHB tape on the bottoms of the 1x1 supports, and simply attached to the roof of the camper.

6 - 1.jpg


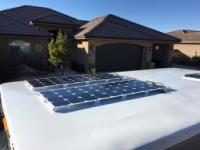
The panels as mounted  have a very low profile to wind, are extremely lightweight, have a lot of air flow underneath, and are fairly cheap.  In a subsequent post I will outline the performance of the system so far.

Attached Thumbnails

  • 6 - 1.jpg

  • 1

#2 Happyjax

Happyjax

    Senior Member

  • Members
  • 1,444 posts
  • LocationMaryland

Posted 17 July 2017 - 02:53 AM

Nice job Zirdu :)


  • 0

2018 Ford F-250. Customized Bundutec Sable :)


#3 Zirdu

Zirdu

    Senior Member

  • Members
  • 110 posts
  • LocationSt. George, UT

Posted 17 July 2017 - 02:59 AM

I installed these with the intent that if they did not work, I could easily remove the panels by unscrewing them, leaving the 1x1 "mounts" attached, for future use with other panels.


The performance of the panels has been very good so far. In using them this summer, I logged a maximum voltage of 49.3 volts at one brief point.  The maximum daily production was 920 watt hours one sunny day.  Dividing by 12 would give 76.7 Amp Hours.  But maybe I should divide by the actual average voltage the batteries were charged at, maybe 13.7 volts?  That would result in 67.2 Amp hours.


The maximum system output I logged this summer was 219 watts at one point.  Typical day maximum might be 185 watts. This for a 240 watt nominal setup.  I was hoping for a bit more from this system, but I guess this is OK for a horizontal mounting?  Not sure.  What production do others measure from thier systems?


My measurements are from the Victron "dongle", sold separately from the Victron controller, but very useful in monitoring the performance of your solar system.  With an app downloaded from Victron you can read the production of your solar system, and 30 days of history, on your smart phone.  


The only issue in the mount so far is a possible movement of the roof in high winds.  The mounts as attached by VHB tape to the roof do not always hit the roof "joists", making for some play in the whole system.  To help in this, I may VHB another 1 x 1/20 aluminum strip along the front edge of the panels, thereby reinforcing the roof where most needed.  This would add little weight and give me some peace of mind.  


I have room on the roof to add two more panels.  I am thinking of doing this, since in my opinion, you really can't have too much solar.  I would probably wire the two more in series, then parallel the two new panels with the existing ones.  That way I would be keeping the voltage of the panels to the controller at the current 46 volts or so.  If I wired all four in series, this would be a voltage of up to 98.6  volts (per my maximum measured voltage) which would be pushing the 100 volt maximum of the controller.  


By the way, I live in the US Southwest, where most of my camping takes place.


  • 0

#4 Vic Harder

Vic Harder

    Doctor Electric

  • Site Team
  • 4,948 posts
  • LocationCalgary, Alberta

Posted 17 July 2017 - 06:03 AM

slick mounting idea, nicely executed.  Good power production too!


  • 0

#5 Zirdu

Zirdu

    Senior Member

  • Members
  • 110 posts
  • LocationSt. George, UT

Posted 17 July 2017 - 12:17 PM

When using the VHB tape, I first lightly sanded the aluminum stock with very fine sandpaper, then cleaned with  Isopropol Alcohol.  I marked the spots on the roof where the mounts would hit, then very lightly sanded there, and cleaned with isopropol alcohol.  I used a little roller to add pressure when applying the tape to the aluminum stock, as the tape needs pressure to activate.  Then I added some weight for an hour or so.


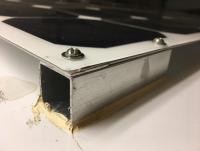
 Finally, when installed, I went around the edges of the mounts on the roof with Sikaflex 221. This is more to protect the VHB tape than for additional adhesion. Here is a close up on the front corner of a panel installed, using the little bolts instead of the screws.  The screws actually worked better.  This is after some  use, so the roof is now a bit dirty.  Like others have said, the VHB method makes for a VERY secure mount.  I used more total square inches of mount in my system than is recommended by AM Solar in their mounting feet. 

7 - 1.jpg


  • 0

#6 Esus

Esus

    Senior Member

  • Members
  • 118 posts

Posted 17 July 2017 - 04:00 PM

Nice work. That air gap is just what you need for flexible panels. And, like you mentioned, if one fails it's easy to remove and replace. 


I have the same two panels and controller (plus an additional 50 watt panel). I'd say your power production looks fine and pretty spot on.


  • 0

2015 Chevy Colorado, 2015 FWC Fleet


#7 RicoV

RicoV

    Senior Member

  • Members
  • 289 posts
  • LocationVail, AZ

Posted 17 July 2017 - 09:22 PM

Thanks for the detailed writeup!  If I ever decide to go solar I expect to use your thread for my inspiration and rough template.

Rico


  • 0
RicoV
2011 FWC Grandby Shell on a 2011 Nissan Titan King Cab SV 4WD

#8 Sharx

Sharx

    Advanced Member

  • Members
  • PipPipPip
  • 67 posts
  • LocationLos Gatos, CA

Posted 18 July 2017 - 01:02 AM

Zirdu, one of the best Solar posts I have read anywhere, props to you.  I have been thinking of adding more solar than I have (160w) that came with my '15 Fleet.  I was getting close to adding stock panels until I started seeing the much lighter Flex ones.  So I have been keeping an eye what is going on with them and agree they look like the way to go.  With my solar panel and rack, the top is already heavy (will update struts too to rectify that).  Back in the 80's I was working at a distributor for 3M and VHB (Very High Bond) tape came out.  We put a strip between 2 small 4'' long aluminum I-Beams and in 5 seconds no one could pull them apart.  So we knew it was strong.  In fact we would show customers who came in and big burly guys thought they could break it apart, they couldn't.  The aluminum on one side "broke" before the tape failed.  This was Silicon Valley so a myriad of ideas came about from that tape.  I caution folks here that we were using the 10 mil thick and not the 5 mil which did pull apart with the I-Beams.  It's not really tape but more like stretchy, tacky translucent rubber cement with a paper liner that you peel, then place it down on your surface, and press (or roll over like above) down and then peel the liner off.  Then apply your part to attach to and press down.  According to 3M, it actually shrinks a bit to increase it's bonding shortly after application.  When you see a nameplate on equipment and you cannot pull it off, it's probably VHB under it.  Only a razor blade or 1,1,1, Trichlorethane would probably work.  But once apart, it's easy to clean off either surface, unlike epoxy or other glues.


  • 0

#9 pollux

pollux

    Senior Member

  • Members
  • 169 posts
  • LocationLos Angeles

Posted 18 July 2017 - 03:00 AM

Only a razor blade or 1,1,1, Trichlorethane would probably work.  But once apart, it's easy to clean off either surface, unlike epoxy or other glues.


OMG, dont ever touch 111-TCA, it is cancer causing chemical, hazardous material


  • 0

2015 FWC Eagle, 2016 Tacoma 4wd


#10 Sharx

Sharx

    Advanced Member

  • Members
  • PipPipPip
  • 67 posts
  • LocationLos Gatos, CA

Posted 18 July 2017 - 03:15 AM

I don't touch the stuff, it was a joke really.  But it would make it separate the bond.  Get your MSDS first though (another joke).


  • 0


0 user(s) are reading this topic

0 members, 0 guests, 0 anonymous users