Jump to content


Photo
- - - - -

Door Refurb on FWC Hawk

Door Fix Glass Hawk

  • Please log in to reply
8 replies to this topic

#1 OregonOzzy

OregonOzzy

    Advanced Member

  • Members
  • PipPipPip
  • 61 posts
  • LocationBeaverton, OR

Posted 29 July 2017 - 01:32 AM

Before our long trip of this summer (4 California NP’s – Trip Report coming soon!) decided to refurbish the door on our 2002 FWC Hawk that was looking a bit raggedy. Also wanted to see what the PO had hidden under the stainless plate on the outside of the door. I searched a few times but did not find pictures of anyone’s similar refurb process and only mentions of the glass being loose and fixes, so posting some pics here and my process to help others that might want to do this same fix. The glass in the door had some external sealant applied by the PO but the telltale streaks of dirt showed the need for a better job.
Here is how the door looked before with the rusty acorn nuts in need of replacement and a coat of paint.

IMG 2560


Removed the door from the hinges, leaving the hinges attached to the frame in the camper. Three screws per hinge and the door came off.
 

IMG 2563

Next removed these screws all around the frame of the door to remove the aluminum framing and then tapped it off the door.
 

IMG 2568

This seal profile I could not find anywhere. So, had to re-use the seals, if someone has found a source please share as I would like to replace it, just cleaned the current one and put it back on.

IMG 2581


Out came the lock and the factory installed deadbolt as well, gave both a good cleaning and spray with WD40.
 

IMG 2583

Next was the glass window frame. Remove all the screws around the frame and lift it off. Better to do this on a flat surface with some padding underneath.

IMG 2588

These are the culprits. The two small nubs are supposed to hold the glass in place. Two at top and two at the bottom. The intact ones are the top ones. You can also see the silvery sealant that the PO had globbed on to keep the glass sealed.

IMG 2589


And here are the same bottom ones that have been sheared off over the years.
 
IMG 2591


Sorry, I don’t have a picture, but I basically cut a block of wood to fit in between the bottom of the plastic frame and where the nubs would have been, so the glass rests on this block, instead of two <1/8th” dia plastic nubs.
Cleaned up all the dirt with a vac and plastic bristle brush and directed attention to this mess that the stainless sheet was hiding.
 
IMG 2597


Wonder what story goes with that. Anyway the fix for that was the expanding foam insulation in a can.
 
IMG 2598


Even found the bumper stopper replacements in the ACE hardware drawers. Close enough!
Painted the door with Rustoleum Oil Based Gloss White after cleaning it with brush, vac and wipe down with alcohol wipe. Replaced the locks securing with caulk and window glazing.
 
IMG 2602
IMG 2599


Used caulk around the entire window frame in the channel that is in the plastic frame and screwed the two pieces back together really well. The fix for the cracks was J-BWeld before painting (2 coats). The stainless panel went back with new stainless acorn nuts, bolts and washers.
 
IMG 2603
IMG 2604


IMG 2605

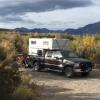
Here is the door back on, looking much cleaner. The plate has received 4 more NP stickers since this refurb and we have driven over 2500miles and everything still is holding up quite well. Hope this helps out someone else.


IMG 2608


  • 0

2000 Alaskan 10' CO

2018 F-350 Extended Cab 8'


#2 OSUFlyer

OSUFlyer

    Advanced Member

  • Members
  • PipPipPip
  • 71 posts
  • LocationWahkiakum County, WA

Posted 29 July 2017 - 04:14 AM

Nice curtains!
  • 0

1997 OBS Ford 7.3 DSL 4x4
1985 Four Wheel Keystone


#3 OregonOzzy

OregonOzzy

    Advanced Member

  • Members
  • PipPipPip
  • 61 posts
  • LocationBeaverton, OR

Posted 29 July 2017 - 05:00 AM

Go Beavs! :-)
  • 0

2000 Alaskan 10' CO

2018 F-350 Extended Cab 8'


#4 longhorn1

longhorn1

    Ouch, that stings!

  • Members
  • 2,826 posts
  • LocationCarmel, Indiana

Posted 29 July 2017 - 11:38 AM

Very nice job. Thanks for sharing. jd
  • 0

http://texaslonghorns01.blogspot.com/


Ford F-250 Long bed, 2014 Grandby


#5 Old Crow

Old Crow

    Searching....

  • Members
  • 1,059 posts
  • LocationSouth Central PA

Posted 29 July 2017 - 02:08 PM

OregonOzzy--


Thanks for documenting the process.  Looks great!


The door seal is available from Dexter Door if your door is a Philips (as I believe it is).  See this 'Rubber on door seal' thread for details. 


It's also interesting to see you have a deadbolt lock on yours.  My 2001 didn't have one so I assume that's the timeframe when FWC decided to add the deadbolt.   I replaced my door's latch assembly for one with the keyed deadbolt (and I wanted the black color).  You don't need that but I thought I'd include it here for anyone else interested in the topic of door refurbishment.


  • 0

'01 FWC Hawk shell on a '13 Tundra Double-Cab  + '19 Ford Transit van with Quigley 4x4 option


#6 takesiteasy

takesiteasy

    Senior Member

  • Members
  • 2,588 posts
  • LocationMinnesota

Posted 29 July 2017 - 02:26 PM

Door looks great! Thanks for posting your report- will be helpful to many, I'm sure.


  • 0
2011 Tacoma AC TRD
ATC Custom Shell

travelswithrockythedog.blogspot.com

#7 dharte

dharte

    Senior Member

  • Members
  • 161 posts

Posted 29 July 2017 - 04:14 PM

Looks good! Did the paint match the original shade of white? I'm curious because I scratched up a small area (about 1/2 a square foot) on the side of my camper and want to touch it up.
  • 0

#8 OregonOzzy

OregonOzzy

    Advanced Member

  • Members
  • PipPipPip
  • 61 posts
  • LocationBeaverton, OR

Posted 30 July 2017 - 04:03 AM

Old Crow: How did I miss your excellent write up (my poor search skills :(). Thanks for the link to Dexter Door for the bulb seal. Indeed the door is Philips since my slider says so. I had to replace the small straight part (handle) when that broke off. Replacement was found at a local RV shop. I have the original invoice from the 1st owner from 6-25-2002 and the deadbolt was a $45.00 option added.


dharte: To me the paint is a very close match. I also used this on the Al siding in the front where some had rubbed off. In fact I used this to paint the underside of the overhang as well after the vinyl started looking a bit tattered.  


  • 0

2000 Alaskan 10' CO

2018 F-350 Extended Cab 8'


#9 slus

slus

    Advanced Member

  • Members
  • PipPipPip
  • 38 posts

Posted 31 July 2017 - 12:12 PM

Looks good. I need to paint my door and replace the hardware, it is about the only thing showing it's age on the 2002 Hawk, yellowed with some rust streaking from the screw heads. 


  • 0


Also tagged with one or more of these keywords: Door, Fix, Glass, Hawk

0 user(s) are reading this topic

0 members, 0 guests, 0 anonymous users