Jump to content


Photo

Low cost DIY Lithium camper batteries.

Lithium LiFePO4 LFP DIY Batteries

  • Please log in to reply
217 replies to this topic

#171 rando

rando

    Senior Member

  • Members
  • 1,638 posts
  • LocationColorado

Posted 05 June 2018 - 03:08 AM

Buckland,


You need to follow the little diagram silkscreened on the back of the board - the orange (?) wire goes to the negative side of the whole pack, the yellow goes to the junction between the first and second set of cells (ie the +ve terminal of the pack with the orange wire on the -ve), the white wire goes to the junction between the second and third set of cells and so forth.....


It doesn't matter where on the junctions between the cells you attach the balance wires.  The yellow wire could either go to the +ve terminal of the 1st pack or the -ve terminal of the second pack.   The way I did it is to have all the heavy gauge wires from all the packs come to a junction block, and then tap the balance wires in there.  You can see in the photo below - the wires on the right are from the individual cell packs, and the yellow wires on the left go to my protection PCB (my specific pcb only needed 3 as it used the main +ve and -ve wires to sense those voltages).  You can also see the metal jumpers between the screw terminals that put the cells in series. 


IMG_0535.jpg

Edited by rando, 05 June 2018 - 03:11 AM.

  • 0

2016 Fleet Flatbed

2016 Toyota Tacoma


#172 buckland

buckland

    Senior Member

  • Members
  • 3,079 posts
  • LocationNew England

Posted 06 June 2018 - 11:24 AM

Okay I will suss this out. I think if I read it over a few times and "dry fit" it the logic should make it apparent. (one hopes!) Thanks... 

You might remember I have the two battery monitors ...one that allows you to adjust voltage... I assume these wires also attach at the same points as the other balancer? I'll recheck that post and edit this if I put a photo. Yes the two 'balancers' are in post #64.


Edited by buckland, 06 June 2018 - 11:28 AM.

  • 0

2016 Duramax 2.8 Diesel long bed Colorado 4WD with 2011 Eagle

Lordwoodcraft  instagram        Rob
The only people who ever get anyplace interesting are the people who get lost.
Henry David Thoreau
"Work to achieve not to acquire"


#173 rando

rando

    Senior Member

  • Members
  • 1,638 posts
  • LocationColorado

Posted 06 June 2018 - 02:15 PM

The connector for the balancer should be the same  as for the protection PCB.  Orange to overall -ve etc.  


  • 0

2016 Fleet Flatbed

2016 Toyota Tacoma


#174 rando

rando

    Senior Member

  • Members
  • 1,638 posts
  • LocationColorado

Posted 16 September 2018 - 09:02 PM

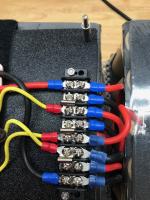
It has been about a year since I built this battery pack, so I wanted to give a quick update.   I have camped ~30 nights using the lithium pack, but I have also left the fridge and fans running in the camper for a good part of the summer - so I would estimate the equivalent of 60 nights of use.   In that time there have been no issues, with the deepest discharge around 60Ah (or down to about 60% SOC).


I was working on a camper project this weekend so I took the opportunity to run another capacity test on the camper battery.   This was similar to the first test I ran right after building the pack (which yielded 150.3Ah) but I ran the discharge rate slightly lower at 7A, just in case the battery had degraded.   After 20 hours at 7 A (so 140Ah), the battery was still > 12V under load, and jumped back up to 12.4V once the test completed, indicating to me that there was at still at least some capacity left.    In retrospect, I should have run the test at 8A rate, but from what I can see the battery is still performing the same as it did last year. 


Over the last year the pack has stayed in balance to within ~0.1V per cell,  but I did activate the balancer once or twice, mainly just because I could. 


I have made a few minor changes to my setup since first installing the battery:


1. I reduced my charging voltages - float is now 13.2V (really just offsets the loads), and my bulk charge cuts off at 13.6V.   This probably only charges the battery up to 90% SOC, but that is still more than enough power for me.  It should also keep the battery in balance longer.


2. Victron has added a remote battery temperature/voltage monitor to their lineup.   This, coupled with a firmware update to the MPPT solar controllers, allows you to set a minimum charge temperature (3C in my case) so as to avoid the issue with charging below freezing.  You can also view the battery temperature on the Victron app on your phone.   In the winter I leave my ACR isolated when driving, and check the battery temperature before switching on the ACR.  Low temperatures have not really turned out to be an issue - we keep the camper well above freezing when we are using it - so the only time it has ever been a concern is on the first day of a trip when the camper has been in the driveway unheated overnight and we are going to drive first thing in the morning. 


So far this project has been an unqualified success, but I will try to remember to update this thread again in a year or so with how the system is holding up. 


Edited by rando, 16 September 2018 - 09:48 PM.

  • 1

2016 Fleet Flatbed

2016 Toyota Tacoma


#175 buckland

buckland

    Senior Member

  • Members
  • 3,079 posts
  • LocationNew England

Posted 16 September 2018 - 09:26 PM

That sound real hopeful and glad it is performing well. I have not completed it yet as a number of serious things got in the way... just rolling with it as I can. BUT.... was wondering if my being in New England where I store the camper presently in the winter with the AGM batteries on board and an external solar panel keeping things charged up.... has worked fine for 7 years.... it gets down to 15 below zero sometimes at zero for a few weeks. But when I change to the lithium pack.... will I need to remove the battery and store in the house (basement is 50 during winter)? I have a 'battery tender' 4 amp I use for another project...should I keep it on that?


Edited by buckland, 16 September 2018 - 09:27 PM.

  • 0

2016 Duramax 2.8 Diesel long bed Colorado 4WD with 2011 Eagle

Lordwoodcraft  instagram        Rob
The only people who ever get anyplace interesting are the people who get lost.
Henry David Thoreau
"Work to achieve not to acquire"


#176 rando

rando

    Senior Member

  • Members
  • 1,638 posts
  • LocationColorado

Posted 16 September 2018 - 09:51 PM

If you don't use the camper over the winter - just charge up the battery to ~80% SOC before it gets cold and then switch everything off (solar included).   One of beauties of lithium is that is doesn't mind just sitting there at a partial SOC.  In fact they prefer to sit at somewhere between 40 - 80% SOC than at 100% SOC.   These batteries don't need or want a 'maintenance' charger.


  • 1

2016 Fleet Flatbed

2016 Toyota Tacoma


#177 buckland

buckland

    Senior Member

  • Members
  • 3,079 posts
  • LocationNew England

Posted 16 September 2018 - 11:14 PM

Thanks on that ...that is good news. I think this will be great ....as soon as The cold weather sets in people will leave me alone enough to get back to the project. Thanks for thinking this one up!


  • 0

2016 Duramax 2.8 Diesel long bed Colorado 4WD with 2011 Eagle

Lordwoodcraft  instagram        Rob
The only people who ever get anyplace interesting are the people who get lost.
Henry David Thoreau
"Work to achieve not to acquire"


#178 TeraWales

TeraWales

    Newbie

  • Members
  • Pip
  • 1 posts

Posted 02 April 2019 - 05:59 PM

Hi...thanks for the information. Hobbyist RC chargers and even my simple Fluke 87V multimeter rarely ever show any cell-cell difference larger than .015v - even when taken well down into the discharge knee beyond their recommendation, nor at the top when I charge with a voltage of about 14.6 and the absorb current is essentially zero. Neither of these is not good on a regular basis, and probably due to factory matching, they are still in balance. The components and their pcb assembly can also impact the value of knee voltage value. So, always consider the components rating when calculating the knee voltage discharge. 


Edited by TeraWales, 20 December 2021 - 04:08 PM.

  • 0

#179 Vic Harder

Vic Harder

    Doctor Electric

  • Site Team
  • 4,962 posts
  • LocationCalgary, Alberta

Posted 08 April 2019 - 01:47 AM

What about using these if the price was comparable?

https://www.alibaba....a3db0iE2lR8&s=p

cwd

I am thinking of diving into the LiFePo deep end, with the above batteries.... unless there is less expensive option available?  CWD, I have never dealt with Alibaba before... how does the negotiation process work?  


Any suggestions on a BMS to use with these?  I am thinking of building a 200AH (maybe 250) battery bank. 


Rando, you use a BMS and the Victron BMV as well, right?  What does the BMV get you that a BMS doesn't?


  • 0

#180 PaulT

PaulT

    Need gumbo

  • Members
  • 2,612 posts
  • LocationHillsboro, Oregon

Posted 08 April 2019 - 02:40 AM

Vic,


Julian OH8STN, a ham in Finland, has built and documented DIY LifePo4 battery pacs. His larger one is 45 aH and he has links to supplier for the BMS and other parts that may be of interest.


Bestech makes his BMS.


rando is likely your best source for information on design and build.


Paul


  • 0
I thought getting old would take longer.


Also tagged with one or more of these keywords: Lithium, LiFePO4, LFP, DIY, Batteries

0 user(s) are reading this topic

0 members, 0 guests, 0 anonymous users