In order to make it easier for me to lift and lower the rear portion of my FWC Hawk, I installed 40lb struts. I already had struts for the front side that were installed inside the camper by the factory.
After installing the 40lb struts on the rear, I noticed that lowering the rear of the camper took some effort/pull since there was not any extra weight added to the roof. So, I decided to add some weight to the rear of the roof by installing a floor to the existing roof rack…thereby making the rack more usable and practical.
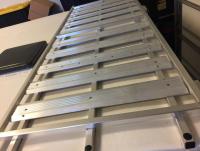
First, I considered installing chicken kennel flooring from Farmtek, which appears to make a solid floor with abundant tie down options. Then, I ultimately decided to install some type of aluminum flooring in the form of slats or planks. I went to my local metal recycling company, which carries anything in metal including household items, car parts, wagon wheels, etc., and I found some good candidates for aluminum flooring. I found some never-used aluminum door thresholds. The thresholds met my size criteria, and were 4” X 32”, and each had a nice raised profile.
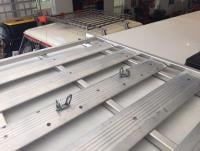
Installation: I cut off both ends of each threshold to the correct length, drilled holes, and installed the threshold (10 thresholds total) onto the roof rack. Each threshold was spaced about 2.6” apart across the entire rack. Bonus – the three existing/factory holes on each threshold matched up with the three existing roof rack tubes! To anchor the thresholds, I used 30-12X1” stainless steel screws combined with 20-10 X 1” SS screws (five screws per threshold).
Time and Cost: Took about 5-6 hours to cut, drill and install. Time was measuring rook rack, measuring and drilling each threshold, cutting off both ends of each threshold, and sealing each hole drilled in the rack tubes during install (probably overkill). Total cost was about $130 ($90 = thresholds, even used aluminum is expensive); $30 (screws); and $6 (tube of sealant).
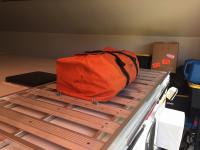
Results: After installation, the roof rack seems very sturdy and I can now load a multitude of items and gear. The total weight added to the roof, including thresholds and screws, is about 14 pounds. The only problem now is I’m probably going to have to purchase a portable/telescopic ladder to access the roof rack.
Stay tuned for other mods… including adding swing arms to my Reneul rear bumper which is in the works.
Happy Trails!