Damnit, I need to read up on linking URLs to share photos.
Edited by Portercassidy, 16 November 2017 - 04:37 PM.


Senior Member
Posted 16 November 2017 - 04:32 PM
Damnit, I need to read up on linking URLs to share photos.
Edited by Portercassidy, 16 November 2017 - 04:37 PM.
Senior Member

Posted 17 November 2017 - 08:05 AM
Old, bum around in Ford and an even older FWC Grandby
New Mantra: "Everyday camping is just making up for lost time"
Senior Member
Posted 17 November 2017 - 06:45 PM
Edited by Portercassidy, 17 November 2017 - 06:57 PM.
Senior Member
Posted 17 November 2017 - 08:42 PM
Edited by Portercassidy, 17 November 2017 - 08:44 PM.
Senior Member
Posted 17 November 2017 - 10:13 PM
Senior Member

Posted 17 November 2017 - 11:50 PM
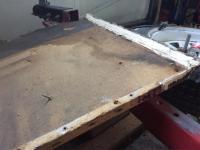
Good Hell, what did I do. Wondering how hard it is to just replace the Foundation wood. Looks like there are a few layers of plywood now.
I assume by foundation wood you mean the plywood floor pack? With the camper looking pretty well gutted, it shouldn't be much of a project. My brother and I had my floor pack built in less than a day. IIRC, you need to remove the trim pieces and then the screws that hold the floor pack to the aluminum framing. Of course you will have to provide some type of support for upper body and roof once you separate the two. I built mine out of 5/8 plywood, and stapled and glued the joints, same as the original. One of the easier tasks when completely rebuilding a FWC.
.
Senior Member
Posted 18 November 2017 - 12:54 AM
I assume by foundation wood you mean the plywood floor pack? With the camper looking pretty well gutted, it shouldn't be much of a project. My brother and I had my floor pack built in less than a day. IIRC, you need to remove the trim pieces and then the screws that hold the floor pack to the aluminum framing. Of course you will have to provide some type of support for upper body and roof once you separate the two. I built mine out of 5/8 plywood, and stapled and glued the joints, same as the original. One of the easier tasks when completely rebuilding a FWC.
.
Senior Member
Posted 18 November 2017 - 02:04 AM
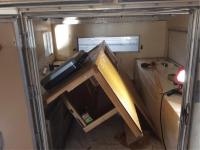
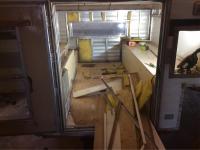
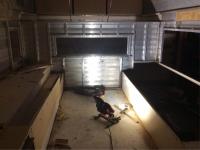
Yes, my build was a complete demo to the aluminum skeleton, then build from the ground up. I only used the aluminum frame, windows, door frame, and the roof. My floor pack was shot, plus I had to narrow the aluminum frame to fit my newer pick up tailgate opening. I have a table saw, radial arm saw, compressor and 1/4" crown stapler, so the floor pack build went very well.I started my floor pack build on 2x4's ripped to 3 inches running front to back. Reason being, I needed the extra height over the bed sides, plus I most often take the camper off the truck and lower it to accommodate my handicapped wife.
Senior Member
Posted 18 November 2017 - 04:17 AM
Senior Member
Posted 18 November 2017 - 01:34 PM
One thing to consider when widening or increasing height is the siding. I found the cost to duplicate the original siding and have it crated and shipped to be prohibitive. Of course I'm on the east coast, and most suppliers seemed to be in the west.


0 members, 0 guests, 0 anonymous users

