Jump to content


Photo
- - - - -

Flawk project: Turning a fleet into a hawk


  • Please log in to reply
53 replies to this topic

#1 lostwon

lostwon

    Member

  • Members
  • PipPip
  • 24 posts

Posted 22 November 2017 - 06:44 AM

So last weekend I acquired a 1988 Fleet that needed a lot of TLC. My wife and I decided fairly recently that we wanted a FWC and a couple weeks later this gem popped up for sale so we jumped. Probably paid too much for it knowing how much it needed but didn't want to wait around forever and ski season is already here and we need a place for our almost 2 year old to take a nap while one of us makes some turns. Now that I've torn into it, I figure I've paid $900 for the aluminum frame and windows as that's probably all I intend to keep original.

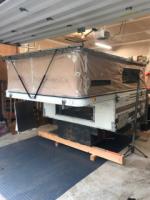
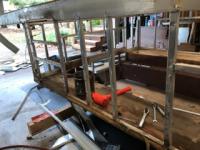
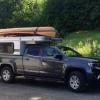
We spared no time tearing into it. Plans are to make a new floor pack that fits the Tundra Crewmax. This will make for about 5.5" more headroom and about a foot wider footprint before and cabinetry, etc. Also plan on re-siding using 0.025" aluminum. Interior panels will be fabric covered plywood and loncoin flooring.

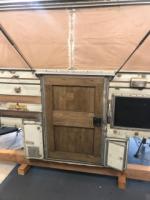
I plan on a running a fairly bare-bones electrical system with a few LED lights and a new Fan-Tastic fan. Heating will be done by a Wave-6 to make things simple and not draw any of the electrical power. My thoughts are to install a flush mount sink with a 7 gallon aqua-tainer for water storage as it's cheap and replaceable if for some reason it gets nasty. Still haven't decided if I want an electric water pump or just put a foot pump in.

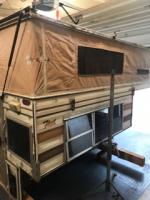
The purchase price included a really awesome old school Singer sewing machine as well as new popup material and clear window material. After a lot of himming and hawing we decided that sewing up our own popup wasn't time conducive. In the end we found the best option for us was to have ATC fabricate the new popup for us. This would guarantee us a quality, dry canvas and ATC was about $1,100 less than FWC. For reference, ATC is charging $1,050 for the canvas plus $495 for the arctic pack. FWC wants $2,200-2,400 and the camper is required to be at their facility.

Another idea is to make a pullout bed like the newer models. I'm thinking this will take a bit of reinforcing for this older model's frame. One question I have is: how are the pullout beds constructed? Are they simply a plywood pullout on top of the cabover that slides out? I've trying looking to find picture of how FWC constructs the pullout bed with no luck. I'd love some pics of the bed without cushions both tucked in and pulled out if someone can help!

The other question I have is the front bulb seal between the roof and the cabover that is used on the newer models. Does someone have a source for this seal?


IMG_3353.JPG IMG_3356.JPG IMG_3391.JPG IMG_3361.JPG IMG_3391.JPG IMG_3361.JPG
  • 1

#2 longhorn1

longhorn1

    Ouch, that stings!

  • Members
  • 2,826 posts
  • LocationCarmel, Indiana

Posted 22 November 2017 - 11:42 AM

Welcome. A lot of great build posts to help you. The bed slide is another partial sheet of plywood with a front face to hold the cushions and make the pullout easier. There are wood tracks on either side with stops. There is a 1/2" lip between the overhang and pullout. We installed Marine Hyper-vent to help with airflow under the matteress and make the bed fully level. We lift up the Hyper-vent and slide the slide back in. Camper is in storage so no pictures. Good luck and keep posting pictures. jd

Edited by longhorn1, 22 November 2017 - 04:12 PM.

  • 0

http://texaslonghorns01.blogspot.com/


Ford F-250 Long bed, 2014 Grandby


#3 buckland

buckland

    Senior Member

  • Members
  • 3,078 posts
  • LocationNew England

Posted 22 November 2017 - 12:12 PM

Here is an incredible link to another brave soul.    http://www.wanderthe...tacoma-project/

Best of luck and be sure to post progress photos!


  • 0

2016 Duramax 2.8 Diesel long bed Colorado 4WD with 2011 Eagle

Lordwoodcraft  instagram        Rob
The only people who ever get anyplace interesting are the people who get lost.
Henry David Thoreau
"Work to achieve not to acquire"


#4 shellback

shellback

    Senior Member

  • Members
  • 336 posts
  • LocationWagontown,PA

Posted 22 November 2017 - 01:25 PM

For my overhead bed I used 3/4" plywood. The slide out is also 3/4". To support it against the main bed, I used a 1 1/2" piece of aluminum angle screwed to the front wall. On each side I laminated 2 3/4" plywood pieces together for extra width. I think they are about 4 inches high and the length was determined by screwing the to the aluminum framing members. I know my passenger side is longer than the drivers side. Then to add strength to the pull out plywood, I bought a piece of 1x4 oak and using a table saw, I made a slot for the 3/4" plywood to fit into and be screwed and glued. So the aluminum angle supports the cabover edge, the  wood pieces are screwed to the framing, and supports the ends, and the 1x4 stiffens the front edge. I'm about 235#s and it's plenty strong enough. I've got a few pictures here. http://www.wanderthe...w-owner/page-7 

  Take your time and thoroughly read these 2 threads, you will find just about all the info you will need.

http://www.wanderthe...tacoma-project/

http://www.wanderthe...-become-a-hawk/

PS I bet I don't have $300 in the materials for the canvas sides. Living the Dream's video covers making them. All you need is the right sewing machine. Buy one used, sell it when you are done! Save plenty moola!


  • 0

#5 Wandering Sagebrush

Wandering Sagebrush

    Free Range Human

  • Site Team
  • 10,574 posts
  • LocationNortheast Oregon

Posted 22 November 2017 - 02:26 PM

Welcome to WTW!! It’s a great group, with great members.

I just caught your title of Flawk. It’s pretty neat that an older pop up is being saved and transformed into a different configuration. Having ATC do your vinyl and insulation pack is a good move. I think you’ll be impressed with the results. Keep us posted on your progress. :)
  • 0

I am haunted by waters


#6 Portercassidy

Portercassidy

    Senior Member

  • Members
  • 148 posts
  • LocationColorado Plateau Metro

Posted 22 November 2017 - 03:27 PM

Welcome, I am also doing a Fleet——-> Hawk rebuild.
  • 0

#7 PaulT

PaulT

    Need gumbo

  • Members
  • 2,611 posts
  • LocationHillsboro, Oregon

Posted 22 November 2017 - 03:30 PM

Welcome and what a project!

Flawk, eh? As you'll be "going up the country", your project could also be "Canned Heet". :P

Paul
  • 0
I thought getting old would take longer.

#8 takesiteasy

takesiteasy

    Senior Member

  • Members
  • 2,588 posts
  • LocationMinnesota

Posted 22 November 2017 - 06:55 PM

Welcome to WTW. Lots of these old campers being brought back to life here. You are in good company!


  • 0
2011 Tacoma AC TRD
ATC Custom Shell

travelswithrockythedog.blogspot.com

#9 Casa Escarlata Robles Too

Casa Escarlata Robles Too

    C'est la vie

  • Site Team
  • 9,285 posts
  • Locationmonterey bay area

Posted 22 November 2017 - 10:45 PM

Also welcome to the group. It will be fun tor us to watch your rebuild.

Post as you can.

And ATC will do a great job for you. Marty and crew are very east to work with.

Frank


  • 0

2002 Tundra AC TRD 4WD Limited 2009 ATC Bobcat loaded http://sharychic.blogspot.com/


#10 PokyBro

PokyBro

    Senior Member

  • Members
  • 467 posts
  • LocationLas Vegas, Nevada

Posted 23 November 2017 - 03:24 AM

Hello lostwon and welcome to the forum.


It will be fun to follow along with your build. You certainly dove in quickly with the dismantling and starting to figure how you will make adjustments to the floor plan and height. For some of us, it is fun to do the rebuild, and try to save money in the process. 


My build is the Grandby to Hawk thread, and I wondered what I should call it. After your clever name of "Flawk", maybe I should call mine a "Grawk"! Kind of starting to sound a little Dr Seuss all of a sudden.


Anyhow here's a few pictures of my bed board slide out that might be of help to you, per your request. My bed overhang is 36", and the slide is 24". I pull it out about one more foot for a 48" wide bed, which is quite roomy for one. My slide has a 1"x 4" x 3/4" oak board across the face, with 1/2" thick plywood for the base. I rounded the edges on each side, and did a bevel cut on the back so there isn't a 1/2" hard drop off to feel under the mattress. Rounding the edges seemed to help the slide bind less moving it in and out. 


Good luck on your build and feel free to ask questions on anything I can help with.


Poky


bed slide construction
Slide runners
Bed slide

  • 0

1999 F250 crew cab SRW, 7.3 Powerstroke TD

1981 Grandby shortened to a Hawk

Build thread / https://www.wanderth...by-into-a-hawk/


0 user(s) are reading this topic

0 members, 0 guests, 0 anonymous users