Jump to content


Photo
- - - - -

1980 FWC Keystone - Getting this old beast up to par.


  • Please log in to reply
34 replies to this topic

#1 JDeanP

JDeanP

    Advanced Member

  • Members
  • PipPipPip
  • 51 posts
  • LocationEl Paso, TX

Posted 09 December 2017 - 06:38 PM

Before anything else, this forum has been a treasure of information about restoring and remodeling older FWD campers. Thanks to everyone that has taken the time to upload and share their findings and progress. It's already been a tremendous help.


Some of you will have already seen this Keystone posted around, but a few didn't want to touch it, and those that did apparently didn't have the correct size bed to take it home. While browsing CL, looking for something worth a trip to Colorado from El Paso, TX, I began shooting from the hip, seeing if any of the sellers ever found themselves closer down this way where we could meet up. Low and behold, this Keystone's seller is from El Paso and wanted to visit family for Thanksgiving. We came to a mutually beneficial arrangement and he brought the camper down with him from Northern Colorado. 


Not having eyes on before the purchase was a gamble. I can't say that I regret the purchase, but there were some items that were not apparent in the discussions that took place. If I was actually in Colorado, or somewhere else with a budget friendly supply of used FWCs, I probably would have passed. However, having the thing transported for me was a huge help and now I have something to keep my hands busy. 


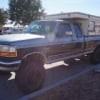
For better or worse, she's now mounted on a 96 F250, perfect fit. Already the overcab particle board was replaced so as not to invite various West Texas critters to take up abode. Next will be the replacement of the vents. 


Below are a few pictures I snagged earlier in the process. My camera isn't handy for uploads at the moment, but I'll take some more pictures while I'm out there and put them up later today.


Thanks for taking a look. Feel free to follow along and throw any advice or pointers my way.


mHoP2.md.jpg


mHY49.md.jpg


mSxKi.md.jpg


Edited by JDeanP, 09 December 2017 - 09:39 PM.

  • 0

96 F250 7.3

80 FWC Keystone


#2 Portercassidy

Portercassidy

    Senior Member

  • Members
  • 148 posts
  • LocationColorado Plateau Metro

Posted 09 December 2017 - 06:54 PM

It just needs some love. Congrats.
  • 0

#3 ckent323

ckent323

    Senior Member

  • Members
  • 1,227 posts
  • LocationSolvang, CA

Posted 09 December 2017 - 07:43 PM

I had an 84 Keystone.  It was bigger inside than my current 2007 Keystone.  We miss that extra space.


These old campers have good bones but do take a lot of effort and time to refurbish.


My first recommendation is to clean the sealant off of all the screws in the roof and re-seal with 3M 4100.  Most of the damage in my old camper was from small leaks in the canvas and the roof.   However, if you have any other roof work to do such as replacing headliner, adding (or replacing) vents, or wiring for solar, light fixture or powered fan(s) I would do that before re-sealing the roof. 


You may want to consider putting full length Yakima or Thule rails on the roof.  They are handy for attaching solar panels and of course kayak carriers, etc.  We found that the Aluminum OEM rack we had on our Keystone was not particularly useful.  It was more like a rectangular luggage rack.


Hopefully the end panels in your camper are OK.  If not you can build or buy.  Same with the pop-top canvas.


Be sure to check the plywood floor box for degradation/rot, particularly under the entry door.


All of the cabinets as well as the cab over wood was originally pressed wood.  I recommend replacing the over cab wood with 3/4" thick Marine plywood that has a piece of thin melamine (or equivalent) bonded to the side that is facing out and be sure the plywood and melamine extend well into the lip around the edge then fill the space between the lip and the melamine with 3M 4100 before putting all the screws in. Be sure to paint or seal the inside surface of the plywood as well.


I recommend two vents one forward and one aft.  Think about the roof penetrations and wiring before you re-do all the sealant.  If  you plan to put solar on the roof then go with 10 AWG I believe that is standard on Solar panels and commercial solar wire (hopefully rando, ntsqd or Vic Harder will check and confirm or correct this comment).


I assume you have seen the recent thread on replacing the headliner as well as other threads on rebuilding the floor box of the camper.


If you replace the interior check the frame for cracks and repair and add gussets as appropriate.  Depending how far you strip it down you may want to think about upgrading the insulation too (same with the roof).


We did not have hot water or a pump in the old camper.  We do have it in the new camper.  I was going to put in a foot pump had I kept the camper (we found the used 2007 about that time for a good price so went for it).


We had a 3-burner range top and a 3-way Instamatic fridge that still worked - barely. I do not recall the brand of the 110 V/12 V power converter that was in the old camper but I would suggest replacing it and wiring the camper a bit differently than factory so that the power goes to your house batteries and the house loads can be connected to your solar controller (I recommend Victron 100/30).  I believe ntsqd has done this so may have suggestions.


If you remake the cabinets I assume you will use plywood or MDF.  Think about better layout and flush fitting doors and drawers.  I saw the cabinets Alley-Kat built in his first camper and they were nice. He used push button latches and flush doors and drawers on his cabinets which when closed left nothing to snag on. Nice and clean.  Plus they were positive latching so they would not pop open on rough roads.  Not sure if he ever posted pictures not but I am sure he would share the info.


If you replace the mattress and /or cushions recommend you see the info that David of Upholstery Decor in Goleta has posted. He has been doing upholstery and foam all his life - he started as a kid in the shop his Dad owned and now he owns it.  He has done work for me and he knows this stuff like no one I have ever met before.  Here is his website: http://www.foamonline.com/   Be sure to read the info at the "help center"  and "mattresses" tabs on the left side of the home page.  He can bond different foams together if necessary to meet your needs.


Longer term advice:  Do not store the camper with the roof down and the overcab mattress in place.  remove the mattress and stand it on its side in the aisle before closing the top for storage.  That way even if you get condensation in the overcab area you will not get mold.


OK as usual I have gone on long.  I hope some of this is useful to you.  Good luck with the refurbishment of the camper.  


Craig


Edited by ckent323, 09 December 2017 - 07:48 PM.

  • 0

1993 Dodge Cummins W-250 Club Cab long bed, 2007 FWC Keystone


#4 JDeanP

JDeanP

    Advanced Member

  • Members
  • PipPipPip
  • 51 posts
  • LocationEl Paso, TX

Posted 09 December 2017 - 09:36 PM

Sweet lovin'. Thanks for the pointers.

-------------------------------------------

It should probably be pointed out that, due to certain circumstances, almost the entirety of this project takes place in a parking lot, with limited tools and space. Storage of materials consists of the truck cab and camper itself. It isn't ideal, but it makes things more interesting and everything is ready at hand on project days.


The overcab was replaced with 3/4' birch ply and the outside was painted before installation. This replacement, and the vents I replaced today, may not have been done to the most professional standards, but they needed to be completed sooner than later in order to keep out the elements. I'm not against going back later and making fixes to a higher standard, but I didn't want to neglect these deficiencies. This thing was pretty much a breezeway when I started. 


mSMra.md.jpg


Edges were caulked and the new overcab was synched in with new hardware.


-------------------------------------------


This is what the roof vents looked like when I began. One vent had broken in transport to TX and the other was more vent than cover.


mSmlT.md.jpg


mS4r7.md.jpg


It looks to me as if the original 14 1/2'X14 1/2" vent openings were later sized down with plates and smaller vents installed into those plates. Pulling off the old silicone, which was still good, and removing the plates and vents was so easy it spooked me. I kept waiting for some serious snag. 


mSsXb.md.jpg


In come a brace of Heng's universal roof vents. 


mSBkz.md.jpg


They popped right in without much difficulty. A lot of the previous screw holes were close enough to count. As for those that didn't, with enough pressure, any screw can become a self tapping screw! After screwing them down they got a liberal, if not precise application of silicone. The underside of the vents will be installed later when I've decided how to work out the interior roof. Much of that will probably be replaced. For now, no more venting unless I open one on purpose. 


The vents stick up a bit further than the old pair, but that doesn't bother me. With time, there's probably going to be a bunch of other stuff up here as well. And, again, they just needed to get put in place. They can tag out at a later date if I want them to do so.


mSK4r.md.jpg


mSzaq.md.jpg


-------------------------------------------


Excuse the mess, but here's an idea of the original interior layout for anyone interested.


mSHd0.md.jpg


mSpNF.md.jpg


mSOi3.md.jpg


-------------------------------------------


The ID/info plate.


mSe6A.md.jpg


-------------------------------------------


Unfortunately the lift panels are shot to crud and will need to be replaced. I think I've settled on the conduit lifters and some external gas struts. After the fiasco of having to finish my plywood cuts with a wood chisel due to the nature of reciprocating saw precision, I think it best to not try to fabricate the original style wood lifters with the tools available. 


In the meantime, I picked up a couple of these bad boys for holding/lifting the roof up when I need to do interior work. I've seen them at Lowe's and Cabela's for about 25 bucks a pop. They ratchet up very easily and might be an economical solution for the strength or height impaired, both financially and with space.


mSlLD.md.jpg


-------------------------------------------


As you can probably tell, there's a lot of work that needs to be done on this old Keystone. In the end it should be worth the trouble and I've actually been enjoying the process so far. It's been too long since I've had a good project to use my hands on for any length of time. Already this has been both educational and rewarding. 


So, the things I want to accomplish, in no particular order:


Fix the door. It came apart on me it's held together with an unusual use of spare hardware that was in my toolbox for no obvious reason. Shouldn't be terribly difficult to rebuild the frame and insulate.


Remove the interior paneling and replace the insulation with 1' foam board. Pretty strait forward, but the new paneling will have to wait until I settle on the redesign of the interior layout. There's a lot of space to utilize and I want to be efficient with that space. No rushing this department. This also ties into the rewiring and the aspects of the project that entails.


Complete replacement of cushions and upholstery. The interior was too long the home of various insects and critters to simply clean up. Something vinyl or the like will likely win out for both cost and ease of cleanup. 


Patch the few small perforations in the outside panels. This will probably be fiberglassed from the inside and some form of bondo on the outside. This will take place before painting the exterior to roughly match the color scheme of the truck.


Way down the road, replace the pop up side material. This wont happen for a while, but I've got a local place that gives sewing lessons and I plan to be able to complete this myself by the time I'm ready to drop the cash on materials. For now, patch as necessary. 


I will also be removing the original furnace and fridge. If anyone is in the El Paso area and would like to have them, I can hook you up once that portion of the project is reached. I don't know if they have any value, but they are yours if you want them. 


The rest is what you might imagine. Layout, new utilities, various steps that will present themselves along the way, whether or not I see them coming ahead of time. 


Thanks once again for letting me take part and glean from everyone that has gone before. This is a "budget project" and probably won't be featured on any showroom spreads any time soon, but it's fun, it's for hunting season next year, and I'm enjoying the ride.


mSnlM.md.jpg


mSvbQ.md.jpg


  • 0

96 F250 7.3

80 FWC Keystone


#5 ckent323

ckent323

    Senior Member

  • Members
  • 1,227 posts
  • LocationSolvang, CA

Posted 09 December 2017 - 10:08 PM

Looks like it is coming along.  We did not have a cabinet on the passenger side of the entry door.  We kept our porta-potti on the floor in that space.  That looks like a custom cabinet and probably a nice addition (can't tell from the pic).  


From what I can see in the pics the driver's side looks the same as ours. Although, we did not have a heater and it looks like yours does.  I think I see a three burner range top.  The missus misses that.  We have a two burner in our 2007 Keystone.  However, she does like the hot water and pressurized water system over the old hand pump faucet.  ;-)


I tried to seal the canvas on our old 1984 Keystone but it was so brittle that new leaks kept appearing.  I have a friend who has a 1983 Keystone that he has owned since it was new.  It has always been stored inside with the top up.  The canvas is still pliable and he has never had a leak or any mold.  The end panels and in fact the whole camper are still in good shape.  (he also has a 1993 Dodge Diesel W250 long bed truck like mine except his is but it a regular cab not a club cab).  I think the canvas material that is now used in the newer campers is more robust - I hope anyway.  


BTW: the window in the front driver side of our 1984 Keystone camper as well as the two over couch side windows were louvered glass.  I hated those windows.  Yours look to be solid glass.  Much better in my opinion.


I am happy to see you giving this old camper new life.


Craig


Edited by ckent323, 09 December 2017 - 10:09 PM.

  • 0

1993 Dodge Cummins W-250 Club Cab long bed, 2007 FWC Keystone


#6 JDeanP

JDeanP

    Advanced Member

  • Members
  • PipPipPip
  • 51 posts
  • LocationEl Paso, TX

Posted 09 December 2017 - 10:21 PM

Thanks, Craig.


This one has a 3 burner, furnace, sink, and the compartment on the passenger side was for a toilet and maaaaybe a shower, can't tell. I'm considering one, but that depends on how ambitious I get. An instant hot water unit on the outside is too easy, but we'll see. 


All the windows are actual glass. They will most likely get some tint in the future for privacy and temp control. 


The canvas is the single biggest concern. It's going to take some sewing lessons and an appropriate sewing machine, but I think it'll happen. 


  • 0

96 F250 7.3

80 FWC Keystone


#7 shellback

shellback

    Senior Member

  • Members
  • 336 posts
  • LocationWagontown,PA

Posted 09 December 2017 - 10:52 PM

I wouldn't use silicone caulking.on the roof or any penetrations of the roof. Personally I prefer Dicor. There are other sealants also that would be better on your roof.


Edited by shellback, 09 December 2017 - 10:56 PM.

  • 0

#8 ProjectsInProgress

ProjectsInProgress

    Member

  • Members
  • PipPip
  • 14 posts
  • LocationToo Close To Denver Metro Area

Posted 10 December 2017 - 04:07 AM

JDeanP, 


Would it be possible for you to measure and take some more pictures of the rear closet?  I am in the first stages (deconstruction and planning) of a mid 80s Keystone rebuild, that was in a rougher state than yours.   Mine did not show any indication of a closet there, but I would like to see what the configuration would be if installed.  (I will start a thread once I have some progress on the rebuild.)  Thanks.  


Edited by ProjectsInProgress, 10 December 2017 - 04:13 AM.

  • 0

#9 Old Crow

Old Crow

    Searching....

  • Members
  • 1,059 posts
  • LocationSouth Central PA

Posted 10 December 2017 - 07:44 PM

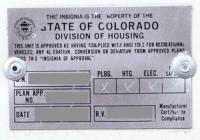
JDeanP-  I believe this is close to what your insignia of approval plate (in post #4) would have looked like... (I zapped the numbers on this one)


ColoradoInsigniaModified copy.jpg


Under the left rivet, that's S.N. (for serial number), and under the right it's 'Fire Safety'


Also- if you run upon model numbers for your furnace, fridge, and converter, I'd appreciate knowing what they are as I'm interested in understanding what FWC put in the campers at the time.


Also- How difficult was it to replace the cabover floor?  I'd think there may be some prospective buyers of older FWCs who would like to know (like, uh, me!)


Edited by Old Crow, 10 December 2017 - 10:46 PM.

  • 0

'01 FWC Hawk shell on a '13 Tundra Double-Cab  + '19 Ford Transit van with Quigley 4x4 option


#10 JDeanP

JDeanP

    Advanced Member

  • Members
  • PipPipPip
  • 51 posts
  • LocationEl Paso, TX

Posted 10 December 2017 - 10:32 PM

PIP, I can do that. The next time I'm in the back I'll try to get some better pictures and measurements for you.


Old Crow, I'll try to keep track of things that might be of interest. With all the things wrong with this camper, it still has the original manual. I plan to get images of that uploaded as well.


As for the cabover floor, as long as you can remove some side panelling in order to remove the oak support boards, it's a piece of pie. I used the one "good" corner as a template to get the rounded portions correct and I did that with a reciprocating saw in a parking lot. If you have a proper work space and tools you shouldn't hesitate to take a whack at replacing one. 


  • 0

96 F250 7.3

80 FWC Keystone


0 user(s) are reading this topic

0 members, 0 guests, 0 anonymous users