I just re-looked at my linked post for the Arctic liner, and the pics suck. So, here's a few more:
Looks great. Did you put velcro on the bottom as well, to create a sealed air pocket, or can air simply "fall" out the bottom?

Doctor Electric

Posted 18 January 2018 - 05:15 AM
I just re-looked at my linked post for the Arctic liner, and the pics suck. So, here's a few more:
Looks great. Did you put velcro on the bottom as well, to create a sealed air pocket, or can air simply "fall" out the bottom?
Advanced Member

Posted 18 January 2018 - 05:27 AM
Looks great. Did you put velcro on the bottom as well, to create a sealed air pocket, or can air simply "fall" out the bottom?
No. Nothing on the bottom. I suppose in theory air could "fall" out the bottom. Scientific theory anyway.... Practically, I don't think its an issue. The liner hangs from the velcro on top, and extends the full height of the camper soft wall with a negligent if not non-existent air space in between. Effectively, its the equivalent of being attached to the wall, so air movement is highly unlikely. Equally, the reflective surface should retain any heat produced within the camper, and would probably negate the minimal amount of air that might "fall" from between the two surfaces.
'08 Dodge 3500, '11 ATC Cougar
Build Thread: http://www.wanderthe...r-build-thread/
Blog: https://raftercexplo...s.wordpress.com
Advanced Member
Posted 19 January 2018 - 02:57 PM
The sort of current final step of my build (for right now anyway) was adding items that could be/maybe could’ve been bought at the time of order of the camper. In my case, I think in 2011, ATC wasn’t doing lift struts, or Yakima racks rails, but they probably were doing rear wall steps and rear facing spot lights (at least if requested by customers). Anyway, I decided I wanted those items, so I made an appointment with the guys just after the first of the year to get them done.
As reported in another post, I showed up at 9 AM, and was out the door at ~11:30, with lots of work and BS-ing done. I opted for the full length Yakima rails on the roof. I currently have a Yakima rail system on my camper shell that was our primary shelter prior to the Cougar, so moving the mounts and bars will be very easy. I went for the full length so I would have greater flexibility/expandability down the road for additional racks, or solar panels (god forbid), or whatever I might need.
I probably could've done the rails myself, but since it entails drilling holes in the roof, I opted to let ATC do it. They’ve done a ton of them, know the tricks to be sure there are no leaks, and to be sure the rails are nice and straight. Both key concerns…
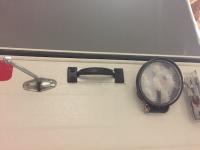
The rear spots I explained in an above post. They knew where to drill, and where to find the hot lead and put the switch (both also KIND OF important). They did a great job there, and then I could grab the power from their work to make my area lighting successful.
The gas struts, I opted to do myself. I bought the 30 lb units ATC normally installs from them, got some pointers from Jeff as far as placement, and they came out great, and work well, though with an empty roof, they can be more of a deterrent, than a help. Right now, we have to pull the roof down, so I attached some short straps to the “push” panels to assist that, but when we have our 2 kayaks on the Yakima rack, it should be well balanced toward lifting and lowering.
To mount the struts, I measured the suggested by Jeff distance away from the outside edge of the camper (~8”), mounted the top pivot, then raised the roof, and mounted the bottom pivot where the strut was fully extended, minus about a 1/2”.
I think they are a good addition, though maybe unnecessary for a few more years, as lifting the roof isn’t really a big deal for me or my wife. Guess we’ll see…
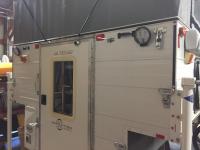
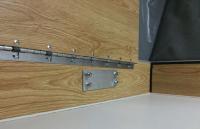
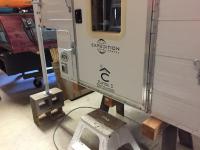
I also opted to mounted my own rear steps. Once I got the info from Marty as far as where there was structural aluminum, and realized that they need to be drilled and bolted all the way through the camper wall, I figured it'd be no big deal. And it wasn’t.
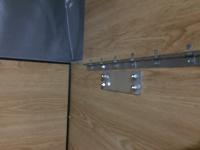
I bought the steps from ATC, though they are available all over the internet, and you can even get them in pure stainless if that suits you. The driver’s side lower step is bolted right next to the door frame, about 16” up from the door sill height. The bolts come through into the short section of rear wall between the door and the wall that the furnace is mounted behind. ATC uses just washers to back the bolts (which I’m sure is more than adequate), but I opted to make some backing plates out of 2” x 3/16” aluminum bar stock. Its nice and light, easily bought at my local Ace Hardware, and provides greater surface area than washers, and adds “compressional” strength in addition to the “sheer” strength of the bolts, and since I’m 200+ pounds, I wanna know that those steps are gonna support me.
The drivers upper step mounts directly next to the trim at the edge/corner of the camper, and the bolts come through into the space behind the fridge, so they are easily accessed. The passenger side steps are basically in the position as the drivers, except the lower step has to mount to the outside edge of the lower wall of the camper in order not interfere with opening the door. Its bolts come through into my rear compartment, and the upper step bolts come through the rear wall. They all have the backing plates, and use a jam nut for tightening, and an acorn not for aesthetics.
And since I had steps to allow me to climb the rear wall, I figured I bet have something to hold onto when I got there. So I mounted couple of simple grab handles on the upper portion of the rear wall, through the channel aluminum. I used the same method to back the through bolts as the steps, but I added a couple of aluminum plates between th handles and the siding of the camper, again, to spread the surface area out. On both the steps and handles, I used white 3M Marine silicone sealer (same stuff as ATC uses) to be sure leaks are averted.
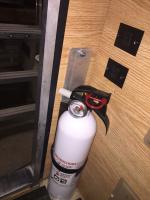
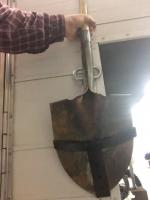
Coming next: Shovel mount and CO2 tank bracket……

'08 Dodge 3500, '11 ATC Cougar
Build Thread: http://www.wanderthe...r-build-thread/
Blog: https://raftercexplo...s.wordpress.com
Doctor Electric
Posted 19 January 2018 - 09:22 PM
Great write up. I've bookmarked this page for a future date!
Advanced Member
Posted 21 January 2018 - 05:21 AM
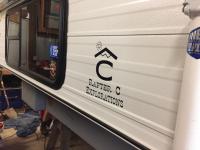
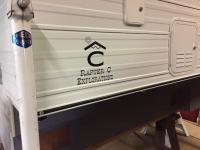
Not really a build subject, but got some new decals for my camper. Just a little logo for a travel blog I’m starting, and who knows where it’ll go from there. The basis of it is our “Rafter C” brand. For those not familiar, the “rafter” is the the peaked shape above the letter C, with the “C” being the first letter of our last name. Its a California registered cattle brand, that we have used on a few cows, but mostly its what we used to represent our family. It has served a basis for many things oriented around our family, and even a small business my wife used to run, and you all may not have noticed, but I recently changed my user name to “Rafter C” to line up with this idea.
The decals were made locally by a friend who has a shop that specializes in things such as logo hats, shirts, etc, and decals obviously.
Anyway, I kind of like them…..

'08 Dodge 3500, '11 ATC Cougar
Build Thread: http://www.wanderthe...r-build-thread/
Blog: https://raftercexplo...s.wordpress.com
Free Range Human

Posted 21 January 2018 - 05:31 AM
I am haunted by waters
C'est la vie

Posted 21 January 2018 - 04:54 PM
Nice let us know when your blog is up to view.
Frank
2002 Tundra AC TRD 4WD Limited 2009 ATC Bobcat loaded http://sharychic.blogspot.com/
Ouch, that stings!

Posted 21 January 2018 - 06:51 PM
Senior Member
Posted 23 January 2018 - 10:46 PM
Great write up.
Can't wait. Does the door hit when opened? I ask because I was thinking about adding a tank mount in that location for a small 5lb propane tank for outside cooking.
Really like this idea -
Keep'em coming!
~Jim2000 Tundra AC- 2000 FWC Ranger
2017 Tundra DC - 2017 ATC Panther
Advanced Member
Posted 24 January 2018 - 02:03 AM
Great write up.
Can't wait. Does the door hit when opened? I ask because I was thinking about adding a tank mount in that location for a small 5lb propane tank for outside cooking.
Really like this idea -
Keep'em coming!
The CO2 tank mount is still in progress, but in my case, no the door won't hit it. But that's only because I moved the door wind catch inward. Meaning toward the door, so that the door doesn't open as far as it used to. To me, thats fine. The storage potential is more important, as well as an improved effectiveness of the spot lights, and clearance for some supports for a planned rear awning I will do. It will also allow me to mount the shovel next the tank.
The table post seemed like a no brainer to me since the floor space is pretty valuable.
'08 Dodge 3500, '11 ATC Cougar
Build Thread: http://www.wanderthe...r-build-thread/
Blog: https://raftercexplo...s.wordpress.com


0 members, 0 guests, 0 anonymous users

