“Also not sure If I can rebuild the inner liner and ceiling with the canvas attached. Thoughts?”
Ourayphotography,
First, thanks for sharing your build project with us. Many people seem to love these build threads, I guess to see what your creative side comes up with. So, we’ll be following along in anticipation.
Regarding your question above, in my opinion, the right way to replace the headliner is with the roof off. Here is my reasoning, first you’re dealing with gravity when you try to put up headliner over your head, and need a way to fasten it. It would be very awkward, and the material you’re replacing is likely perforated vinyl, and it has some weight to it. Second, the headliner should get tucked up under the aluminum skin of the roof, and the sideliner is also best tucked up under the roof skin as well, overtop the headliner material, with the side of the roof material folding over both like a shingle effect. Then the trim ring goes on last. Since you’ve seen my build thread, if you go into it far enough you’ll see the section where I installed the headliner with the roof off, turned upside down.
I don’t know what year it changed, but most of these older campers were assembled with the headliner tucked up under the roof skin (sheet aluminum), then the sideliner was sandwiched between the trim ring and the roof skin. The only barrier for water intrusion was effective use of sealant around the ring. If it dried and/ or peeled, it would fail to block water from entering and seeping inside down the side liner material. So a lot of these old campers suffered from wet lift panels that eventually came apart, and wet overhang bed board, that became damp , moldy, and came apart.
So if you intend to use the existing side liner (canvas), it might be tricky to install new headliner as is. You also have the added situation of the lift panels being in place assembled overtop of the current headliner material.
Hope this is helpful. As others have offered, just let us know when you have questions, you’re sure to get some helpful thoughts.
Poky


1988 Four Wheel Camper Grandby renovation and Tundra Fit
Started by
Ourayphotography
, Oct 30 2018 06:17 PM
FWCFour wheel camper flatbed grandby 2005 toyota 2005 tundra 2005 tundra trd
247 replies to this topic
#21

PokyBro
-

- Members
- 467 posts
Senior Member
- LocationLas Vegas, Nevada
Posted 02 November 2018 - 05:38 AM
1999 F250 crew cab SRW, 7.3 Powerstroke TD
1981 Grandby shortened to a Hawk
Build thread / https://www.wanderth...by-into-a-hawk/
#22
Ourayphotography
-
- Members
- 146 posts
Senior Member
- LocationColorado
Posted 02 November 2018 - 03:02 PM
yes!
Man, all that mold sucks. Where did all the moisture come from to feed that?
Yes, it is pretty bad. I am guessing there are some pretty bad roof leaks. One of the skylites is missing its cover too. I have not gotten up there to look much yet. Crazy thing, someone had painted over it white to hide it in the past. The family I bought it from said they had been camping in there last summer. Yuck
#23
Ourayphotography
-
- Members
- 146 posts
Senior Member
- LocationColorado
Posted 02 November 2018 - 03:21 PM
Thanks Poky, very good info. Going through some of the builds in the group, making a new side canvas is a very daunting thought for me. I would really liike to do my best to salvage the old one if possible. How about a light veneer wood skin as a replacement inner roof? Slice the old junk liner out and screw in veneer panels? Possible? THX
#24
shellback
-

- Members
- 336 posts
Senior Member
- LocationWagontown,PA
Posted 02 November 2018 - 05:18 PM
I'd choose a synthetic material versus wood. There's a lot of condensation in a popup camper when using propane heat. When I rebuilt my roof, I replaced all the screws with the next size up. Some screw holes had spider cracking around them. On those I made up some thin aluminum plates to cover the cracked areas and epoxied them in place. After all that was done, I used Dicor self leveling sealant and covered every screw, the vent joint, and the center seam down the roof. As Pokey said, the side fabric is on the outside of the roof skin, with the trim providing the seal. When Pokey did his build, he tucked the side fabric up under the roof skin, then installed the trim. I followed his method on my build. So with the roof upside down, we installed the headliner with it wrapped over the outside framing and under the roof skin. Once the roof was in place, the side fabric was also wrapped around the outside of the roof framing and up under the roof skin. After that, I stapled the roof skin back to the framing and installed the trim.
#25
Ourayphotography
-
- Members
- 146 posts
Senior Member
- LocationColorado
Posted 02 November 2018 - 05:37 PM
Thanks. Yes, the outer roof I have some good ideas since I did some serious repairs on my travel trailer not long ago. Leveling dicor on each screw is a good idea, I have a few tubes here at the house. On the interior ceiling, instead of wood veneer, maybe the thin PVC sheets like sold at the depot? I dont think it needs to be fabric since moisture will travel through fabric and get into the insulation. I will look closer today at the ceiling fabric and the corners. I am thinking I can leave the side canvas and all attachments alone and simply slice the ceiling fabric liner away. Make sense possibly? Thanks again
#26
shellback
-
- Members
- 336 posts
Senior Member
- LocationWagontown,PA
Posted 02 November 2018 - 09:43 PM
Thanks. Yes, the outer roof I have some good ideas since I did some serious repairs on my travel trailer not long ago. Leveling dicor on each screw is a good idea, I have a few tubes here at the house. On the interior ceiling, instead of wood veneer, maybe the thin PVC sheets like sold at the depot? I dont think it needs to be fabric since moisture will travel through fabric and get into the insulation. I will look closer today at the ceiling fabric and the corners. I am thinking I can leave the side canvas and all attachments alone and simply slice the ceiling fabric liner away. Make sense possibly? Thanks again
I assume you have the original lift panels. So you may have to piece some aluminum angle in the front and back to attach ceiling material, as the lift panel hinges will probably prevent you from attaching on the roof frame.
#27
shellback
-
- Members
- 336 posts
Senior Member
- LocationWagontown,PA
Posted 02 November 2018 - 09:52 PM
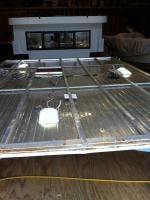
Here's a picture of my roof on saw horses just to give you an idea of the frame work. You can see the screw holes for the lift panel hinges on the front frame member. Also in the picture you will see some white aluminum angle I used to mount the ceiling lights. You could put a few of those front and back to fasten your ceiling panels.
Attached Thumbnails
#28
Vic Harder
-

- Site Team
- 4,948 posts
Doctor Electric
- LocationCalgary, Alberta
Posted 02 November 2018 - 10:37 PM
Curious about your thoughts on center of gravity with a 8' Grandby on a flatbed that used to be a standard pickup truck with a 6' bed. You will have 2' more out back than it was designed for.
I like the idea of a shorter wheelbase, but then the deck/camper will be hanging way out back and may get caught on ditches and such with steep approach/departure angles.
Just thinking about my next truck/camper...
2015 Silverado 3500 crew cab 8' bed Diesel
2012 ATC Puma Shell build - https://www.wanderth...012-puma-build/
Power considerations thread - https://www.wanderth...e-power-scotty/
Building out an electrical system - So, you want to setup a good electrical system in your camper? - Electrical, Charging, Solar, Batteries and Generators - Wander the West
#29
Ourayphotography
-
- Members
- 146 posts
Senior Member
- LocationColorado
Posted 03 November 2018 - 01:02 AM
Hey Vic, my truck is a 6.5 bed, so will be 1.5' extra hang over. It will affect the departure for sure, but I think manageable. I decided it was worth the sacrifice as I need to sleep 3 people. Before I bought this, I was originally gonna build a custom camping pod that was going to be 8' long on the top, but angle cut on the bottom for departure angle. I have already cut the lower rear of my truck off for departure, so just the 4' section of the camper will be low but still better than stock.
#30
Ourayphotography
-
- Members
- 146 posts
Senior Member
- LocationColorado
Posted 03 November 2018 - 01:17 AM
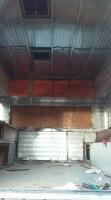
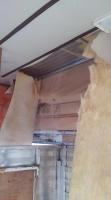
Ok, a pretty good day.
We are pretty much gutted. Answer to my own question, yes, it looks very doable to replace the ceiling with the top attached and will not affect the canvas sides. Will take some planning with the support risers/lifters front and rear, but doable. I will prolly design a new lift system. Pretty happy about that. I dont think I will use a fabric ceiling, but some sort of thin light rigid material.The ceiling might require some breathing, so I would need to add a few filtered ceiling vents.
I may have found someone locally to do aluminum tig welding for me, so my plan to eliminate all of the wood base and tub might be attainable. With all the construction exposed, some things impress me, some not so much. Having only a single weld on each square tube is very weak and will fail over time. I will add welds to as much as possible to beef things up.
Had a crazy coincidence that this set of stairs popped up on market place, $30!! Bam!
Thanks all
Attached Thumbnails

Edited by Ourayphotography, 03 November 2018 - 01:52 AM.


Also tagged with one or more of these keywords: FWCFour wheel camper, flatbed, grandby, 2005 toyota, 2005 tundra, 2005 tundra trd


0 user(s) are reading this topic
0 members, 0 guests, 0 anonymous users

