Jump to content


Photo
* * * * * 1 votes

1980 Granby Rebuild for 2nd Gen Tacoma


  • Please log in to reply
80 replies to this topic

#21 a8ksh4

a8ksh4

    Senior Member

  • Members
  • 109 posts
  • LocationSacramento, CA

Posted 22 April 2019 - 05:07 AM

The window panels are basically complete as originally designed. I'm going to add removable storm flaps, similarly to what I've read atc uses, and also glue a patch over the bottom exterior corner of each window opening, as that's the one easy spot for water to wick in. Also I'll probably use a bit of vinyl cement to seal all of the stitching...

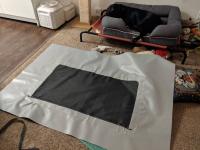
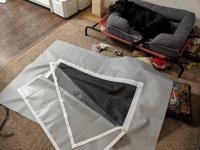
Once the storm flaps are done, I can glue and stitch the panels together one at a time so that I never have more than one panel rolled up and moving through the sewing machine at a time.

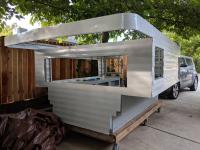
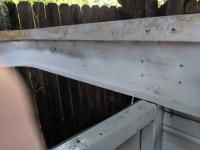
I'm thinking about calling atc this week to see if they can sell me a new sheet of aluminum for my roof vs trying to patch up the old one, which has a number of cracks. TBD.

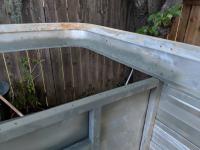
I'm starting to read more on glue types. I have a few spots in the siding and roof aluminum that I want to patch and I figure the best way would be to glue some scrap aluminum into the back.

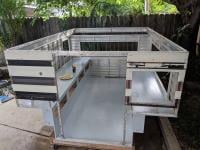
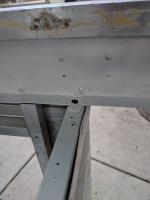
Also I need to reinforce a couple spots on the frame around the door that have cracked. I think I can glue and rivet some flat bar aluminum across the cracked sections to add enough strength.

And I need to order headliner and lights and a fan so that I can actually assemble the top of this thing! I feel like now that the vinyl siding is worked out, I can more safely spend (just) a little money on this. IMG_20190421_121842.jpeg IMG_20190421_121933.jpeg

Edited by a8ksh4, 22 April 2019 - 05:12 AM.

  • 0

#22 a8ksh4

a8ksh4

    Senior Member

  • Members
  • 109 posts
  • LocationSacramento, CA

Posted 28 April 2019 - 01:47 AM

More progress! All four windows are done with removable storm flaps on the outside, inspired by how atc does them.

I have to order another bucket of hh-66 glue to put all of the panels together.

I'm hoping to start cutting on the camper frame tomorrow and attach new plywood. The plan is to glue and use pocket screws for the plywood.

In the photo, an exclusive view into my sewing sweatshop and forced labor kitteh. download_20190427_183935.jpeg
  • 0

#23 a8ksh4

a8ksh4

    Senior Member

  • Members
  • 109 posts
  • LocationSacramento, CA

Posted 29 April 2019 - 05:13 AM

A bit of structural stuff today. I flipped over the Shell of the old camper and built a new tub for it. I trimmed the aluminum frame to fit the bed of the taco.

I picked up a tool to do the pocket screws thing to hold it all together with wood glue. I really really like using pocket screws now. This feelt like a really simple build.
IMG_20190428_150352.jpeg

I haven't screwed the wood to the aluminum yet.... I'm kind of debating whether or not I should use some gorilla glue or just screw and be done.
IMG_20190428_152323.jpeg

Regarding squaring everything up... I cut the wood to be square and just sort of shift the aluminum frame around to line up with the wood. Hope this works!
IMG_20190428_162522.jpeg

The whole thing will get a heavy coat of primer and paint this next week. And the ribbing will be boxed in with holes cut on the interior to make storage boxes down the length of each side of the camper.
IMG_20190428_175329-01.jpeg

I think I mentioned that there were some cracks in the aluminum frame around the door. I'm planning to bond (3m 5200 and screws or rivets??) some reinforcing aluminum to the frame in those spots, and also to use a bit of plywood to help support and keep the whole door wall square.


Edited by a8ksh4, 29 April 2019 - 09:11 PM.

  • 0

#24 WyoIDI

WyoIDI

    Senior Member

  • Members
  • 101 posts
  • LocationCody, WY

Posted 30 April 2019 - 04:04 PM

Wow cruising right along and looking good!  Random question but how much do you think the bare frame of the camper weighs?  I've seen in past builds on this site folks using L brackets and screws for frame repairs.  I'm not sure how steel brackets would play with the aluminum (corrosion issues?) but maybe epoxy in there might help, I don't actually fully understand the potential issue honestly. Can't wait to see the final product.


  • 0

92' Grandby, 93' f350 7.3L CCLB


#25 a8ksh4

a8ksh4

    Senior Member

  • Members
  • 109 posts
  • LocationSacramento, CA

Posted 30 April 2019 - 08:07 PM

I haven't handled just the frame yet... my wife and I flipped it over the other day with the 4' x 8' x 5/8" plywood still attached to the bottom, and that felt like maybe 200 lbs.  If I pull the new plywood off before gluing/screwing it to the frame, I'll weigh the frame.  


When the heater was installed on this camper previously, someone had put a couple L brackets in to hold the tubing around the heater exhaust port.  I didn't see any aluminum corrosion there and the bracket just had surface rust, presumably because it was in the wall and had stayed dry.  There is a ton of corrosion at the front of the camper by the bed platform from water intrusion and interaction between the aluminum and the steel screws in the hinge for inside part of the bed platform.  So I guess as long as they stay dry, they're great!  


I can't wait to get this thing onto the truck for a test fit... next week some time. :D


  • 0

#26 a8ksh4

a8ksh4

    Senior Member

  • Members
  • 109 posts
  • LocationSacramento, CA

Posted 16 May 2019 - 06:46 PM

It's raining all week here, so work is at a standstill for now. The tub is pretty much done and attached to the frame. It'll still get some bits at the ends to attach the interior panels to and improve strength, especially around the front door to keep it from twisting or flexing. IMG_20190514_180956.jpeg IMG_20190514_180726.jpeg IMG_20190514_180747.jpeg
  • 0

#27 a8ksh4

a8ksh4

    Senior Member

  • Members
  • 109 posts
  • LocationSacramento, CA

Posted 23 May 2019 - 07:00 PM

I flipped over the camper yesterday and finally am able to start figuring out how to do the inside. The camper is long for my truck; it sticks out 6" past the end of the tailgate, so I'm trying to keep weight forward as much as possible.

The cab overhang is 24", but in thinking I'll make the fixed part of the bed 34" and put 10 of shelving/storage at the very front of the camper. And a 24" extension for the bed will slide out or maybe fold up/down like it did originally from the factory, but I don't want to block any storage, do probably slide-out.

The platforms along the sides are 19", great sitting space. Well do the same across the front for wrap around seating and have some kind of take to go in there middle and fold down out of the way. This will give a bit more storage under the front bench.

Other priority right now is trying to clean up the old siding so I'll get good adhesion for new paint!IMG_20190522_185244.jpeg IMG_20190523_110206.jpeg
  • 0

#28 BBZ

BBZ

    Senior Member

  • Members
  • 666 posts
  • LocationGolden, CO

Posted 23 May 2019 - 08:25 PM

Looking Good.. 

I spent a lot of time sitting in mine when it was like that trying to figure out the layout I wanted. 


I am pretty confident we nailed it, very happy with our layout. Like you I put as much weight in the front as I have an 8 foot camper on a 6.5 bed.  I also did the slide out bed, works great. Not sure what your lifter plans are? but, I really like the conduit lifters, especially for the back because you can put a window in...


Have fun. 


my build thread if you are curious.. 


http://www.wanderthe...ect-90s-granby/


Edited by BBZ, 23 May 2019 - 08:29 PM.

  • 0

2023 F-150 Scab HDPP + 2013 Grandby Shell +


https://www.wanderth...ect-90s-granby/


#29 a8ksh4

a8ksh4

    Senior Member

  • Members
  • 109 posts
  • LocationSacramento, CA

Posted 01 June 2019 - 06:12 AM

Slow and steady. I made a goal to paint the siding this week, so spent a couple evenings:
* Cleaning rest of the old butyl tape residue off with mineral spirits. The mineral spirits made supper easy work if this once the bulk was removed by scraping.
* Removing silicon crap from around where the old bed platform was. I soaked with gasket remover spray, scraped it off, and wiped the residue of with acetone.
* Brazed (poorly) up some of the patchy aluminum that supports the bed platform.
* Rough sanded any of the black paint the previous owner put it and anywhere there was corrosion.
* Wiped the whole thing down with wax and grease remover.
* Sprayed zinc primer on exposed metal and corroded spots.
* Scratched everything up with sanding pads
* Finally sprayed with Rust-Oleum white enamle paint.

Remarkably, I've had the thing in my driveway for months and I'm still occasionally finding effing staples sticking out randomly. I do believe I've finally pulled the last one that isn't actually holding something on now.


IMG_20190531_184430.jpeg MVIMG_20190531_184407.jpeg MVIMG_20190530_193643.jpeg IMG_20190531_184518.jpeg IMG_20190531_184445.jpeg

Edited by a8ksh4, 01 June 2019 - 06:17 AM.

  • 0

#30 CougarCouple

CougarCouple

    Senior Member

  • Members
  • 1,376 posts
  • LocationLas Vegas

Posted 01 June 2019 - 03:05 PM

Morning a8ksh4
Herd a saying long time ago " safe is slow, slow is smooth, smooth is fast " when I read your recap on painting the camper that came to mind. Winner makes the least mistakes, sometimes speed has nothing to do with it. Looking good!
Mr. Slow n Steady.

Russ
  • 0
F250 extended cab, Cougar from ATC. You guys rock thank you!


0 user(s) are reading this topic

0 members, 0 guests, 0 anonymous users