Nice lighting upgrade. I'm not sure what the bugs are like where you camp, but I find amber lights attract them less.


2001 Eagle 4 Wheel Camper- Refresh
Started by
jlhois
, Apr 12 2019 05:28 PM
34 replies to this topic
#21

Vic Harder
-

- Site Team
- 4,962 posts
Doctor Electric
- LocationCalgary, Alberta
Posted 02 May 2019 - 06:40 PM
2015 Silverado 3500 crew cab 8' bed Diesel
2012 ATC Puma Shell build - https://www.wanderth...012-puma-build/
Power considerations thread - https://www.wanderth...e-power-scotty/
Building out an electrical system - So, you want to setup a good electrical system in your camper? - Electrical, Charging, Solar, Batteries and Generators - Wander the West
#22
jlhois
-
- Members
-

- 28 posts
Member
Posted 02 May 2019 - 07:32 PM
Nice lighting upgrade. I'm not sure what the bugs are like where you camp, but I find amber lights attract them less.
Good call. Bugs vary on spots and time of year for us, but always want to minimize. The lights came with amber covers too. Wasn’t sure what to do with them, but will find to find a way to stash them somewhere to see if that helps.
#23
jlhois
-
- Members
-
- 28 posts
Member
Posted 11 May 2019 - 04:38 PM
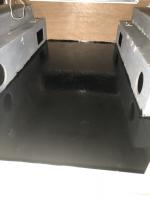
Floor all sanded and sealed. Condensation over time had cause all of the staples used to hold down the flooring to rust. Floor was in good shape. No water damage, just some wear.
#24
jlhois
-
- Members
-
- 28 posts
Member
Posted 17 May 2019 - 04:11 AM
Floor down. 
Traffic master peel and stick.
Adhered well to the seal I put down.
Traffic master peel and stick.
Adhered well to the seal I put down.
#25
jlhois
-
- Members
-
- 28 posts
Member
Posted 27 May 2019 - 03:29 AM
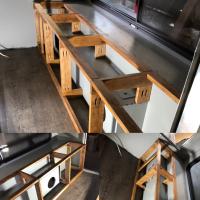
Putting in the lower bench/bed.
Eliminating the back rest. Looking to add some depth to bench without losing anything in the center. The new box for the heater is going to require more inches on the other side. Wanted to still have same or equal space in the center.
Eliminating the back rest. Looking to add some depth to bench without losing anything in the center. The new box for the heater is going to require more inches on the other side. Wanted to still have same or equal space in the center.
#26
Wildcat
-

- Members
-
- 97 posts
Advanced Member
- LocationCalifornia
Posted 27 May 2019 - 08:10 AM
Nice framework for the new bench. What storage plans do you have for the framed-in places under the bench? I generally try to keep the floor space as flexible as possible, partly because there isn't much room in the Eagle to begin with. I removed the old frame from under my bench and instead have a few legs to hold the bench up. That way I can easily slide a few plastic containers under the bench and a porta-potti near the rear door. Sometimes I push the bench up 90 degrees so that I can put bicycles in the center. The legs on the bench need to fold flat, otherwise they would be in the way when the bench is raised.
2001 FWC Eagle on 1998 Taco 4x4
#27
jlhois
-
- Members
-
- 28 posts
Member
Posted 27 May 2019 - 01:03 PM
Nice framework for the new bench. What storage plans do you have for the framed-in places under the bench? I generally try to keep the floor space as flexible as possible, partly because there isn't much room in the Eagle to begin with. I removed the old frame from under my bench and instead have a few legs to hold the bench up. That way I can easily slide a few plastic containers under the bench and a porta-potti near the rear door. Sometimes I push the bench up 90 degrees so that I can put bicycles in the center. The legs on the bench need to fold flat, otherwise they would be in the way when the bench is raised.
Will end up enclosing the entire frame. Going to add a folding “sleeve” with legs to extend the bed out another 8-10”. Had to sacrifice the storage to make sure I had a stable bed platform. For storage I have used bins that i keep in center isle of camper when on road and then move to cab of truck with camping. Not turn key, but need the bed. Tried to convince my wife the kids can sleep in a tent outside, but you can see who won that battle.
#28
jlhois
-
- Members
-
- 28 posts
Member
Posted 28 May 2019 - 04:49 PM
Well..,Making progress.
The propex HS 2800 heater is installed. Need to get some tools to get the gas line finished up so I can test.
Couple thoughts. Should have went with the smaller unit HS2000. Had to use a lot if space to accommodate the venting.
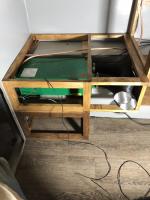
The goal of this was to build two boxes. One that contains the exhaust and intake. The second is platform the heater.
The top will serve as bench for cooler/stove/bins.
The propex HS 2800 heater is installed. Need to get some tools to get the gas line finished up so I can test.
Couple thoughts. Should have went with the smaller unit HS2000. Had to use a lot if space to accommodate the venting.
The goal of this was to build two boxes. One that contains the exhaust and intake. The second is platform the heater.
The top will serve as bench for cooler/stove/bins.
#29
jlhois
-
- Members
-
- 28 posts
Member
Posted 28 May 2019 - 05:13 PM
Here is a picture of the lower box.
Carl at Westy Ventures provided me with the heat insulation for exhaust pipe. Uses hogh temp silicone in an attempt to seal everything up.
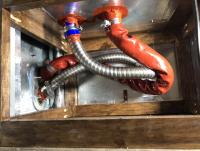
Carl at Westy Ventures provided me with the heat insulation for exhaust pipe. Uses hogh temp silicone in an attempt to seal everything up.
#30
jlhois
-
- Members
-
- 28 posts
Member
Posted 30 June 2019 - 05:19 AM
Been an adventure getting this thing finalized....Got it on life support for our family vacation to SOCAL...here she is at Point Mugu State Park


0 user(s) are reading this topic
0 members, 0 guests, 0 anonymous users

