Jump to content


Photo
* * * * * 1 votes

Gutted Fleet - Rebuilding


  • Please log in to reply
63 replies to this topic

#1 scheefdog

scheefdog

    Advanced Member

  • Members
  • PipPipPip
  • 50 posts

Posted 06 March 2011 - 03:56 AM

I recently became an owner of an 87 Fleet for my Tundra and decided to jump right in to some modifications...and ended up gutting the inside. There is a before picture below. Stripping all the old particle board and plywood out was very satisfying and revealing the frame and problem areas is worth it in my mind. I think I'm going to go as far as replacing the floor pack because now seems like the time. Plus, I can add a little more storage and make it custom for my Tundra. The plywood is is decent shape, but the drivers side of the floor pack is a little worked from some previous owners modifications that sacrificed the frame structure. The bottom cord of the aluminum frame was cut for the propane box and a battery? hatch leaving the 3/4 plywood doing most of the support work on that side of the camper when on the jack. See the picture below.

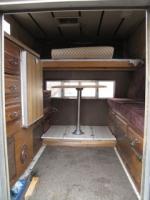
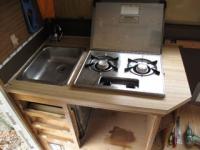
I'm working on modeling up the camper and interior on the computer to figure out exactly what I want. I'm going to do a dinette in the front of the camper. There are some pictures on the forum I found posted by Stan of an Eagle with a green interior that I really like the design of. I am going to reuse the stove and ice-box. What are peoples thoughts on the original Atwood furnaces? I'm not sure if mine works and like the idea of a simple Wave 3 heater. I don't really care about running heat while sleeping, but it would be nice in the evenings and in the morning.

I'm clueless when it comes to wiring the camper. I don't have the money to do anything fancy right now but would like to wire for the future. I would like to have a plug on the outside of the camper for an extension cord. Solar sounds appealing. What type of panels/converters etc. are needed? Can someone point me in the right direction for some "basic camper wiring"?

I have been searching and finding all sorts of good info on the forum. I'm open to all advice as this is my first camper.

Attached Thumbnails

  • IMG_1874.jpg
  • IMG_1879.jpg
  • IMG_1882.jpg
  • IMG_1885.jpg
  • IMG_1860.jpg
  • IMG_1861.jpg

  • 0

#2 Mark W. Ingalls

Mark W. Ingalls

    Senior Member

  • Members
  • 1,248 posts
  • LocationHouston, TX

Posted 06 March 2011 - 02:41 PM

Start with this thread: b team eagle camper wire job
  • 0

#3 trasko

trasko

    Advanced Member

  • Members
  • PipPipPip
  • 54 posts
  • LocationSouth Carolina

Posted 07 March 2011 - 04:36 AM

Looking good! My '7X Grandby is looking very much like that, except my lift panels are rotting away and I've stripped the roof liner out to the Al frame just like your walls. It's so simple and elegant when you get right down to the core of it.

I should start one of these threads.

BTW, I decided to pull the furnace and go w/ a Wave 3. Seems better in most ways: quieter, uses no battery and smaller/lighter. It does have the disadvantages of needing to manually vent it and not having a temp. control. This was one of the easier decisions, though.
  • 0

#4 scheefdog

scheefdog

    Advanced Member

  • Members
  • PipPipPip
  • 50 posts

Posted 13 March 2011 - 03:51 AM

I wanted to update as I have done a lot of work on the camper the past few days. I want to get it done so I can take it out to the desert in a couple of weeks.

I decided to strip off the siding and replace the floor pack. I wanted to replace the floor pack because it had a few extra hatches and holes in it. I also wanted to simplify the design by getting rid of the extra step and customizing the width of the floor to match my Tundra. I used sheets of 3/4" CDX and made the width 4' to fit between the wheel wells in my truck. I attached 2x4s to the aluminum frame and used my jacks to support the camper while I removed the old floor and installed the new. I didn't think there was any rot in the old floor pack and was surprised when I started pulling it off and found it pretty wet and rotting in all four corners. This made me really glad I was taking the extra step to replace it. I had to cut a little bit of the old frame where it stepped to fit my new floor pack but well worth it as I will have more storage in the camper.

I searched all over for different options for siding and in ended up choosing to buy 18 gauge aluminum sheets from a local source. I thought about smooth fiberglass which would have cost a little more but I couldn't find a source within a few hour drive and shipping was really expensive. I'm happy with my choice as it was cheaper and I think it will be really durable and add some lateral strength to the camper. It is raw aluminum and I'm putting a brushed finish on it to dull the shine. I installed the first piece this evening and will put the rest on tomorrow.

The walls and roof are going to get rigid foam insulation. I will run all my wiring for lights at the same time. I'm thinking of ordering some of these LED dome lights and maybe a strip for above the kitchen. Anyone have these?
http://www.superbrig...e2Disp=/fit.htm

I'm still deciding what to use for the new wall panels, white walls instead of wood is appealing to me. Some sort of plastic or composite would be better than thin plywood I think. Any suggestions?

Attached Thumbnails

  • IMG_1902.jpg
  • IMG_1905.jpg
  • IMG_1908.jpg
  • IMG_1917.jpg
  • IMG_1922.jpg
  • IMG_1924.jpg

  • 0

#5 Mark W. Ingalls

Mark W. Ingalls

    Senior Member

  • Members
  • 1,248 posts
  • LocationHouston, TX

Posted 13 March 2011 - 02:55 PM

Wow.

Awesome.
  • 0

#6 scheefdog

scheefdog

    Advanced Member

  • Members
  • PipPipPip
  • 50 posts

Posted 17 March 2011 - 03:00 AM

More progress...Siding

Finished up the installing the new siding. I let the siding hang 1/8" proud of the floor pack on the bottom to allow for the water to drip off. I think this will work better in the long run then running a bottom trim piece and then have to caulk it. I used aluminum 1x1 angle for the corner trim pieces to match the sheets. The siding is stout and stiffened up the camper a lot. It also reflects a lot of heat and should be nice against the desert sun.

I reinstalled the windows and door after a good cleaning. I decided to just reuse the original windows as they are in good shape. I did take the trim off the door and found some rotten wood along the bottoms and sides. I did a quick fix on the door for now as I will probably take the time to totally rebuild it later. I didn't reinstall the large window on the side of the camper. I didn't particularly like how big the window was with the couch on that side, seemed kind of useless. I might decide I want it later, but I'm going to see if I like without first.

On to the roof.

Attached Thumbnails

  • IMG_1930.jpg
  • IMG_1934.jpg
  • IMG_1935.jpg
  • IMG_1936.jpg
  • IMG_1937.jpg

  • 0

#7 scheefdog

scheefdog

    Advanced Member

  • Members
  • PipPipPip
  • 50 posts

Posted 17 March 2011 - 03:22 AM

The roof....

I cut out the headliner and removed all of the old fiberglass insulation in the roof. This gave me a better look at the condition of the aluminum roof. I was hoping I might be able to stuff rigid insulation to help straighten the sag but that seemed like a band aid solution. After 25 years and at least one large hailstorm I decided it needed replacing as well.

I pulled the outer trim ring off and detached the popup canvas to get the roof free. I moved it onto the garage floor so it could lay flat to work on it. I had to cut off the huge globs of silicon applied by a previous owner to get to the screws. Adding more and more silicon isn't the solution, my roof had at least a couple full tubes and it was still leaking. I pulled the roof off in one piece and gave it to the neighbor who might use it on his chicken coop(vents and all)! Now that is recycling.

Taking the roof down to the frame also gave me a chance to straighten one side that was a little bent. I was able to clamp a straight 2x4 onto the side of the frame and over correct the bend to get it straight again(or close enough). I bought some .040" aluminum sheet for the new roofing(twice as thick as the original). I am going to have to do it in two pieces like the original but I'm hoping to not use screws to attach it.

I ordered some new headliner material that I think is very similar to the original(perforated vinyl).
http://www.defender....309382&id=23866

I also ordered the gas struts and brackets to do the lift assist for my roof. Actually my hope is to maybe eliminate the lift panels...

That is all for now, I'm looking forward to finish the exterior of the camper so I can work on the interior.

Attached Thumbnails

  • IMG_1938.jpg
  • IMG_1943.jpg
  • IMG_1946.jpg
  • IMG_1949.jpg

  • 0

#8 Barko1

Barko1

    Senior Member

  • Members
  • 1,635 posts
  • LocationSouthern Appalachians

Posted 17 March 2011 - 02:12 PM

I also ordered the gas struts and brackets to do the lift assist for my roof. Actually my hope is to maybe eliminate the lift panels...

That is all for now, I'm looking forward to finish the exterior of the camper so I can work on the interior.


Great job!! Be interesting to see if you can eliminate the lift panels.
  • 0
Granby on an F250 in S. NM

#9 Mark W. Ingalls

Mark W. Ingalls

    Senior Member

  • Members
  • 1,248 posts
  • LocationHouston, TX

Posted 17 March 2011 - 02:20 PM

"2X thick" => "2X heavy"

Just sayin'
  • 0

#10 trasko

trasko

    Advanced Member

  • Members
  • PipPipPip
  • 54 posts
  • LocationSouth Carolina

Posted 19 March 2011 - 07:32 AM

Ambitious! My rebuild is standing still next to this! I'm excited to see where the roof repair goes. Mine looks less beat up but is probably pretty much the same. I'm hoping to repair it, though.
  • 0


0 user(s) are reading this topic

0 members, 0 guests, 0 anonymous users