scheefdog
how are you attaching the skins to the framing? looked like rivets? Are you applying any sealer between the aluminun frame and the skins? Keep up the good work ,and reports as you go, I have thoughts of doing similar reskin to my keystone camper one of these days,to give it a more modern look.

 1 votes
Gutted Fleet - Rebuilding
Started by
scheefdog
, Mar 06 2011 03:56 AM
63 replies to this topic
#11

BenG
-

- Members
- 148 posts
Senior Member
- Locationwa state
Posted 20 March 2011 - 07:26 PM
Ben
96 f350 4x4
86 keystone
#12
bobg333
-

- Members
- 123 posts
Senior Member
Posted 21 March 2011 - 03:12 AM
In regard to alternative interior paneling, I suggest you take a look at FRP (fiberglass reinforced paneling). It takes a lot of abuse and is easy to clean. Marlite is one name brand.
Former Grandby owner
#13
scheefdog
-
- Members
-

- 50 posts
Advanced Member
Posted 25 April 2011 - 10:50 PM
I have been meaning to update for a month...so here it goes.
Ben-I have been attaching the panels using small sheetmetal screws that are pretty low profile.
New Roof-
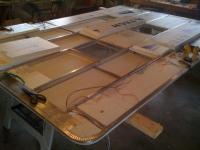
With the frame all cleaned up and straightened I decided to install the headliner first. This would allow me to wrap it up around the roof edge and then run tape all the way around to secure it. The new material I got from defender looks identical to the stuff I pulled off so I was happy with the purchase. I cleaned the roof frame really well and smoothed all the screw holes before installing the headliner. Then used 3m spray adhesive to bond the liner to the frame. I did the headliner in two pieces just like the original with the seam down the middle. I ran tape around the edge of the frame to really hold the headliner in place while installing the insulation and roofing. I used 1" wide strips of aluminum(cutoffs from the roofing metal) secured with screws as battens over the framing in place of the old foam/fake wood composite trim that was stapled.
Once the headliner was in place I flipped the roof over and insulated the roof using rigid insulation. I ran wiring for the fans and lights at the same time. I had to drill holes for wiring to run through the frame in a few places and used an old air compressor hose scrap cut into short pieces as sleeves to protect the wire from the sharp metal. I also created brackets out of aluminum scrap for the dome light fixtures to mount to. I’m planing on 4 lights, 2 at each end of the bed for reading, 1 over the kitchen, and 1 over the couch.
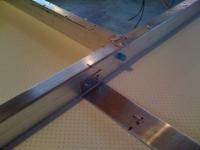
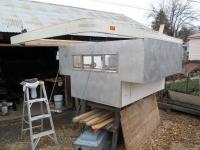
For the new roofing I bought two 4x10 sheets of .040" aluminum. I had a local sheet metal shop cut and bend the sheets to my specs, the new metal is way more stout. Yes, it does weight twice as much, but it is only the difference of 20 lbs. I had the metal shop bend a flat seam for the center of the roof which overlaps 3/4" to prevent any water working its way through.
I did the same brushed finish on the roofing metal as the siding using an orbital sander and scotchbrite pad. Originally I was going to use 3M VCB tape to fasten the roof to the frame(like they do on the new campers). However, I abandoned that idea once I did a test fit of the metal on the roof. The frame needed a little persuasion to match the new roofing metal(square and straight). I had to fasten one side first so I could work the frame as I went. I fastened the new roof using rubber washers on the screws(just like a metal roof on a house). After seeing the silicon mess a previous owner created on the camper I wanted to try an alternative. I will see if it leaks over time and I can always add silicon.
I installed two new vents(Heng) with powered fans that I purchased for cheap off ebay. They have translucent covers which should let in some nice light(the original vents had metal covers).
Ben-I have been attaching the panels using small sheetmetal screws that are pretty low profile.
New Roof-
With the frame all cleaned up and straightened I decided to install the headliner first. This would allow me to wrap it up around the roof edge and then run tape all the way around to secure it. The new material I got from defender looks identical to the stuff I pulled off so I was happy with the purchase. I cleaned the roof frame really well and smoothed all the screw holes before installing the headliner. Then used 3m spray adhesive to bond the liner to the frame. I did the headliner in two pieces just like the original with the seam down the middle. I ran tape around the edge of the frame to really hold the headliner in place while installing the insulation and roofing. I used 1" wide strips of aluminum(cutoffs from the roofing metal) secured with screws as battens over the framing in place of the old foam/fake wood composite trim that was stapled.
Once the headliner was in place I flipped the roof over and insulated the roof using rigid insulation. I ran wiring for the fans and lights at the same time. I had to drill holes for wiring to run through the frame in a few places and used an old air compressor hose scrap cut into short pieces as sleeves to protect the wire from the sharp metal. I also created brackets out of aluminum scrap for the dome light fixtures to mount to. I’m planing on 4 lights, 2 at each end of the bed for reading, 1 over the kitchen, and 1 over the couch.
For the new roofing I bought two 4x10 sheets of .040" aluminum. I had a local sheet metal shop cut and bend the sheets to my specs, the new metal is way more stout. Yes, it does weight twice as much, but it is only the difference of 20 lbs. I had the metal shop bend a flat seam for the center of the roof which overlaps 3/4" to prevent any water working its way through.
I did the same brushed finish on the roofing metal as the siding using an orbital sander and scotchbrite pad. Originally I was going to use 3M VCB tape to fasten the roof to the frame(like they do on the new campers). However, I abandoned that idea once I did a test fit of the metal on the roof. The frame needed a little persuasion to match the new roofing metal(square and straight). I had to fasten one side first so I could work the frame as I went. I fastened the new roof using rubber washers on the screws(just like a metal roof on a house). After seeing the silicon mess a previous owner created on the camper I wanted to try an alternative. I will see if it leaks over time and I can always add silicon.
I installed two new vents(Heng) with powered fans that I purchased for cheap off ebay. They have translucent covers which should let in some nice light(the original vents had metal covers).
Attached Thumbnails
#14
scheefdog
-
- Members
-
- 50 posts
Advanced Member
Posted 25 April 2011 - 10:52 PM
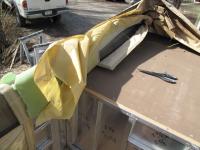
Cleaning the old Pop Up Canvas
I read somewhere on here that the old pop up canvas like mine had two layers with insulation in the middle. I got out the scissors for further investigation and an hour later I had cut all of the interior liner and insulation out of the canvas. If you do this you have to be careful not to cut the vinyl exterior liner. The interior liner was gross because the insulation acts like a giant sponge to help spawn mold growth on the lightweight nylon interior liner. I purchased some Camco Awning cleaning to clean the aged canvas. After another hour of scrubbing with a sponge the canvas was looking rejuvenated with life.
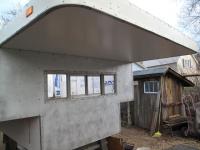
Re-Installing the roof
With the roof complete and the canvas all clean I was excited to put the new roof on. I set the roof back on the camper and elevated it a few inches so the canvas could be pulled up and wrapped around the edge of the roof(like it was originally). The first side was easy, I started at one end of the metal trim strip and worked the canvas as I put a screw in every foot. Of course it was the last 6 inches that proved to be the most difficult. The canvas doesn’t have any give to it and by the time you get all the way around the roof there is no slack left to pull it up on the final corner. After trying for a good half hour to stretch it over the final corner I decided to unfasten one side to see if I could pull more of the vinyl to get enough slack. It didn’t work, instead when I pulled hard in a section toward the middle I heard a RIP.....
Darn, so close to having the camper back together(or the outside) and I tore the canvas. The tear started from a screw hole towards the front of one side. The canvas was pretty brittle along the top edge from years of dirt and rain. I was done for the weekend and had to decide to try to patch it or spend the money for a new canvas.
I decided patching would be too much of a temporary fix for my liking. I called up ATC to find out about getting a new liner and it was more reasonable than I expected, so I went ahead and ordered. I also received some information from Marty about installing the new canvas. On the newer campers they install the canvas inside the lip of the roof so even if water works its way behind the trim piece it will run down the inside of the canvas. I plan on installing my new canvas this way.
I read somewhere on here that the old pop up canvas like mine had two layers with insulation in the middle. I got out the scissors for further investigation and an hour later I had cut all of the interior liner and insulation out of the canvas. If you do this you have to be careful not to cut the vinyl exterior liner. The interior liner was gross because the insulation acts like a giant sponge to help spawn mold growth on the lightweight nylon interior liner. I purchased some Camco Awning cleaning to clean the aged canvas. After another hour of scrubbing with a sponge the canvas was looking rejuvenated with life.
Re-Installing the roof
With the roof complete and the canvas all clean I was excited to put the new roof on. I set the roof back on the camper and elevated it a few inches so the canvas could be pulled up and wrapped around the edge of the roof(like it was originally). The first side was easy, I started at one end of the metal trim strip and worked the canvas as I put a screw in every foot. Of course it was the last 6 inches that proved to be the most difficult. The canvas doesn’t have any give to it and by the time you get all the way around the roof there is no slack left to pull it up on the final corner. After trying for a good half hour to stretch it over the final corner I decided to unfasten one side to see if I could pull more of the vinyl to get enough slack. It didn’t work, instead when I pulled hard in a section toward the middle I heard a RIP.....
Darn, so close to having the camper back together(or the outside) and I tore the canvas. The tear started from a screw hole towards the front of one side. The canvas was pretty brittle along the top edge from years of dirt and rain. I was done for the weekend and had to decide to try to patch it or spend the money for a new canvas.
I decided patching would be too much of a temporary fix for my liking. I called up ATC to find out about getting a new liner and it was more reasonable than I expected, so I went ahead and ordered. I also received some information from Marty about installing the new canvas. On the newer campers they install the canvas inside the lip of the roof so even if water works its way behind the trim piece it will run down the inside of the canvas. I plan on installing my new canvas this way.
Attached Thumbnails
#15
scheefdog
-
- Members
-
- 50 posts
Advanced Member
Posted 25 April 2011 - 10:56 PM
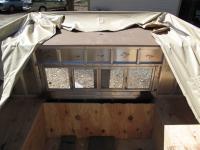
More deconstruction
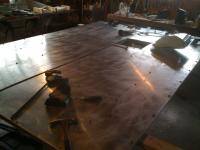
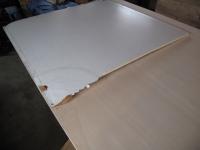
I removed the trim strips from the bottom of the canvas as well as the trim around the bed board. I cleaned underneath the trip strips really well and smoothed any sharp screw holes in the siding so they don’t damage my new canvas. The bed board had some serious sag in the middle as well as some water damage in the front so why not replace it too.
Replacing the bedboard was sort of a pain. The old bed board has a lot of screws holding it in(bottom and sides) as well as a fair amount of staples that hold the siding on. There are also the two strips of wood above the bedboard that are tight inside the aluminum C channel and have screws and staples into them as well. I ended up cutting the bedboard in half with a circular saw to make it easier to remove. I chose some nice 3/4” sanded plywood as the replacement. It is way lighter than any sort of mdf and because of the added plys it is stiffer than typical CDX plywood. I used the Ace equivalent of Rustoleum to paint the underside of the new bed board white.
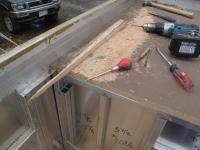
I decided to leave the new bedboard full width, 48”, and let it overhang the front wall of the camper by 5”(the old bed board was 42”). Then I don’t have to do any sort of sliding extension to make the bed larger and I can add some storage underneath the overhang if I want. I added a strip of plywood inside the C channel of the aluminum frame across the front and sides(like before) of the bedboard to add strength.
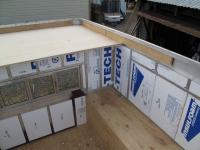
I also cut and fitted rigid insulation inside the walls of the camper. Next up, wiring and wall panels.
I guess I’m going to end up with a new camper after all....The only part of the part of the camper that I have not taken apart is the upper band of original siding that still wraps all the way around the camper. Hopefully my exploration will help others out if they are thinking of doing something similar.
I removed the trim strips from the bottom of the canvas as well as the trim around the bed board. I cleaned underneath the trip strips really well and smoothed any sharp screw holes in the siding so they don’t damage my new canvas. The bed board had some serious sag in the middle as well as some water damage in the front so why not replace it too.
Replacing the bedboard was sort of a pain. The old bed board has a lot of screws holding it in(bottom and sides) as well as a fair amount of staples that hold the siding on. There are also the two strips of wood above the bedboard that are tight inside the aluminum C channel and have screws and staples into them as well. I ended up cutting the bedboard in half with a circular saw to make it easier to remove. I chose some nice 3/4” sanded plywood as the replacement. It is way lighter than any sort of mdf and because of the added plys it is stiffer than typical CDX plywood. I used the Ace equivalent of Rustoleum to paint the underside of the new bed board white.
I decided to leave the new bedboard full width, 48”, and let it overhang the front wall of the camper by 5”(the old bed board was 42”). Then I don’t have to do any sort of sliding extension to make the bed larger and I can add some storage underneath the overhang if I want. I added a strip of plywood inside the C channel of the aluminum frame across the front and sides(like before) of the bedboard to add strength.
I also cut and fitted rigid insulation inside the walls of the camper. Next up, wiring and wall panels.
I guess I’m going to end up with a new camper after all....The only part of the part of the camper that I have not taken apart is the upper band of original siding that still wraps all the way around the camper. Hopefully my exploration will help others out if they are thinking of doing something similar.
Attached Thumbnails
#16
trasko
-

- Members
-
- 54 posts
Advanced Member
- LocationSouth Carolina
Posted 25 April 2011 - 11:06 PM
Looks like you've made some good progress. I've got another 2 weeks before I'm back working on my restoration. I think I get what you are saying about the fabric on the roof -- not 100% sure, though.
I've got the replacement fabric from ATC in a box ready to go when I get to that part. It is what I am worried about the most. Metal, wood and electrical stuff all seems straight-forward; that fabric stuff seems like an art.
I've got the replacement fabric from ATC in a box ready to go when I get to that part. It is what I am worried about the most. Metal, wood and electrical stuff all seems straight-forward; that fabric stuff seems like an art.
#17
Casa Escarlata Robles Too
-

- Site Team
- 9,295 posts
C'est la vie
- Locationmonterey bay area
Posted 26 April 2011 - 01:25 AM
More deconstruction
I removed the trim strips from the bottom of the canvas as well as the trim around the bed board. I cleaned underneath the trip strips really well and smoothed any sharp screw holes in the siding so they don’t damage my new canvas. The bed board had some serious sag in the middle as well as some water damage in the front so why not replace it too.
Replacing the bedboard was sort of a pain. The old bed board has a lot of screws holding it in(bottom and sides) as well as a fair amount of staples that hold the siding on. There are also the two strips of wood above the bedboard that are tight inside the aluminum C channel and have screws and staples into them as well. I ended up cutting the bedboard in half with a circular saw to make it easier to remove. I chose some nice 3/4” sanded plywood as the replacement. It is way lighter than any sort of mdf and because of the added plys it is stiffer than typical CDX plywood. I used the Ace equivalent of Rustoleum to paint the underside of the new bed board white.
I decided to leave the new bedboard full width, 48”, and let it overhang the front wall of the camper by 5”(the old bed board was 42”). Then I don’t have to do any sort of sliding extension to make the bed larger and I can add some storage underneath the overhang if I want. I added a strip of plywood inside the C channel of the aluminum frame across the front and sides(like before) of the bedboard to add strength.
I also cut and fitted rigid insulation inside the walls of the camper. Next up, wiring and wall panels.
I guess I’m going to end up with a new camper after all....The only part of the part of the camper that I have not taken apart is the upper band of original siding that still wraps all the way around the camper. Hopefully my exploration will help others out if they are thinking of doing something similar.
The job you have taken up is quite a big one.Sure looks good.I will look forward to future up dates.
Great job
Frank
2002 Tundra AC TRD 4WD Limited 2009 ATC Bobcat loaded http://sharychic.blogspot.com/
#18
Chris R
-

- Members
-
- 15 posts
Member
Posted 05 May 2011 - 06:33 AM
So there is no metal framing along the floor except the front and back? How difficult do you think it would be to remove just the floor? I need to build a platform to raise my 81 Fleet up 6 inches, and although I'm only 5'10" and it's not a huge problem, a few more inches of headroom would be fantastic.
2006 F-150 + 1981 FWC Fleet
#19
pods8
-

- Members
- 2,555 posts
Senior Member
- LocationThornton, CO
Posted 05 May 2011 - 02:34 PM
So there is no metal framing along the floor except the front and back? How difficult do you think it would be to remove just the floor? I need to build a platform to raise my 81 Fleet up 6 inches, and although I'm only 5'10" and it's not a huge problem, a few more inches of headroom would be fantastic.
Nope just a wood floor pack.
Are just planning to strip out the interior of your fleet so you have access to things and to rework the interior to match the new lowered floor. Difficulty would depend on how skilled you are.
 One thing to keep in mind is the door will move up with the camper so you'll have a step over (aka tripping hazard) threshold to deal with.
2022 F350 7.3L; family trailer at the moment and some aluminum stuck together to eventually form another truck camper
#20
scheefdog
-
- Members
-
- 50 posts
Advanced Member
Posted 06 May 2011 - 03:00 AM
So there is no metal framing along the floor except the front and back? How difficult do you think it would be to remove just the floor? I need to build a platform to raise my 81 Fleet up 6 inches, and although I'm only 5'10" and it's not a huge problem, a few more inches of headroom would be fantastic.
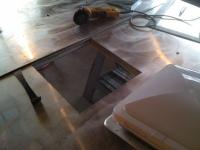
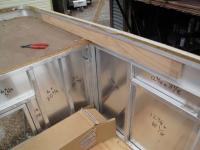
You are correct, there is no metal framing along the floor except for the front and back. I was a little surprised by this when I bought my camper after all the reading about the aluminum frame on the FWCs. From an ease of construction it makes sense, plywood is cheap and easy to assemble(unfortunately it also rots over time).
You can look at my pics to see how I removed my floor. First, you have to gut the inside of your camper(down to the frame). Then you have to support the frame of the camper somehow and the best way I could think of was to screw 2x4s on the sides of the frame and support the camper from them. It also involves removing the lower trim and probably some siding. Then you unscrew the floor pack from the frame and it drops out. I assembled my new floor pack on the garage floor using a biscuit joiner, gorilla glue, and staples. Paint it and then install.
As far as difficulty goes, I would say it is fairly difficult. I searched a bunch on this forum and couldn't find anyone else who had tackled replacing their floor pack(that might tell you something). If you do carpentry for a living or have at some point then you can probably tackle it. If you don't have much experience doing carpentry or fabricating things then you might find yourself in over your head. Hope that helps!
I am really happy with the result because you can custom fit your camper to your truck.


0 user(s) are reading this topic
0 members, 0 guests, 0 anonymous users

