
Thanks for the advice! I decided not to tackle this...yet. There was a bit of separation on the drivers side, and I'm sure the floor pack on my camper could use a rebuild, but I was hoping to get on the road in a few weeks so I decided to just seal up the floor on that side, and build a platform to set the camper on. If I ever do rebuild the floor pack, I'd definitely consider adding some additional height in the floor. I needed an additional 6 inches just to clear the bed rails.
Good luck with your project!

 1 votes
Gutted Fleet - Rebuilding
Started by
scheefdog
, Mar 06 2011 03:56 AM
63 replies to this topic
#22

Overland Hadley
-

- Members
- 1,365 posts
Senior Member
- LocationLake Superior North
Posted 07 June 2011 - 03:47 AM
Updates?
Nathanael - Large Format Landscape Photography
www.KuenzliPhotography.com
2012 Four Wheel Camper - The FWC Build
"If life was fair, Utah would be closer to home" DD
www.KuenzliPhotography.com
2012 Four Wheel Camper - The FWC Build
"If life was fair, Utah would be closer to home" DD
#23
scheefdog
-
- Members
-

- 50 posts
Advanced Member
Posted 19 June 2011 - 11:30 PM
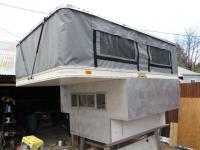
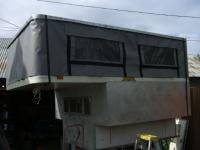
I have been meaning to update forever now... The shell is now complete and I've had it on the truck for a month, the interior is almost done...I'll pick up where I left off.
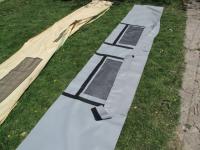
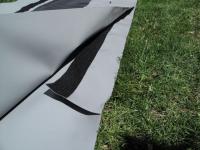
Sideliner Replacement-
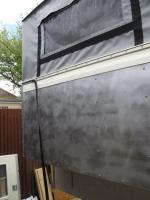
I was really excited the day the sideliner showed up for the camper. The first thing I did was lay out the old canvas and new canvas on the grass to check the size. The new canvas is so nice compared to the brittle old one. Four big windows, exterior storm flaps, and some added height as well as the velcro on the inside for an insulation pack. Now I just needed to figure out how to install it.
I started by marking the middle of the new canvas(front and back) so I could line that up with the middle of the camper. I then attached the insulation velcro strip using regular staples every 18" or so along the very edge. I'm not sure why they don't just sew it on at the factory, I guess so it is optional?
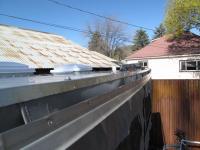
Then I went around the edge of the roof and bent the lip of the sheet metal up enough so I could slide the new canvas up under the metal. I started in the front and center of the camper with the canvas and worked it up into the metal, moving down one side and then the other. I used an air staple gun to hold the canvas in place as I worked it around. My new sidliner ended up being about 6" too long(not sure if my measurement to ATC was wrong or the canvas was sewn wrong, I tossed the paper that I had the measurement on when I called the order in). I ended up just folding the canvas over in the back(center) to make it the right length. I then bent the roof edge back down and attached the trim strips in the same fashion(working front to back).
Once the canvas was attached to the roof, I lifted the roof up so it was high enough that the canvas would line up with the bottom trim strip. I did it this way because I figured I would just make my new lift panels to match and keep the canvas as long as possible. If you were reusing your old lift panels you would just pop the top up and let the canvas hang long attaching the trim first and then trimming the extra length after. The one drawback to that method you can't get the canvas super tight(I ended up making my lift panels so they pulled the canvas nice and tight). I also got some new trim strip insert from ATC as the old stuff was pretty brittle and would have been hard to reuse.
The pictures are before I installed the lift panels which tightened up the canvas.
Sideliner Replacement-
I was really excited the day the sideliner showed up for the camper. The first thing I did was lay out the old canvas and new canvas on the grass to check the size. The new canvas is so nice compared to the brittle old one. Four big windows, exterior storm flaps, and some added height as well as the velcro on the inside for an insulation pack. Now I just needed to figure out how to install it.
I started by marking the middle of the new canvas(front and back) so I could line that up with the middle of the camper. I then attached the insulation velcro strip using regular staples every 18" or so along the very edge. I'm not sure why they don't just sew it on at the factory, I guess so it is optional?
Then I went around the edge of the roof and bent the lip of the sheet metal up enough so I could slide the new canvas up under the metal. I started in the front and center of the camper with the canvas and worked it up into the metal, moving down one side and then the other. I used an air staple gun to hold the canvas in place as I worked it around. My new sidliner ended up being about 6" too long(not sure if my measurement to ATC was wrong or the canvas was sewn wrong, I tossed the paper that I had the measurement on when I called the order in). I ended up just folding the canvas over in the back(center) to make it the right length. I then bent the roof edge back down and attached the trim strips in the same fashion(working front to back).
Once the canvas was attached to the roof, I lifted the roof up so it was high enough that the canvas would line up with the bottom trim strip. I did it this way because I figured I would just make my new lift panels to match and keep the canvas as long as possible. If you were reusing your old lift panels you would just pop the top up and let the canvas hang long attaching the trim first and then trimming the extra length after. The one drawback to that method you can't get the canvas super tight(I ended up making my lift panels so they pulled the canvas nice and tight). I also got some new trim strip insert from ATC as the old stuff was pretty brittle and would have been hard to reuse.
The pictures are before I installed the lift panels which tightened up the canvas.
Attached Thumbnails
#24
Mark W. Ingalls
-

- Members
- 1,248 posts
Senior Member
- LocationHouston, TX
Posted 20 June 2011 - 02:44 PM
Thanks for the update. If you wouldn't mind, how about a photo of the rear?
#25
chnlisle
-
- Members
- 3,811 posts
Post Master
- LocationThe Old Pueblo
Posted 20 June 2011 - 05:01 PM
Really nice job. Quite ambitious. Keep up the good work and Pix.
Special Engel Pricing For WTW Members
Click here to see my ATC Cougar
JayAronowSales.com
(520)579-9610
jayaronow@gmail.com
#26
Desert Rancher
-
- Members
- 514 posts
Senior Member
- LocationSocal desert
Posted 20 June 2011 - 05:15 PM
Granbaby ridin' on an F250HD 4x4, International Diesel powered T444E
"And camping will grant each man new hope...as sleep brings dreams of home"
#27
Overland Hadley
-
- Members
- 1,365 posts
Senior Member
- LocationLake Superior North
Posted 20 June 2011 - 10:46 PM
What kind of headroom do you have now? (Sometimes it is a drag being a tall freak.)
Nathanael - Large Format Landscape Photography
www.KuenzliPhotography.com
2012 Four Wheel Camper - The FWC Build
"If life was fair, Utah would be closer to home" DD
www.KuenzliPhotography.com
2012 Four Wheel Camper - The FWC Build
"If life was fair, Utah would be closer to home" DD
#28
dorocks
-

- Members
- 306 posts
Senior Member
- LocationEl Cajon CA
Posted 21 June 2011 - 12:53 PM
Skilled people drive me nuts. Looking good. I wonder if FWC knew they would be be the skilled person's dream hobby?
Keith Barnes El Cajon CA 2021 Ram 3500 Diesel with 2016 Lance 650
#29
scheefdog
-
- Members
-
- 50 posts
Advanced Member
Posted 22 June 2011 - 01:38 PM
Thanks for the comments guys.
Desert Rancher-Thanks for the offer on the door pieces. What I really need is an entire door(now the one I have looks hammered compared to the rest of the camper), I'll probably eventually rebuild it.
Hadley- I think I have about 6-4 for headroom now. I'll measure it today and let you know. If I remember correctly I gained 4".
I'll try to post some more progress and pictures tonight.
#30
natjwest
-

- Members
- 312 posts
Senior Member
- LocationPortland Orygun
Posted 22 June 2011 - 02:37 PM
Scheefdog, your photos and reports are a boon to the community, even though you've been getting relatively few comments. Excellent job, keep it up with the pics.
FWC-Owning Human


0 user(s) are reading this topic
0 members, 0 guests, 0 anonymous users

