We are now completing year Six (May 2018). We have camped 190 nights in the desert, mountains and beach. Boon docking and basic hookups (elec. and water).
Look for updates as this Post will be an ongoing record of improvements as I test new products and inexpensive upgrades. I'm assuming the reader knows one can apply these "improvements" to any of the shell models.
Each single post is limited to a certain number of pictures. Since I have been adding/editing this post the last 6 years, I started doing "Field Reports" on the various parts of the camper (Start on page 3 of the replies).
So when your finished viewing this main one - scroll through the rest of them. Many have photos as "we all love to see pictures" of our improvements.
Font size
As I age (now 74 plus) its getting harder to read 14 pt type so I'm slowly increasing the size to 18 point
With the discontinuance of the Eagle (March 2016) I am updating the post with more Fleet info.
Fleet
Note: 4/2016
Fleet dimensions are the same as the Eagle between the wheel wells. INSIDE Fleet is 72 inches wide above the bed sides. while the Eagle is 65 inches. Length is the same - 78 inches.
Feb 2016:
Replaced Flexible 100 watt panel with a RIGID 150 watt Renogy panel. producing 5.5 amps-December 22nd (sun low angle in the sky) and 9.1 amps-June 22nd ( sun angle directly overhead).
Update August 2017:
Replaced the Engel MT-35 (34 quarts) portable compressor with the Engel MR-040 (40 quarts) side opening compressor fridge. Scroll down for photo under Refrigerator and on page 17 of the replies
Update March 2017:
Roof solar panels cannot be aimed at the sun. The 150 watt Renogy produces 5.5 amps December 22nd if the battery is discharged to about 70%. On June 22nd (sun high in the sky) it produces 9.1 amps. Under normal conditions with the battery over 80% full input around 4.1 amps per hour.
Flex solar panel Report
Our panel failed September 2015. Symptoms 19.5 volts NO amps. Renogy did not prorate - returned entire purchase price, plus tax, plus sent a shipping carton and a return address label to pay for shipping. Am impressed enough to replace it with their 150 watt rigid.
Renogy is not the only manufacture of flexible solar panels. Search on Amazon for other makes.
.As you read through this post I have scattered Field reports on the various subjects - battery, solar, battery monitoring, electrical, fuses, How to's with links to the appropriate posts by others and myself.
Eagle vs Fleet
We are happy with the Eagle shell. Smaller than the Fleet, however at 69" wide = easier to park at shopping centers. No problems driving in cross winds. Doesn't even feel any different than our old 450 pound "Flip-Pac" as we drive it around town running errands. Truck mileage range 15.5 city - 18 mpg hiway (driving under 70 mph). and 14.5 towing the Samurai. (see page 10 of this post # 91)
REASONS: to purchase a shell instead of full camper
Initially We decided on the shell because we weren’t going to purchase the refrigerator or the on board water tank system. We didn’t plan to cook in it (too small), so didn’t need a kitchen. We needed a sink to wash up, place to sit out of the weather to read, (outside is our living room and Kitchen), comfortable, dry place to sleep, porta-potty, and a hard cover to transport the model airplanes and material for wood projects. We wanted it to be as light as possible because we wanted to permanently mount it (saving on storage costs). We also saved about $6,500 over the full model.
Shell Factory options
Original Eagle shell purchase price $10,069 included base price ($6,995) plus options: a rear cabinet and the small cabinet (comes with std dinette table) on Drivers side. screen door, aux battery system (installed in bottom of the large cabinet), two 12 volt outlets, two solar plugs, Fantastic Fan, Inside-Front roof lifters, Fiamma awning, European curtains (roll up over side window), two couch cushions, Front opening window, and 4 mechanical Ricoh Jacks.
Current "creature comforts" include: Queen bed, couch, stove, sink, 12 volt portable compressor refrigerator, auxiliary battery, 110 volt, 1.25 amp charger/maintainer, 150 watt Renology Rigid solar panel, Fiamma awning, Thermal pack, porta-potty.
The following is a "Basic" buildout that can be done by the average person with limited wood building skills, tools and money using some factory supplied cabinets and some custom made parts.
The Build
We liked the original layout of the full camper, just didn't want the small storage compartments that come with the cabinets. Didn't need the water system (which can freeze in the winter time) or the roll-over couch (intrudes to far into the walking area) or the front opening fridge, or the furnace, or the large propane tank. We modeled our shell like the regular model though.
Update April 2016
At the Four Wheel owners rally I was advised the factory no longer can accommodate - installed - "custom" additions to the Shell Model other than the one or two standard configurations. The reason - units are built on an assembly line. Custom additions slow down the speed. They are producing about 60 units a month with a 4 month delivery time.
New owners can purchase separate pieces (like counters) though and install them themselves.
June 3rd, 2012
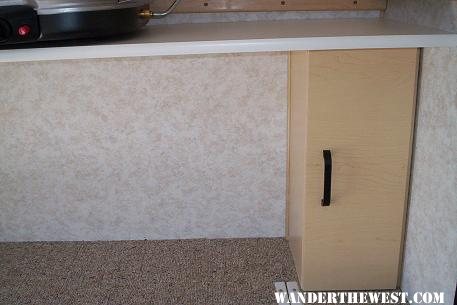
First removed the top of the small cabinet then bridged the space with furniture grade Melomine - 3/4" x 15 3/4" deep - $14.98 at Home Depot. Aluminum angle iron on rear drivers side cabinet and screwed to top of the small cabinet drivers side front. We will use a propane stove mostly outside as our weather in San Diego is very mild most of the year.
Note: You might also consider purchasing the counter from Four Wheel as it already has the finished top installed. Then it can be cut down to accommodate whatever depth you need.
Counter Not very deep, however it gives us more room in the "cabin" to move around (Inside width of Eagle is 65 inches)
============================================================================
Fleet
Note: 4/2016
The shelf under the counter is 18" deep - Eagle is 15 inches. Buy the standard galley counter from FWC (21 inches deep) and cut it down to 18 inches.
==============================================================================
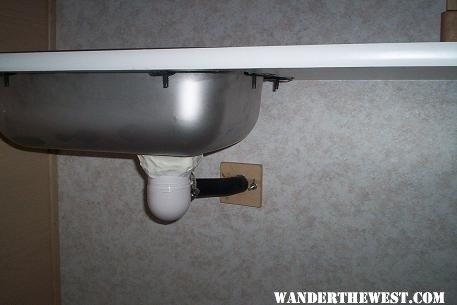
Sink
Update Sept 2012
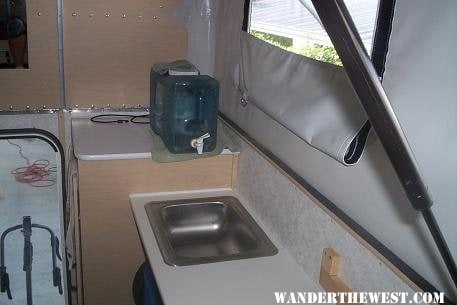
Added the FWC sink (an easy install as FWC supplies all the parts: brackets to hold sink into counter, and drain hose and connector to outside wall) and a template for about $ 88 delivered). Note: standard bar sinks don't come with the pieces between the sink drain and the outside fitting or the clamps to hold sink into counter.
Note: More pictures in My Gallery. Album titled "How to install a sink" .
Procedure Click link:
Sink
Reinforced counter and sink....Desert Washboard required reinforcing counter with
angle aluminum on back wall and a 1x1 across the front. We store our camp kit and other items under the counter.
Kitchen/Galley
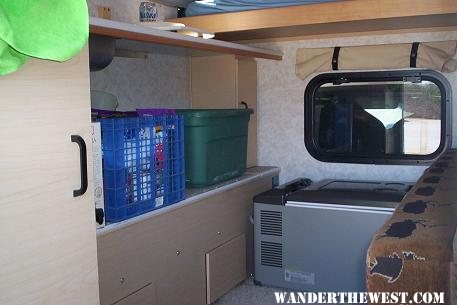
Compressor Refrigerator
Engel recently lowered the price from $849 to $629. opens from the side not the end. 2 inches higher and 40 quarts capacity (MT35 - 34 quarts).
NOTE: The old MT-35 still appears in many of the pictures. As of our next camping trip the MT-35 will be gone.
A top loader it easily fits cross-wise under the front window. Stores enough food for two people for a week.
Note: Place ice cubes in 1Qt Tupperware container. Fridge temp 39* only 7 degrees warmer then freezing. Cubes will last 4-6 days. Minimal melt water (cold) can be added to the whisky in your highball glass - "Cheers" !!
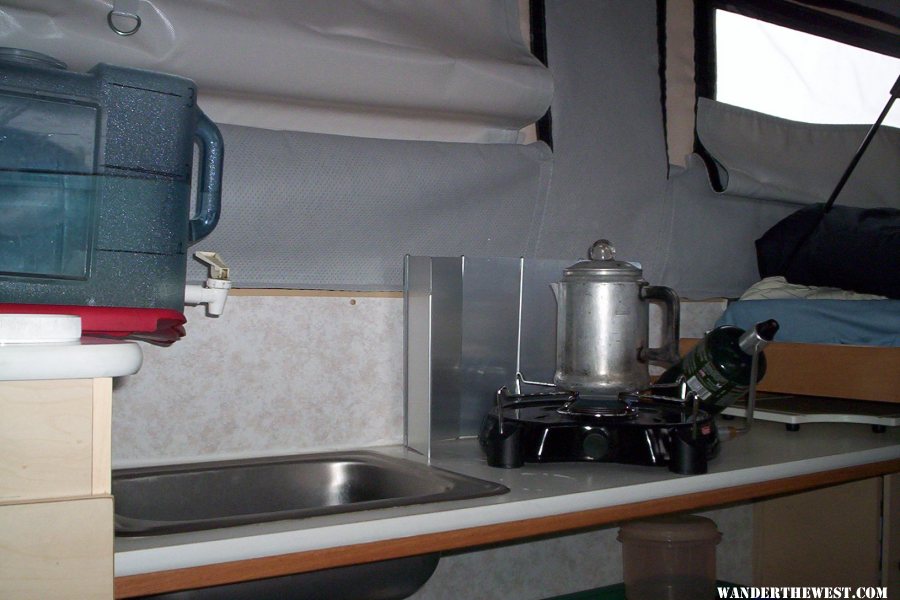
Water and Stove
The Water container holds 3 gallons, has a "sliding petcock" (not showing in this picture) and empty's by gravity. Available at any "water store" where containers are refilled. A 2 gallon model can be bought at Wall-mart in the kitchen dept.
We bring a combination of 1 gallon and 2-1/2 gallon containers when camping in the desert for a week or more as they are easier to store. All developed campsites have water available so we only carry 3 ea - 1 gallon bottles for these trips.
Water weighs 8 pounds per gallon. 3 gallon re-fillable containers are available online from "Reliance" . Retail sporting goods stores only stock 5 gallon containers (weigh 40 pounds when full !!).
Feb 2016
We replaced the spring loaded spigot with a sliding "petcock" (pictures page 11 of this post # 107)
One burner Coleman propane stove
Update August 2016
We find that when Jim is camping alone he uses it more and more because its just easier than carrying two stoves. He just takes it outside and sets it up to cook dishes containing onions and garlic.For coffee and soupds he uses it inside.
Purchase the stove at Camping World, Sport Chalet, Big 5, REI.
Use it to keep heat off the panel behind the stove.
Remember DON'T run your stove in an enclosed space without ventilation.
Turn everything off when you go to bed !!!
"90 degree hose adaptor" from sink drain to container about $ 5.00 from Camping World . This link shows a product a little different than the one pictured. You might have to adapt it to the drain connection.
Ace Hardware also carries this item by Camco part #22505
"90 degree elbow" Length of garden hose and a collapsible water container serves as a "gray water" tank. Available at Walmart also.
Or purchase the "Famous Covered Bucket" from FWC" It is located in their "Ready to go Anywhere " package. Includes a flexible hose takes up less room.

Couch-
The standard roll over couch intrudes too far into the floor area. A 'gaucho' couch was created by extending the box (holds the wheel well storage) 7 inches. We purchased the standard roll-over couch cushions as they match the camper fabric. The couch cushion measurements are 36" wide x 20" deep. We cut one of them down to 24" x 20" deep and made a small triangle "bolster" to fit against the window to lean against.Two of the 4 small bed cushions are the back rest.
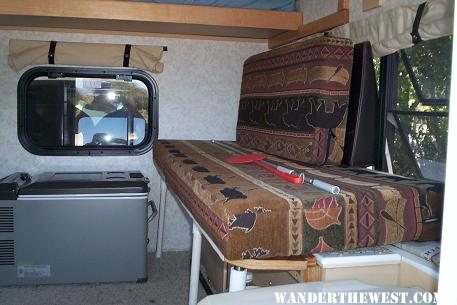
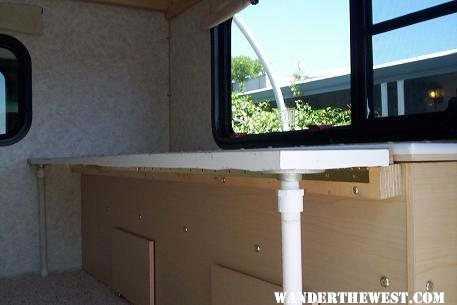
The 7" hinged wood plate extends the boxed section to 22". The "stand-off" is made with 2" x 2" bolted to the wood framing the wheel well, piano hinge, 1" x 6" board attached to one side of piano hinge. You will note the 2x2 fits about 1/2" under the opening to the wheel well storage. I used a piece of 3/4" x 3/4" bolted to the top of the 2 x 2. Half inch sprinkler pipe screws into shallow plumbing pipe fittings to secure the legs. When folded down my camping gear easily fits in the space under the counter and in the middle - Cost about $20.00
==============================================================================
Fleet
Note: 4/2016
The shelf under the gaucho couch cushion is 18" deep - Eagle is 15 inches. The standard couch cushion dimension is: 36" wide x 20 " deep. We used a small 2" deep x 24 inches wide scrap piece of foam between the back of the cushion and the window to protect fabric from abrasion from the window components.
Fleet
The hinged plate extension would need to be cut down to 4 inches or you could make the board the same depth and add a 3" - 5 " deep storage bags for loose gear. behind the back rest.
===============================================================================
Field Report Sept 2014
We removed the smaller cushion at the front. Because the "Refer" sits under the front window - no one can sit opposite it. We extend the bed 15" placing two of the small cushions in that space. In the space below we place small duffel bags for clothes storage. The other two cushions we place on the bed during the day - just using the backrest. We also cut 2" out of the sitting board in front of the "Refer" to grant easier access to the refer hatch locking mechanism.
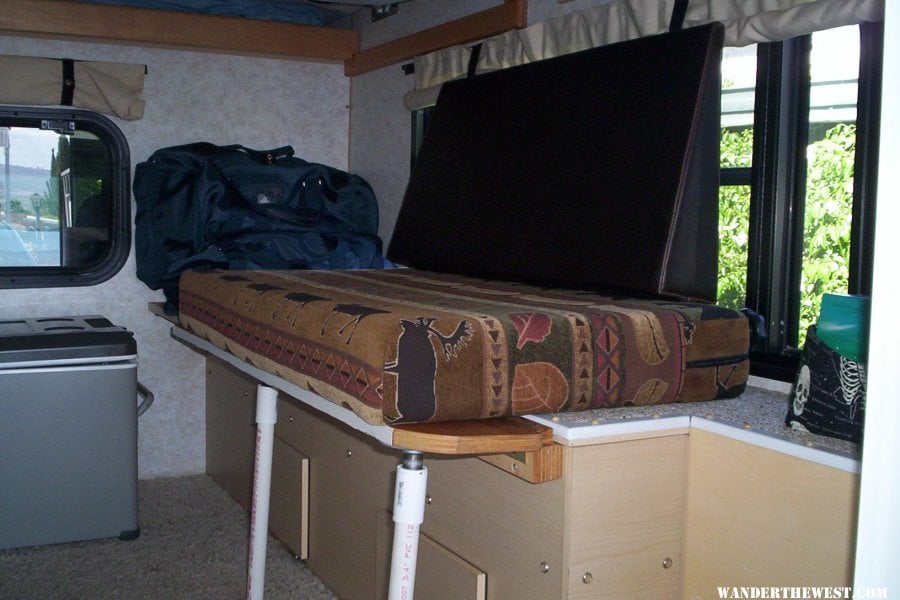
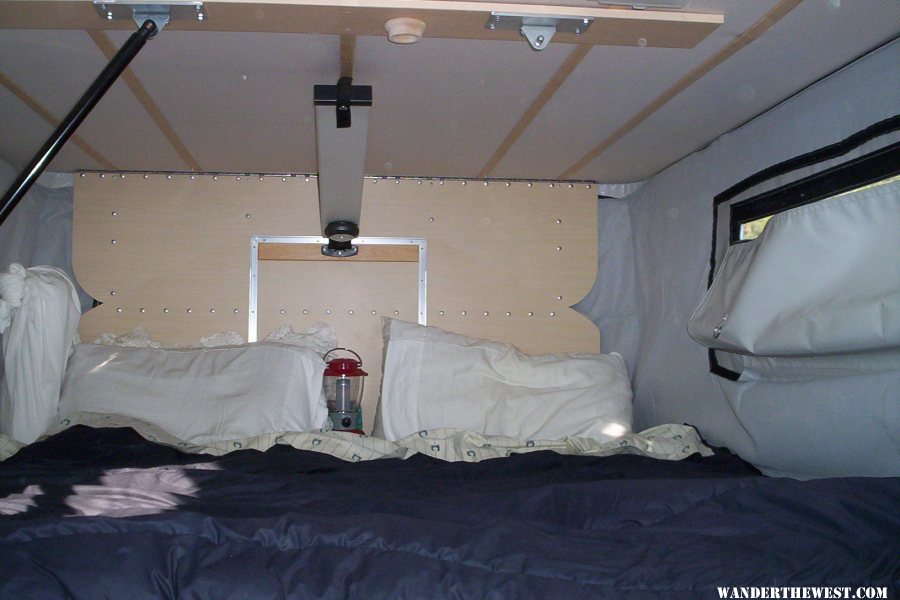
Sleeping Area and Mattress
July-2012: tired of sleeping on "carpeted concrete", replaced the foam in the bed mattress with high density "Nymbus model Q41" foam -contours to the sleeper, has high bounce back and had the mattress cut down so queen size fitted sheets would fit ( now 60" x 78").
Placed some small (3"x 12") plastic tubs in the open 3" spaces (either side of bed) to hold eyeglasses and books.
Camco good resource for hard-to-find RV products.
==============================================================================
Fleet
Note: 4/2016
Stan at Four Wheel reports the bed is only 72" wide so many tall Fleet owners sleep "front-to-back" like one does in the Eagle..
If the bed was cut down to 60" x 78" (standard queen size) a 48"L x 12" wide x 3-4" high storage cabinet lying flat for clothes storage could be added to the Drivers side. The top could be made to lift straight off like a stove pan lid. Go to your local Lance camper dealer and check out the storage "tubs" next to their mattress.
=================================================================================
Note: In 2013
FWC replaced the old hard foam with Medium hard and changed depth to 3 inches to allow for bedding to be left on the mattress. Our "old" 'Flip-Pac' had a 3" mattress (Nymbus Q41) and was just as comfortable as the 4".
=================================================================================
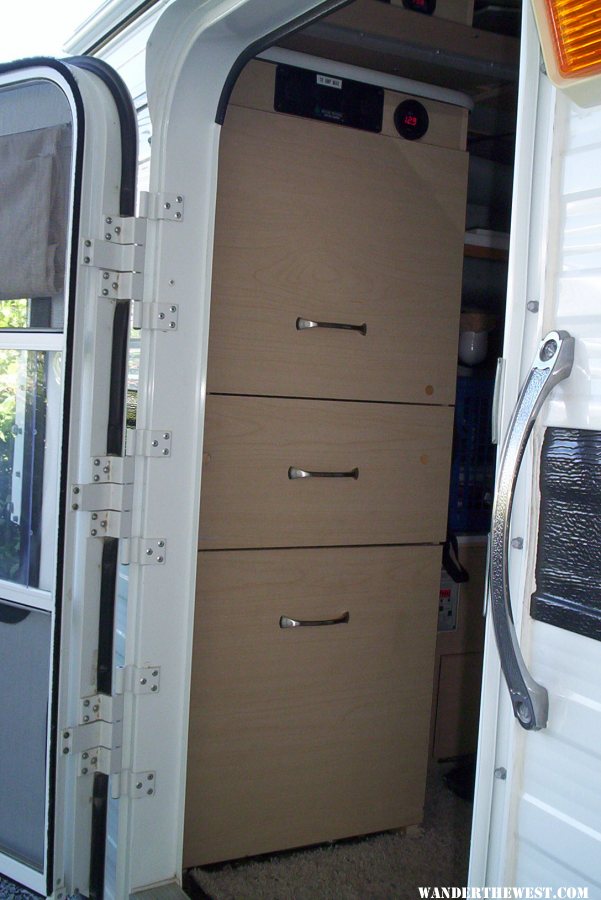
Cabinet Drawers
These went into the large storage area above the battery, solar controller, Sure-Power, Trimetric Shunt. The door originally was one piece opening right to left with no access to the contents from outside the camper.
2013 Removed the door and cut it horizontally. Bottom panel is mounted with "real earth magnets" and stock catches covering the battery, charger, solar controller. Top panel is hinged on top giving good access to drawer storage whether outside or in. Installed Open "under kitchen cabinet" basket drawers. Still leaving a couple of inches on either side for misc Large items (collapsible containers, etc).
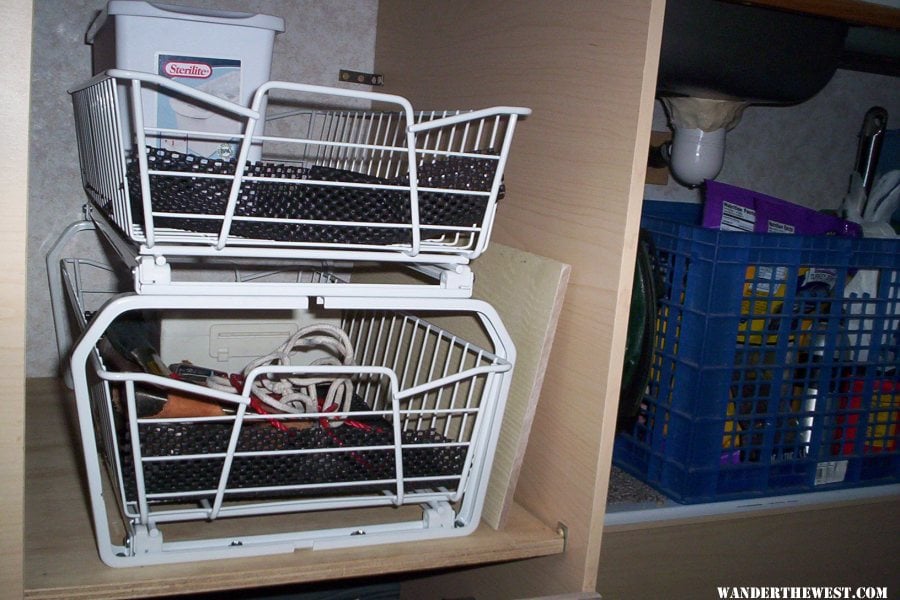
View shows access to stored cabinet items from outside or inside.
New Drawers and Reworked "Hatch"
The fold up panel over the baskets was not properly supported. plus there was a lot of wasted space, so I finally with the help of my cabinet maker friend removed the baskets and replaced them with "Two Drawers" and a easily opened 'Hatch" over the battery - solar compartment.
The rest of the pictures are in my Gallery under "Eagle Shell Build # 2) as we are limited to 20 pictures per Post. Or page 12 this post... Build pictures and text (page 11 - #104 and # 106)
April 2016
As You read through the info remember a cabinet maker can build anything you can't do yourself
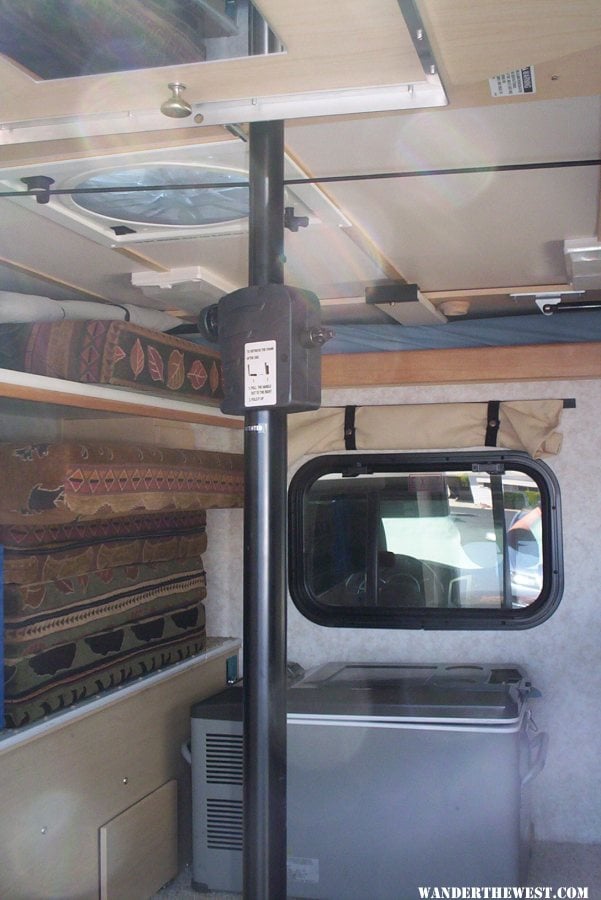
Methods to raise the top
BobM has a good video on its operation. Click on "speaker lift" to access the video. Bob demonstrated it at last months owners rally.
12/2014 "Santa" brought me one... and I have tried it a couple of times and it is easier than my "T" mop. I continue to Love it. Saved extra dollars on adding outside strut lifters
================================================================================
Electrical
NOTE
When you take delivery of your new shell or as you are ordering if you purchase the auxiliary battery system request that the circuits(fan, lights, 12 volt ports) be fused either with a fuse block or in-line fuse attachments.
My Shell did NOT come with fuses and it did not dawn on me to add them until August of 2014. See thread -
NOT fused...
Batteries
Field Report Sept 2015
Replaced our camper battery - warranty 36 months. Died at 40 months. Our battery was a 79 amp hour
AGM model Inimidator by East Penn Mfg.
Performed a 10 hour LOAD TEST to make sure battery and solar panel were working smoothly together.
Field Report August 2015
Camper batteries have a useful life just like regular car batteries.
Exide AGM deep cycle batteries (supplied with all new Four Wheel Campers) are guaranteed for 2 years from Four Wheel plus a year (from Exide).
Batteries are fresh less than a week old when installed in your new camper.
Click on link to the Post "Battery age affects charging (trickle or solar)"
Field Report Sept 2015
Bought a 79 amp hour - HD Deep Cycle AGM from East Penn Manufacturing. Group 24M Model 8A24M."Intimidator" Click on the link to see the specs.
Charging and Usage
NOTE:
Re-reading this section I finally realized "so what". Why is charging an issue?
Well it is primarily important if you have a "Compressor-refrigerator". The Absorption "3-ways" don't have a problem because they run on either 110 volt on shore power or propane off the grid. The only time they are on battery is running down the road as it is a "fire hazard" to leave propane on when vehicle is moving.
Compressors are 2-ways : 12 volt and 110 volt. They work on shore power or battery off the grid.
We have a compressor refrigerator and a 12 volt system so aux battery condition is very important to us and all shell owners that have similar systems.
You will need to purchase a small trickle charger and a solar panel mounted on the roof.
Auxiliary Battery Charger -
If you don't plan to install an "IOTA power converter" or Equivalent like the regular campers have, you will need to purchase a small 1.25 amp charger maintainer to "top" off the battery before going on a trip off the grid.
"Battery Tender or
"Battery Doc Sport" (Camping World).
Update December 2014:
Since adding the solar panel on the roof we only use the charger the night before we leave on a trip, because we store the rig under a carport. Good backup for camping at RV sites with hookups on cloudy or rainy days.
Details click link
Field report (2014)
Most of our camping is off-the-grid at state parks or the desert. About 25% is exploring the country, on asphalt. We stay in KOA's when available, because they take last minute credit-card reservations (like a Motel 6) and are easy to get into on weekends when the western state parks are full (6 month reservation system). They have Wi-Fi, washer-dryers, small convenient store and water-electric sites. We plug in our 15 amp x-tension cord (shell "shore-power") which through our "Battery Doctor" charger/maintainer, tops off our battery while powering the Engle refer.
30 amp utility boxes at public campsites.
On our trip to Oregon we noticed all the RV campground electrical ports took 30 amp plugs, You will need a small adapter(15 amp to 30 amp) so your straight blade "shore power" cable can plug into a 30 amp receptacle. This
little adapter from Camping World doesn't take up any room and only costs $3.97 -
The "Engle" refer has110 volt mode, however you have to unplug the 12 volt cable and plug in the 110 volt cable to switch modes. It is easier to stay in one mode...12 volt, and the little 1.25 amp charger maintainer is below the maximum 2 amps "Engle" recommends for charger voltage when "fridge" is running..
Field Report - July 2014
We camped 5 nights running the Engle refer, fan, lights and changing the IPAD on the single battery - engine off. The 1.25 amp " Battery Doc" (shell-shore power) easily kept the battery between 12.4 volts and full..
Solar Panels
January 2016
Replaced Flexible 100 watt panel with a RIGID 150 watt Renogy panel. Producing 5.5 amps December 22nd if the battery is discharged to about 70%. On June 22nd (sun high in the sky) it produces 9.1 amps.
Pictures and test results page 12. # 111,115,119.
Purpose to run compressor fridge when parked engine off sightseeing. "Sure Power" regulates alternator charging so not to overcharge the battery.
Morningstar SunSaver 10L runs two panels at the same time because panels can't be tilted into the sun and generate less than 10 amps together.
=================================================================================
Solar Panel History
Update January 2016
Renogy Flex panel dead. It died in September 2015. Symptoms it produced rated voltage - NO current (amps). Switched to a 150 watt Renogy rigid,
Update: April 2013 -
For my March trip to Saline we added a portable 100 watt 12 volt solar panel and Morningstar sunsaver -10L charge controller from www.solarblvd.com in Norco, Ca. ($201 online). Unit outputs 5.7 amps per day more than enough to replace the current the Engle draws (2.5 amps start up, .7 amps running).
Although the 100 watt panel was satisfactory it also is large (24"x42") and Heavy (25 pounds) and takes up a lot of storage area when used as a portable unit. Reviewing the specs for the Engle I decided to try a smaller - lighter panel so purchased a 60 watt. One third smaller (24"x29") and 15 pounds weight. Easier to store in camper. We used it at Sugarloaf state park while attending the FWC Owners rally. Even though it's output in only 3.8 amps a day it easily kept the battery at 12.8 volts overnight the 3 days we were there in 80* weather.
To get the voltage from the panel to the camper I made up 50 feet of 12 diameter wire (one black - one red) with a connector at each end. Coiled wire onto a "extension cord" reel to keep it organized - Home Depot. The "raw voltage" before the controller is 20.5 volts (direct from solar panel) and 20.5 from the camper end of the spool. Controller steps the voltage down to 14.0. to the battery.
=================================================================================
Note: In addition to the 'Engle', we run two pairs of 12 volt lights (stock incandescent fixtures converted to LED bulb) , Fantastic fan, charge the airplane and radio batteries, IPAD, and digital camera.
60 watt panel handles it all. Battery voltage is 12.9 after sunset.
=================================================================================
Note : For 2014 FWC standard lights are LED fixtures and bulbs.
=================================================================================
Note : If you are going to build your shell with the driver-side counter, have the factory add a third ceiling fixture positioned the over the counter.
Field experience: One battery will run the lights and a fan for 5-6 days with engine off. The "Engle" needs the solar panel as it will only run 15-20 hours engine off in 80* temperature. Adding a furnace blower, water pump, lights, charge tablets, smart phones, TV's you will need at least two 100 watt panels and two batteries.
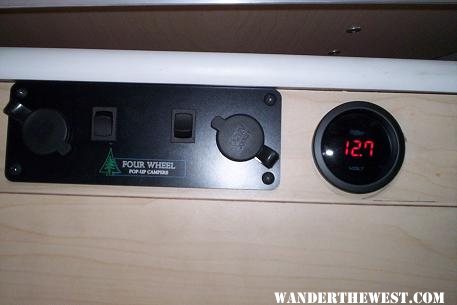
Battery Monitor
Update Sept 2014
We have had a good discussion on devices to monitor amp draw, charging amps and battery percentage of full.
Picture shows "Refer" amp draw displays as a minus. Charging amps from Alternator, solar, charger-maintainer NO minus sign plus value for battery full. Our "Engle" fridge cycles on and off. Average amp draw 1.5 amps per hour in 80* temps

More pictures in my album titled "MISC".
The conclusion was recommendation owner purchase A Trimetric TM-2030-RV monitor or equivalent
============================================================
For 2014 FWC now offers outside mounted gas lifting struts for about $325.00. We discussed retrofitting and decided to stick with the inside ones.
============================================================
October 3rd 2013 - Removing inside gas struts -
EAGLE & Fleet ONLY (Front-to-Back) sleeping Orientation
Reason to temporarily "remove" the passenger side strut is to ease getting in and out of bed ( sleeping orientation front to back). The easiest (cheapest) solution would be to just remove one or both struts (AFTER the top is lifted).
I called FWC and asked Terry for the procedure.....The trick is to use a small "THIN" blade screw driver (about 1/4" wide) insert under spring clip.....gently turn blade under clip.one quarter of a turn while pulling the strut towards you ...and it pops right off !! I did both ends in less than 15 seconds...AND they just push back on the balls when your ready to lower the top.
If you try this on your lifters, pick up a worn out strut from the auto parts store or local camper shell installer and practice until you feel confident to try it on your camper strut.
Note: "strut semi-blocking bed access" is an issue sleeping front-rear in narrow camper. Not clear if this is an issue sleeping cross ways (Hawk, Grandby). The Advantage sleeping Front-to-Back is inside person doesn't have to crawl over the outside person to get out of bed....FWC as an option will change your sleeping orientation(Hawk, Grandby) when camper is ordered.
Volt Meter
Replaced the portable plug-in voltmeter with a "Glowshift" Digital voltmeter installed to the right of the 12 volt plugs wired into one of the the "on-off" switchs. Red numerals make it easy to see day or night. Very easy to install with a reasonable price. See link:
Glowshift
Heater:
"Thermal Blanket"
November 2013
Spent a week at Saline Hot Springs. Night temps dipped into the high 30's. Thermal blanket kept the heat from the "Mr Buddy" tent-safe propane heater much longer than without it. I was very "cozy" all week as we had night time winds and rain one night. Definitely a great addition to the Eagle.
FWC model is expensive $475 because they are hand-made. Delivery time about 30 days.
"Ski3pin" has an excellent post on making your own Arctic Blanket for less than $150..
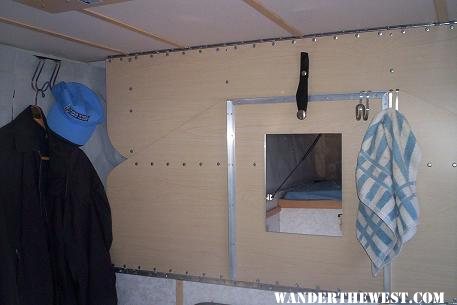
Coat Hooks
March 2014
Went to Home Depot and bought Two "over the cabinet Double-Hook hook" by Liberty $8.97. Glued on velcro (male) on outside. (female-fuzzy on inside. Pulled thermal wrap away from the end and threaded the hook into place. It holds a jacket and sweat suit . Modified the second one to be fitted "pinched" between the rear boards. (more pictures "my Profile" /Gallery in "Storage Ideas" Album).
February 20th 2014
Just returned from a week at the hot springs. Clothes hook worked really well and held up to constant changing of the items hung on it.
March 31st: Swapped out single hook for a double and added a modified Double-Hook on the back wall for a towel holder.
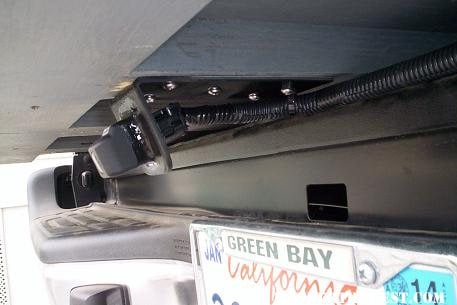
Back Up Camera
Removed back-up camera from tailgate and re-installed with a custom mount below camper:
"Receiver bar step". Second receiver in back for your bike rack, boat or "Samurai".
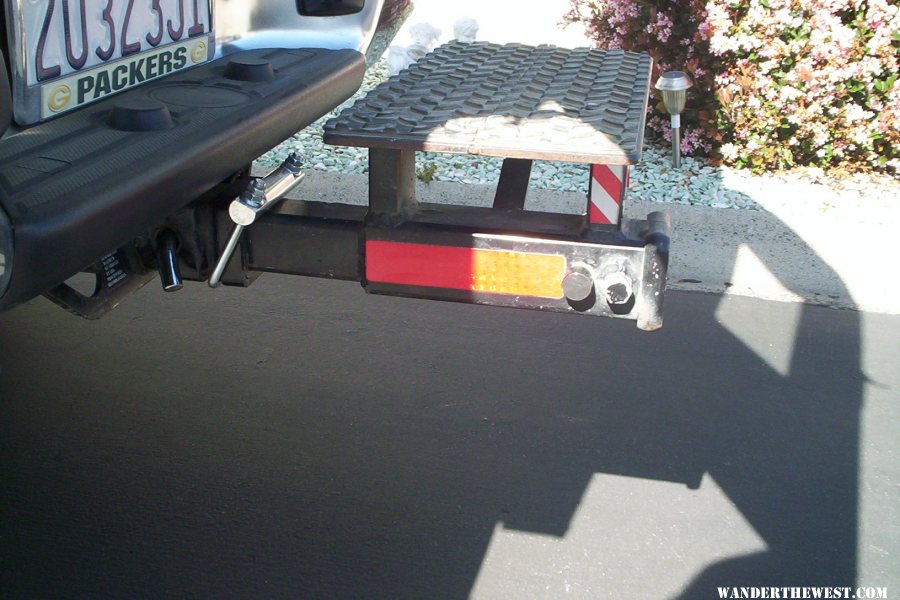
Quiet Hitch:
The top step slides into the 2 inch receiver. It has always rattled due to the "slop" between the draw bar and receiver. The movement is less than an inch - still the step was "wobbly" when stepping on it. Our fabricator can't add a bolt to take up the slack because there is no room in the Tacoma factory tow bar receiver to add it.
We purchased the "Quiet Hitch" by Roadmaster through Amazon for about $25.00. Very heavy duty takes all the "wobble" out of the step. . Night and day difference. Now step feels secure. It also acts as a Anti-sway ring taking the sway out of the Samurai tow hitch.
TRUCK
UPDATE: (Jan 2013)
1. Replaced the '99 Tacoma with a 2013 Tacoma V6, 4WD. A local spring shop replaced the stock 3 rear springs with a custom 4 leaf set rated at 1800 pounds. Cost $625.00. Air bags cost around $500. New springs are a better choice if you leave camper on truck full time. I replaced the stock tires ( "P" 265/70R16) with LT265/75R16 - half inch higher Load range E - rated to 6,000 pounds. "P" stands for passenger Load range C. "P" tires are found on SUV's . "People are lighter than campers".
Camper Weight - 1000 pounds
- with options: two cabinets, aux battery, 8 foot awning, Fantastic fan, Engle "Fridge", single burner propane stove, storage cabinet, wood mods.
Total weight camper and Tacoma truck, half tank gas, no driver or passengers - 5200 pounds - Add driver 220 pounds - weight 5420. GVWR (2005-2013) 5500 pounds with "P" 265x70/R16 tires).
2013 Tacoma Axles are rated at 5800 pounds + "E" rated tires (LT265x75/R16) = 6,000 pounds. I estimate the current weight with camping gear, food, water for 7 days at 5800-6,000 pounds. The brakes have no problem stopping it when driven conservatively.
Feb 2014 Update: When in Big Pine for our latest trip to Saline hot springs we weighed the truck with a full tank of fuel and food and water for a full week off the grid = 5,960 pounds plus one human = 6,200 pounds !!!
Opinion:
Overloading your Tacoma by 700 pounds shouldn't shorten (by much) the life of your truck, however if it does your probably looking at 200,000 miles before you need expensive parts replaced as most of us camp less than 30 days per year.
Cost Summary as of December 2014
Since purchase I added a sink - $85.00, Engle MR040 refrig/freezer - $629, 150 watt Renogy Rigid solar panel - $200, 60 watt solar panel (NOW our winter backup) and controller- $145 (www.solarblvd.com), Replaced bed mattress foam - $210. Cut down mattress to 60"x 78" - $200. Move electrical from old Tacoma to new and add a dedicated 12 volt outlet (with 10 amp fuse)to run the "Fridge" - $175. Fabricate a receiver bar step $87.00.. Thermal pack - $475. Misc hardware - $150. Custom drawers and battery Hatch (2015) - $280. Plus factory upgrades.
Current investment - $12,700.
Fabricate four mounts to bolt camper to frame $400 (NOT NEEDED if you don't plan to bolt camper down full time).
By comparison the regular model (with same options) would cost (2012 dollars) - $19,550 plus tax (Dometic/Waeco compressor refrigerator, standard sink and cook top and 100 watt solar panel). And add about 350 pounds to the dry weight.
We encourage those of you who haven't yet purchased and are on the fence as to whether to purchase a shell model or the full camper to attend a local owners rally in your area, speak to the owners, and check out the "personal" improvements to an already fantastic camper.
Currently there are two rallies in California - Annual factory rally in April near Napa-Sonoma north of San Francisco and a Regional rally in Southern Calif (San Diego) in late -October. For more information, contact Stan at Four Wheel Campers - stan@fourwh.com , Click on the link to view the video.
See you out there......