Jump to content


Photo
- - - - -

Grandby Shell - Water Damage

Grandby cabover water damage

  • Please log in to reply
6 replies to this topic

#1 1stGen

1stGen

    Newbie

  • Members
  • Pip
  • 8 posts
  • LocationPeterborough, ON

Posted 05 July 2013 - 05:47 PM

Hey Guys,


I recently purchased a 2000 Grandby Shell model from a guy here in Ontario. I'd been searching for months and everything I found was either on the West coast or wayyyy out of my price range. Then, on April 15th, a member by the name of Lingenstein posted a Kijiji ad over on the alert thread and that was it. I emailed the poster right away and called him that night to make arrangements for when I could pickup my new camper.


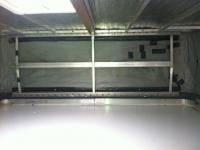
He told me over the phone that there had been some water damage near the front right corner (passenger side) from the previous owner installing a roof rack incorrectly. He said the rack had been removed and the holes filled with silicone, but the lift mechanism had to be replaced, so he used a square aluminum frame design that he fabricated himself. Of course, I was skeptical, but when I saw it for myself, it was actually pretty neat. He used the original springs and everything, and just used sheet metal screws to secure them to the aluminum frame. I actually quite like the new design as you can easily clean the vinyl at the front of the camper where before it would have been impossible with the original lift mechanism. He removed all the insulation in the roof because he said it was damaged from the water, so now there's basically no roof, which I don't really mind because I'll probably need to run some more wires for lights and possibly solar panels (if I ever get there).


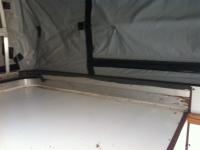
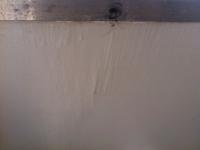
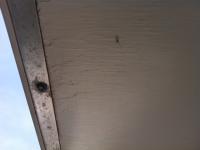
While performing my due diligence, I noticed the white paint underneath the cabover was cracking just a little along the trim. He assured me it was just residual damage and it was nothing to be concerned about. The price was right and it was only about a 3 hour drive from my house, so I went ahead and bought it. Last weekend, I gave it a real thorough cleaning and noticed 4 inch paneling on the passenger side cabover was wet, and not just a little bit wet, but really wet! My curisotiy got the better of me and I ended up ripping all the way back to where the cabover starts. I got looking at the floor of the cabover and it now looks like there's about a 6 inch area that is wet and soft.


So my question is this... What do I do now? Do I leave it and wait for it to get worse? Can I patch just that one small section? Do I pull the entire thing out and replace it? If so, how difficult is it? Is that whole front cabover just plywood or are there some kind of aluminum supports up there? Just not really sure which way to turn. You guys have been a great source of knowledge so far and I look forward to hearing your suggestions.


Cheers,


Dylan

Attached Thumbnails

  • photo 1.JPG
  • photo 2.JPG
  • photo 3.JPG
  • photo 4.JPG

  • 0

#2 Darryla

Darryla

    Senior Member

  • Members
  • 318 posts
  • LocationLivermore, CA

Posted 06 July 2013 - 01:48 AM

Well, looks like you have some figuring out to do.  That cracking looks like residual water damage to me by looking at the picture.  If I were you, I would call the folks at All Terrain Camper and ask them their thoughts?  They work on a lot of older models and they will know what to tell you.  Since you are in Cananda and may ask for a lot of advice maybe you could work out some consuting payment to them. Just my thought for you.  Good luck with your project.


Darryl


  • 0
ATC Bobcat, 2001 Tacoma 4X4, Supersprings, Bilsteins, Hewig Stabalizer

#3 LuckyDan

LuckyDan

    Senior Member

  • Members
  • 644 posts
  • LocationBased in Eastern, NOW CENTRAL Oregon

Posted 07 July 2013 - 01:39 AM

From your picture's I'd guess all the fabric patch work on the same side has something to do with it.  If your's is a 2000 I think FWC was using the plastic encapsulated plywood by then.  Depending how "soft" the wood is and it is plywood there are IMO two options:


1 epoxy the wood or 2 replace the wood.


There a couple of epoxy products I know of for soft ply once you get it dried out and the plys are not totally broken down.  You could approach it kinda like a transom repair in a boat.  If it's an encapsulated ply base in your camper  the two are not grossly different.  They are marine products but I've seen them used on RV's.  The two links are just to aid in seeing the product.  I'd google around.  There are probably other like products, cheaper sources, how to's and of course the disclaimer, I have no personal interest it either company blah, blah.


CPES, http://www.rotdoctor...ducts/cpes.html

Git Rot, http://www.westmarine.com


The second option is to replace the bottom wood.  It can be done by removing the bottom screws from one side of the fabric, removing the board and use it as a template, cut another one slightly smaller to aid in installing then seal and reattach the fabric.  if you search the WTW site there are couple threads where this was done.  If you go this route I'd consider going a little further and install the D bulb weather seal around the bottom of the fabric around the cab over.  It helps keep things dry while driving through the rain and there is a thread or two on WTW describing this too.  ATC is a good source for questions and product.  While I didn't have a board quite like yours they did help me with my fabric patching which looks like you may also need.


Good luck and from the pictures I'd guess overall it's not a goner.


Edited by LuckyDan, 07 July 2013 - 01:51 AM.

  • 0

Old, bum around in Ford and an even older FWC Grandby

New Mantra: "Everyday camping is just making up for lost time"


#4 1stGen

1stGen

    Newbie

  • Members
  • Pip
  • 8 posts
  • LocationPeterborough, ON

Posted 08 July 2013 - 03:36 PM

Hey guys,


Thanks so much for your help. I will call the guys at All Terrain and see what they say. I believe the owners of All Terrain (I wanna say his name was Terry) owned Four Wheel back in the 90's but not too sure when they sold it and started All Terrain.


Dan, I'm definitely leaning more towards the "repair" idea than the "replace" idea, since the effected area is so small and the rest of the plywood seems to be in great shape. I believe it is that plastic encapsulated plywood as you say, so would I need to strip the plastic off to repair it and then paint over it once it's dry? Seems like that might be the best route to go. Has anyone used either product to repair a rotten section? If so, how well did it work? Is one product better or worse than the other? Just trying to get an idea for how this stuff works.


I haven't taken the tape off yet to see what kind of shape the liner is in. Partly because of time, partly because I'm kinda scared to see what's under there. I took a trip to my local upholstery shop and picked up some HH-66 vinyl cement for some patches, as well as some scrap bits of "marine-grade vinyl". I use quotation marks because I'm really not sure what makes this stuff marine-grade, or whether it will even work for patching the sides of the pop-up liner. I believe they use it for seat cushions in boats, because it has the one vinyl side and the other is like a soft fuzzy side. I'll have to speak to the guys at All Terrain and see if this will work or not. I read on their site that they can send some remnants of the actual stuff they use for patch work, which may be a better option.


Thanks again for all your help guys. I really do appreciate it.


Cheers,


Dylan


  • 0

#5 AK Nomad

AK Nomad

    Senior Member

  • Members
  • 112 posts
  • LocationAlaska

Posted 09 July 2013 - 04:19 PM

I also had a leaking front passenger corner on an unmodified, stock Grandby.  So be careful that your problem leak is for sure taken care of. Look for those slots in the underside of the roof frame that drain condensation/leaks/etc. into your roof.  You can search for discussions on plugging that frame with spray foam.  I ended up replacing and resealing every screw in the roof and roof trim.  One of my next projects is to replace the front lift panels, and I found your aluminum solution interesting, and worth some consideration.  I've often wished when camping in cold weather that I could wipe the condensation out of that area - I'm afraid of what I might find behind that panel!  If it were me, I think I would attempt to repair the bottom wood.  If the bad area is soft and not very big, I'm thinking you could cut out the bad spot, and replace it with a new piece of wood, then refinish. Good luck.


  • 0

#6 1stGen

1stGen

    Newbie

  • Members
  • Pip
  • 8 posts
  • LocationPeterborough, ON

Posted 15 July 2013 - 05:33 PM

So I called the guys from All Terrain Campers... Super helpful bunch of guys and helped get me on the right track. We tore off all the tape this past weekend and gave the inside a good cleaning with goo gone (to get rid of the sticky) and then soap and water. There were about 20 or 30 small pin holes that needed to be patched, which the guys from All Terrain helped walk me through. Got the HH-66 Vinyl Cement and some patch material from a place that sells inflatable tubes and water trampolines. I asked them about the marine grade vinyl and they basically said stay away. The patch material I got is much closer to the actual texture of the pop-up sides.


I'm planning on using the marine grade vinyl to protect the pop-up sides at the front where the hinges are. If you look in the picture, you can see two long strips of tape running at the top and bottom where the material hits the springs. I think on the original style lift panels, the wood paneling actually helps keep the fabric from rubbing on the springs/screw heads, whereas on mine, it's totally exposed. I had thought about covering it up with a piece of paneling, but that would defeat the purpose of having an open front lift panel. I'll try the vinyl wrap idea and let you know how it works out.


As for the water damage, I think I'm going to be replacing the roof screws with stainless steel and some neoprene washers. The guys from All Terrain also told me about spraying some of that spray foam stuff in the corners, so I'll give that a shot while I'm up there. As for the wood, I've decided to give that CPES stuff from Rot Doctor a try. Seems like a pretty cool idea, but I'm afraid I'll have to strip all the plastic/encapsulated wood in order to match it up afterwards. I've got some white moisture resistant paint that we used on the ceiling in our bathroom at home, so I'm thinking that might be a good route to go. Has anyone ever used anything similar to repair rotten wood? It seems simple enough but if anyone had any tips or tricks, I'd certainly love to hear them.


Cheers,


Dylan


  • 0

#7 LuckyDan

LuckyDan

    Senior Member

  • Members
  • 644 posts
  • LocationBased in Eastern, NOW CENTRAL Oregon

Posted 19 July 2013 - 06:35 AM

When you go to re-cover the wood after the epoxy I'd use an outdoor paint on the outside like a porch and deck paint.  I've been fortunate, so far any bad wood I've dealt with just required a little epoxy filler.  I've helped once with fixing a bad spot in a boat transom using a penetrating, basically a thinned epoxy.  The short story is there was a bad spot where the depth finder/speedo transducer was installed.  We just drilled small holes about 2/3 the depth into the ply from the inside of the boat and injected the stuff in till it started to bead out the bottom where we had removed the fiberglass to get more air to the spot.  It wasn't my boat so I don't remember the exact product as I didn't purchase it.  After curing we just patched the removed glass area.


Good luck with your repair. 


Edited by LuckyDan, 19 July 2013 - 06:38 AM.

  • 0

Old, bum around in Ford and an even older FWC Grandby

New Mantra: "Everyday camping is just making up for lost time"


Also tagged with one or more of these keywords: Grandby, cabover, water damage

0 user(s) are reading this topic

0 members, 0 guests, 0 anonymous users