Jump to content


Photo
- - - - -

Bill's FWC Hawk build.


  • Please log in to reply
138 replies to this topic

#11 billharr

billharr

    Senior Member

  • Members
  • 2,824 posts
  • LocationStockton CA

Posted 22 November 2013 - 05:58 AM

Congrats Bill. Looking forward to this build. If you don't mind, why did you get another (newer) Hawk?


My old Hawk had the short cabover, worked but had to remake the camper each night. With the longer cabover you can leave the bedding up and close the top.  I got lucky and found a 2013 shell that I can build out the way I want. I also get all the new stuff. One piece roof, new lift panels, latest heater, new propane tanks, light color pop up. Just nicer than the old camper.  That said if the 2002 had an extended cabover I would not have been looking. 


Bill


  • 0

#12 Casa Escarlata Robles Too

Casa Escarlata Robles Too

    C'est la vie

  • Site Team
  • 9,295 posts
  • Locationmonterey bay area

Posted 22 November 2013 - 08:19 PM

I guess I didn't look at your camper that closely in Zion to see that you didn't have the extended cab.

It's so nice to have that extra room.I don't have to make up the bed every time.I just leave the sleeping bags on the mattress.We don't use the pull out part of the bed just sleep across the camper.Works for us as we can fit there.

Will you have room for your "air spoiler" with the extended cab?

Have fun with your build.

Frank


  • 0

2002 Tundra AC TRD 4WD Limited 2009 ATC Bobcat loaded http://sharychic.blogspot.com/


#13 billharr

billharr

    Senior Member

  • Members
  • 2,824 posts
  • LocationStockton CA

Posted 23 November 2013 - 03:23 AM

Placed my parts order with FWC today.  Decided to order the counter top so it will look almost stock. I will have drawers and doors in different places than the factory.  After Thanksgiving everything should be here and the work will begin. 


Side note: found out everyones favorite service guy Terry will be moving over to sales. He should do well there, he has customer service down.


Bill 


  • 0

#14 billharr

billharr

    Senior Member

  • Members
  • 2,824 posts
  • LocationStockton CA

Posted 25 November 2013 - 11:48 PM

Started doing a little removal today. An FWC shell is more than just a shell, they put in finish boards and small storage compartments on each side. I don't need these for my side dinette build, so out they come.  Below is what I ended up with after pulling the finish board and hinged tops. The tops are also carpeted, no glue but hundreds of staples.


right side
left side
 
These are the staples I got out of just the small 3" strips of carpet that are hanging in the photos above. 
staples
 
Some parts of the finished boards will be going back after the Cabinets and seat bottoms are finished. 


Edited by billharr, 25 November 2013 - 11:50 PM.

  • 0

#15 mitch h

mitch h

    Senior Member

  • Members
  • 317 posts
  • Locationbrazil,in.

Posted 26 November 2013 - 12:03 AM

Bill while you have it tore down, you might think about some bigger backing plates for your eye bolts. easy to get to now. Just a thought. Mitch


  • 0

#16 mitch h

mitch h

    Senior Member

  • Members
  • 317 posts
  • Locationbrazil,in.

Posted 26 November 2013 - 12:05 AM

Never mind. Should have looked at your pics first


  • 0

#17 billharr

billharr

    Senior Member

  • Members
  • 2,824 posts
  • LocationStockton CA

Posted 26 November 2013 - 12:24 AM

Never mind. Should have looked at your pics first


Those are how FWC makes them now. Not at all like my old 2002 Hawk the out side are not eye bolts any more. Large angle with a hole, they have done a great job on them.


Edited by billharr, 26 November 2013 - 12:33 AM.

  • 0

#18 mitch h

mitch h

    Senior Member

  • Members
  • 317 posts
  • Locationbrazil,in.

Posted 26 November 2013 - 02:41 AM

Different than my 2007 grandby too.


  • 0

#19 billharr

billharr

    Senior Member

  • Members
  • 2,824 posts
  • LocationStockton CA

Posted 29 November 2013 - 11:40 PM

Did not do a lot over the Holiday. I am on hurry up and wait for parts. Go a call today on the Waeco Fridge it will be here Tuesday, Solar on Monday (120 folding panel).  As soon as FWC finishes the counter tops I start putting things together. 


Got the battery and heater out of the cabinet. next week the DC fridge will be here. Tomorrow I will start moving the wiring around to the battery in the front. 

gallery_1903_712_81309.jpg


  • 0

#20 billharr

billharr

    Senior Member

  • Members
  • 2,824 posts
  • LocationStockton CA

Posted 02 December 2013 - 12:21 AM

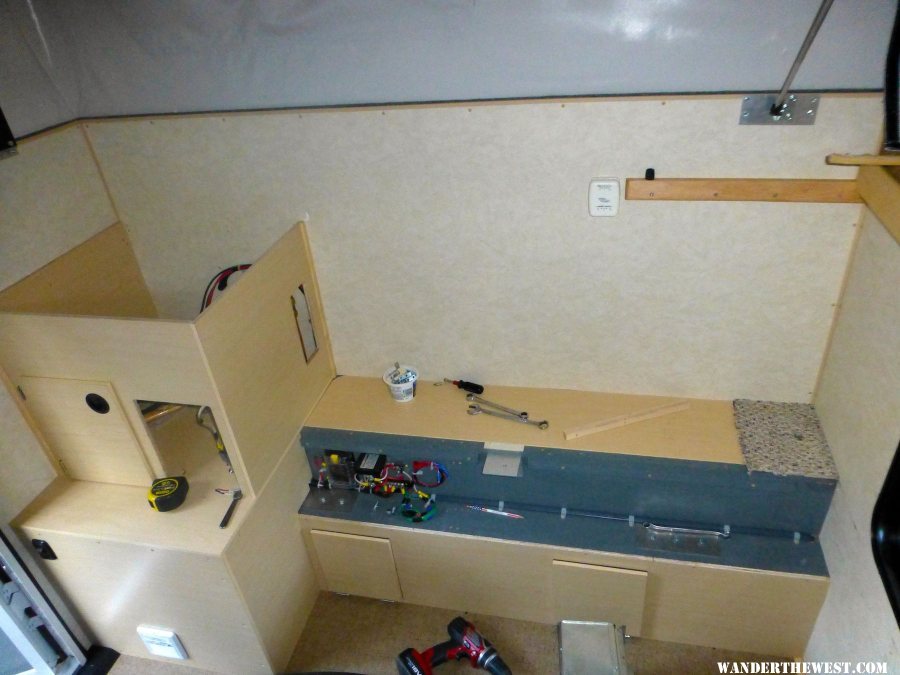
Slow day, got the battery and separator moved to the front. Glad I know how to use an VOM, tracing wires that are not marked is a lot easier. Had an unmarked set of wires with connectors by the battery. Traced and found they are rolled up with the solar plug wires. Solar wires are well marked but then this set was running to where the battery was.  Going to have to move these over to where the battery is now. Moved the plug to the truck from the drivers side to the passenger side, that is where my truck plug is and now where the battery is. 3 wires from the truck plug a white hot and black ground but the third wire was Blue. After 4 " Blue hooked to Green into the camper, Green then hooked to Orange, Orange back to a smaller gage green that had 3 scotch lock taps off of it, what could it be??   A little checking and found I have LED marker lights on the camper :) I will need to wire this to the trucks tail lights. 


Just about all I can do until parts arrive.  Going to leave the blue sea fuse box in the same location just move it forward. I will cover it with a small door next to the Drawers (or drawer) I will be putting in. The master cut off switch will be next to the fuse box under the new door. Planning to leave this area open underneath so the heater can pull air in here. This way I will not need to have the  louvered vent in the cabinet face. 


  • 0


0 user(s) are reading this topic

0 members, 0 guests, 0 anonymous users