Jump to content


Photo
- - - - -

Installing a Trimetric 2030


  • Please log in to reply
15 replies to this topic

#1 DrJ

DrJ

    Senior Member

  • Members
  • 514 posts
  • LocationSouthern Idaho

Posted 08 September 2014 - 12:06 AM

I've seen several requests on the Trimetric 2030 installation and wanted to post a few pictures.


Here is some information about the battery monitor in case you don't know much about it:

http://www.bogarteng...ducts/trimetric

http://www.bogarteng...Reference-2.pdf


In a nutshell, it's a battery monitor that uses a shunt to monitor the amp hours of your battery. As electricity passes through the shunt, the monitor keeps track of whether it is going into or out of your battery. It monitors real time voltage, amperage, percentage of charge and a ton of other things I don't even really pay that much attention too.


IMG 4053
 
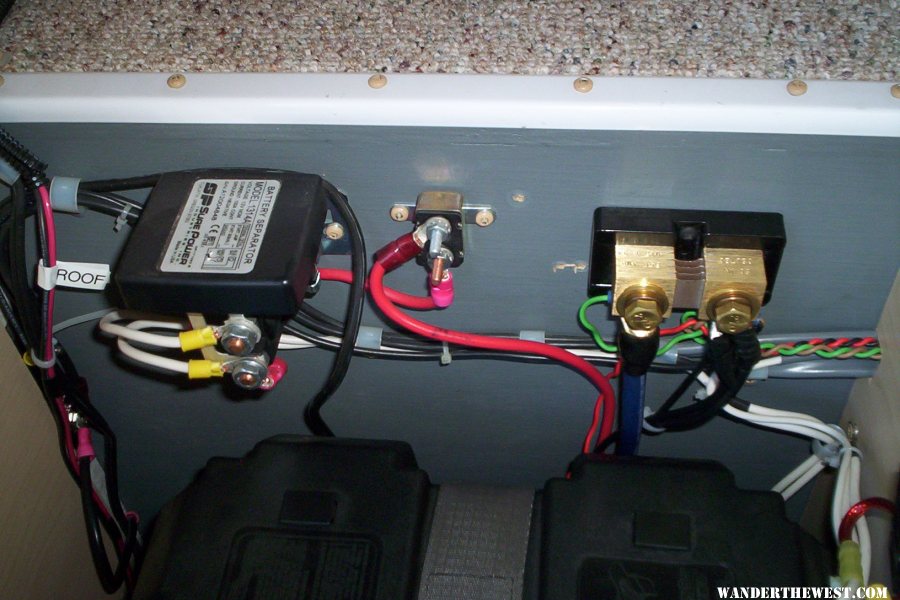
I installed it near the sink because I didn't have the room on the right side of the cabinets. This is where I would have preferred to place it.
 
IMG 4054
 
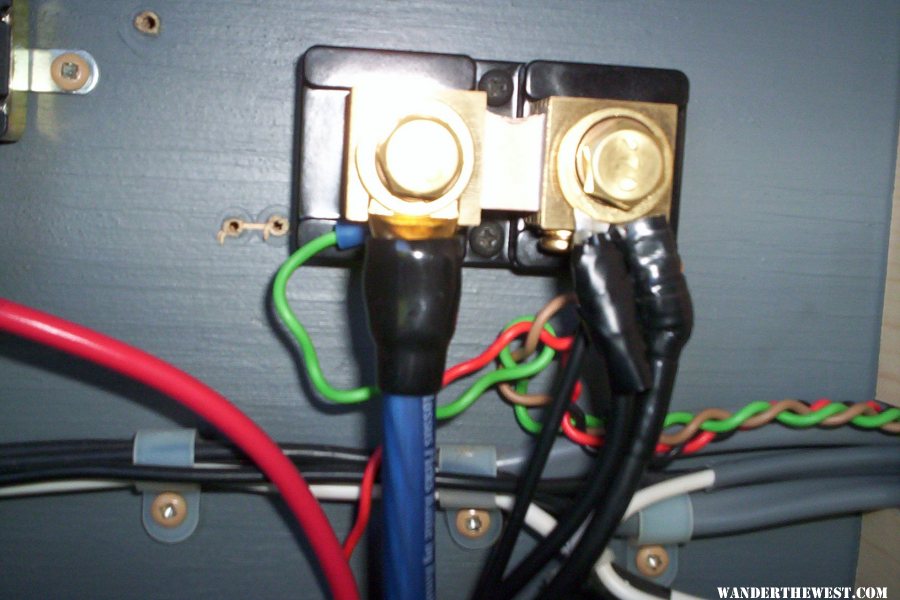
The setup is a little confusing even after reading the manual. You essentially have to hook up a shunt, which is the gold/black hardware with two bolts at the top of the picture. This senses power by running it through the negative side of the battery system. You also hook up the monitors 4 wires. The white wire goes to one side of the shunt and the two black wires go to the far side of the shunt.
There is also a red wire from the monitor that goes to the positive side of the terminal.
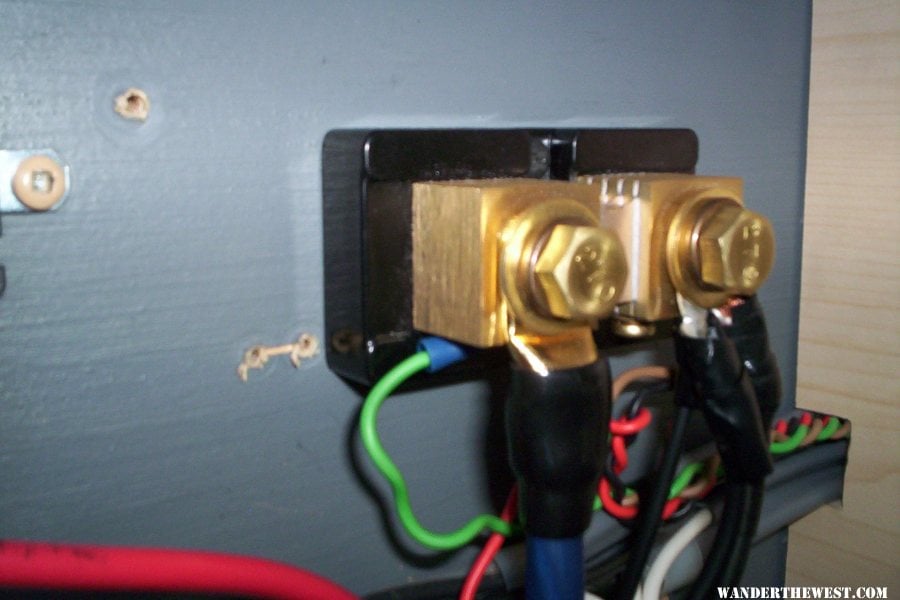
 
IMG 4056


Another view of it:
IMG 4055
 
 
Here is how mine is hooked up:
 
Shunt Left Side
Negative from battery bank
White Trimetric wire to Top Screw
 
Shunt Right Side
Negative from solar controller
Negative from main truck camper (FWC negative)
Two black wires from trimetric to top screw
 
Positive Battery Terminal
Red trimetric with 1 amp fuse
 
Hope this helps a few of you who were looking for more explanation.


  • 0

2015 Silverado Crew Cab Duramax and 2015 Front Dinette Grandby

One can change the world, it only requires kindness

http://www.truckcamp...g-family-earth/


#2 Kokopelli

Kokopelli

    Senior Member

  • Members
  • 134 posts
  • LocationDurango, Colorado

Posted 08 September 2014 - 01:43 AM

Thanks DrJ!


  • 0
Rick 2007 Nissan Frontier King Cab 4x4 NISMO. Ride-Rite air bags. 2008 Eagle

#3 RC Pilot Jim

RC Pilot Jim

    Senior Member

  • Members
  • 1,544 posts
  • LocationSan Diego Calif

Posted 08 September 2014 - 01:38 PM

As I look at the shunt one size says 50mv other side 500 amp. On opposite side -two small screws in the side.

Are left and right side as you face the side with two small screws?

Does it may any difference which end of the shunt the negative cables from solar, alternator, and charger ( my small Bat Doc)
Side of battery are attached too?

Edited by RC Pilot Jim, 08 September 2014 - 01:45 PM.

  • 0

Jim

Retired from truck camping June 2021

Our Basic Eagle/Fleet Shell Build


#4 DrJ

DrJ

    Senior Member

  • Members
  • 514 posts
  • LocationSouthern Idaho

Posted 08 September 2014 - 01:55 PM

As I look at the shunt one size says 50mv other side 500 amp. On opposite side -two small screws in the side.

Are left and right side as you face the side with two small screws?

Does it may any difference which end of the shunt the negative cables from solar, alternator, and charger ( my small Bat Doc)
Side of battery are attached too?


I am describing it with the left and right as you face the shunt - with the screws pointing up.

It did seem to spell out in the instructions which side of the shunt everything was placed on.

The shunt is just a highly conductive instrument from which all the power in your system has to pass through at some point.
If it's connected wrong it can either read the opposite result or blow a fuse. It has a 1 amp fuse so it doesn't take much to blow it.
My solar, alternator and iota charger would have all been connected on the right side. I am assuming yours would be too. But I would go with the manual if it says differently.
  • 0

2015 Silverado Crew Cab Duramax and 2015 Front Dinette Grandby

One can change the world, it only requires kindness

http://www.truckcamp...g-family-earth/


#5 PaulT

PaulT

    Need gumbo

  • Members
  • 2,611 posts
  • LocationHillsboro, Oregon

Posted 08 September 2014 - 03:06 PM

The shunt is a low resistance, high precision resistor. As current flows through the shunt, a small voltage can be measured that is proportional to the current. Current going into the battery produces a voltage of one polarity. Current flowing out of the battery produces a voltage of the opposite polarity.

This allows the battery monitor to compute the amps being consumed from the battery or charging the battery. The monitor can directly measure the battery/charging voltage. Besides the current and voltage, the monitor's processor collects the data over time which allows the monitor to accumulate state of charge, amp hours, etc.

The difference between the two shunts primarily allows the monitor to collect more precise data for the lower current version. The need for the 1 amp fuse is in case of a short or failed component somewhere in that circuit, the battery does not dump mass quantities of power through the small wire causing a fire inside your cabinets.

After seeing all the good data you guys are getting, you are helping me spend more money. I need a Trimetric now and have to justify it to SWMBO. It's just a day & a half at Yosemite Housekeeping camp. Or 3 tanks of gas driving to that great camping spot.

Paul
  • 0
I thought getting old would take longer.

#6 RC Pilot Jim

RC Pilot Jim

    Senior Member

  • Members
  • 1,544 posts
  • LocationSan Diego Calif

Posted 09 September 2014 - 10:06 PM

We had the Trimetric and shunt installed this morning. If you are in San Diego county area and you have decided to have a shop do the work I recommend :


Mobile Electronics

2905 Oceanside Blvd Suite A

Oceanside, CA 92054

Mike Lewis - owner

ph: 760-967-1100

mike@northcountymobile.net


He charges $70 per hour. Installation cost $80

The installer Billy  knew his business, read the install manual, and did a good job.


It should be less expensive for the next ones because now he knows steps to do it.


Now  am testing amp usage to take Refer temp down to 39*

Temp here is 99* when I turned refer on about half hour ago. Refer temp 50* when I last checked it. Amp draw 2.7 at this point in the process. Here are the pictures:


gallery_2684_767_37920.jpg


gallery_2684_767_310335.jpg


gallery_2684_767_5139.jpg


Edited by RC Pilot Jim, 09 September 2014 - 10:29 PM.

  • 0

Jim

Retired from truck camping June 2021

Our Basic Eagle/Fleet Shell Build


#7 DrJ

DrJ

    Senior Member

  • Members
  • 514 posts
  • LocationSouthern Idaho

Posted 09 September 2014 - 10:11 PM

Jim,

That looks like a great installation.

Welcome to the trimetric family!

My wife calls it a toy for battery nerds! :D


I'd love to hear your measurements on your camper.

It's great to compare from different campers.


  • 0

2015 Silverado Crew Cab Duramax and 2015 Front Dinette Grandby

One can change the world, it only requires kindness

http://www.truckcamp...g-family-earth/


#8 billharr

billharr

    Senior Member

  • Members
  • 2,824 posts
  • LocationStockton CA

Posted 09 September 2014 - 10:17 PM

Nice install. Like the twisted pair going to meter.  Only an electronic shop would do that.


Bill


  • 0

#9 RC Pilot Jim

RC Pilot Jim

    Senior Member

  • Members
  • 1,544 posts
  • LocationSan Diego Calif

Posted 09 September 2014 - 10:21 PM

Here is the rest of pics that did't make the first page:


First Trimetric monitor. I installed it on the side of the wheel well box on drivers side Monitor is displaying amps draw on the Refer. Notice the minus sign? When system is charging minus turns off and it displays charging amp. When I started battery was a 100% of full.

gallery_2684_767_24320.jpg


I took their advice and went with the inline fuse on the combined circuit:( wire on left pole of push/pull switch). Wire and fuse on right pole is the Engle Refer


gallery_2684_767_55303.jpg


Edited by RC Pilot Jim, 09 September 2014 - 11:20 PM.

  • 0

Jim

Retired from truck camping June 2021

Our Basic Eagle/Fleet Shell Build


#10 RC Pilot Jim

RC Pilot Jim

    Senior Member

  • Members
  • 1,544 posts
  • LocationSan Diego Calif

Posted 09 September 2014 - 10:26 PM

Yes I will take the measurements. Now I am testing the monitor. I have the refer on with no charging from alternator, solar, or alternator.

It is very hot and unseasonably humid the past few days. We only live 7 miles from the ocean and have been running the A/C every day. It doesn't cool down until after 8 pm and humidity climbs back to 70% or higher. 


  • 0

Jim

Retired from truck camping June 2021

Our Basic Eagle/Fleet Shell Build


0 user(s) are reading this topic

0 members, 0 guests, 0 anonymous users