You may have read this announcement and wondered what's next. Here's an update...
We have a brand new Site Team to help out when needed. They've bravely stepped up to volunteer their time without really knowing what's expected and we are very grateful. This is a lovely forum; posts are helpful, polite and just plain fun but occasionally members need to have threads moved, need help with attachments or have suggestions for a new feature. The Site Team is here to help as they are able.
What about Aaron? He carefully built a wonderful community and tended it daily. He's still around although more infrequently than in the past and we're glad to have him drop in anytime. Meet the new team, give them a pat on the back and cut them some slack as they explore the extra tools they have.
Congratulations (and condolences) to:
MarkBC, Ted, Mark W. Ingalls and ski3pin
Highest Reputation Content
#63883 New Site Team!
 Posted by
on 02 February 2012 - 08:25 PM
Posted by
on 02 February 2012 - 08:25 PM
#247400 So, you want to setup a good electrical system in your camper?
 Posted by
on 01 February 2021 - 03:12 AM
Posted by
on 01 February 2021 - 03:12 AM
So you have a camper shell… or are wanting to start all over with wiring up your camper? This guide/thread should help. Technical explanations and even terms like “current” “voltage” and “watts” are not used unless absolutely necessary.
If you have questions or comments, please post them in this other thread instead of here, to keep this one cleaner and easier to read.
Charging your camper from the truck?
The wiring that comes with your truck for a trailer connection is too thin to carry enough power back to your camper batteries to do much good. That includes wiring that your camper installer may have put in when you picked up your brand new camper. This needs to be upgraded to at least 6AWG wire. Copper wire is expensive these days! The wire should also be rated to handle automotive (read: greasy and hot/cold). I use 2AWG welding cables in my builds.
This wire goes from the engine bay, under the truck and back to the truck’s box or flatbed tray to a heavy duty “Anderson Power Pole” connector. Be careful when you route the wires/cables to make sure they don’t rub or interfere with anything. When going through metal surfaces, ensure you protect the cable from any sharp edges.
You need two cables, one for the positive wire, and another for the ground. Using a “frame” ground is not recommended. The positive wire leaving the battery has to immediately go to a fuse/breaker to protect the wire (and you) in case it gets shorted somehow. I use 100A Blue Sea 285 breakers. Its nice to have a breaker (vs a fuse) that you can use as a “switch” to disable the alternator charging function or to remove power during maintenance work.
You will also want to make a new hole or two in the wooden “floor pack” part of your camper and route the wires into the battery box of the camper. I used a ½” drill, and sealed it with a urethane caulk. Butyl rubber tape works well as a sealer too.
Just before these hefty cables connect to your camper batter(ies), you will want to add another 100A breaker to the positive wire. This way the cable is protected on both ends. From there a short run from the breaker to the positive battery wire completes the basic circuit.
You may wonder why a fuse or circuit breaker is needed at each end of the main battery charging positive cable. Isn't one good enough? Good question! (and thanks to Jon R for suggesting that I answer this question here)
That heavy duty wire can carry a lot of juice. And it is getting that juice (power, aka current and voltage) from BOTH batteries. Meaning that if any part of that wire touches a metal part of the camper or truck, all the available power in those batteries is going to come out of that wire and create a LOT of sparks and heat and more than likely burn down your camper & truck. And if you are unlucky enough to be part of the circuit that the current goes through, it could kill you. It's only 12V you say? Yes, and people have been known to weld with 12V out on 4x4 trails. Do you really want to experiment with that unexpectedly?
Having just one fuse/breaker at one end still leaves the other battery connected to that wire. So, it just makes sense to have one at either end, as close to the batteries as possible.
OK, two breakers, got it.... (I hope!) Now the camper/truck batteries are linked, unless you trip one of the breakers manually, and the truck will charge the camper battery if it running and the camper will charge the truck battery if you have solar and the sun is shining. Cool, eh? (yes, I’m Canadian!)
Variations
If you do not want to charge the truck from the camper (via solar for example) and the charging function will only ever flow from truck to camper, then you might want to add a DC-DC charger into the mix. I say might, because an older truck with a “dumb” alternator will now happily charge your camper batteries. My truck is a 2006 Chevy 1 ton, and I can saw 90A going over the wires (I have a gauge for that) into the AGM batteries in my first FWC. That’s lots.. like over 1200W! That usually ramped down very fast (10 minutes) to more like 40A for the duration of the charging time.
BUT, now that I have LiFePo4 batteries, they have a different reaction to charge current, and will take whatever my alternator can through at them. I was afraid that my alternator would burn up. So I added a DC-DC charger to LIMIT the charging current to a nice stable 30A. I’ve used both the Renogy and Victron brands. The Victron is smaller, but runs quite hot. I added a cooling fan to keep it happy.
On the other hand, if you have a truck with a “Smart” alternator (almost all have those now) they tend to “manage” themselves and reduce how much power they put out, in order to reduce the load on the engine, and thus improve fuel economy. As smart alternator will not charge your camper batteries much at all with the stock trailer plug sized wires, and likely not much more with 2g wire. In this case, a DC-DC charger will make sure you do get a decent amount (30A) of charge whenever the truck is running.
The DC-DC charger goes between the 100A breaker in the camper and the camper battery. It will likely not fit into an already full camper battery box, so you need to find a well ventilated spot for it nearby. The closer the better.
If you want to charge the truck from the camper, then you can’t use the DC-DC charger wired like this. Instead, you will want to use an Automatic Charge Relay (ACR). I use the Blue Sea ML-7622. It is robust enough I could actually start my truck with the camper batteries if necessary. This relay can sit anywhere in the circuit between the truck and camper, as it automatically senses the presence of enough power on either side of the ACR to connect the two systems together. Meaning, if the sun is shining on your solar panels, you are charging both the camper and the truck. Or, if driving, the alternator is also charging both the truck and the camper.
More later ...
#257763 Fire Rings - Clean Them Up!...And Make Them Disappear
 Posted by
on 05 August 2021 - 06:38 PM
Posted by
on 05 August 2021 - 06:38 PM
If possible l always dismantle fire rings at dispersed sites. I move the rocks as far as possible from the site and in different directions. I bury the ashes and smooth over the ground so no trace is visible.
I consider myself a fire ring vigilante and take pride in my work.
#288590 Old Atwood heater
 Posted by
on 22 January 2024 - 07:59 AM
Posted by
on 22 January 2024 - 07:59 AM
I had the exact same issue on my atwood (domestic) furnace, 2001 eagle. I think FWC used the same furnace on all models of that era. It was the gas valve and haven't had any problem with the furnace since replacing it 6 years ago. DOMETIC 31150 Kit, Gas Valve Side Out, 12Vd https://a.co/d/5tGc2Nk. This is a common problem as these furnaces age. I'm very surprised that Zack did not suggest it. When I bought the gas valve it was called an Atwood part. Now listed as DOMETIC. There are different configurations of the valve based on the particular furnace size and orientation. If you want to confirm the part number you need to view the label on the side of the valve which is hard to do unless you remove it, and it's probably covered with dust ( mine was). I think I found a video on YouTube for replacing it. Just Google for the Atwood gas valve. It was used on many RVs and not just FWCs.
In 2018 when I was having the problem with the furnace I attended a FWC rally where the factory sent a tech person to go around and review and possibly fix people's issues at the rally. I had the tech look at my furnace and he also couldn't come up with a solution. Ultimately it was a friend with a 2004 Hawk who knew what to do as he recently replaced his gas valve. Unless a tech person has gray hair, he probably doesn't really know the old units, but I'll bet that the guys at All Terrain Campers can point you in the right direction and would probably suggest the gas valve as their first guess if the battery is good. After that, the circuit board or electrical connections but the gas valve is the cheapest first step as opposed to replacing the circuit board.
#281862 Venting Turnbuckle Doors
 Posted by
on 05 June 2023 - 10:57 PM
Posted by
on 05 June 2023 - 10:57 PM
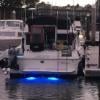
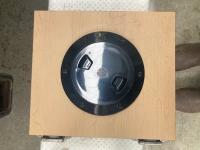
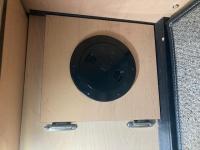
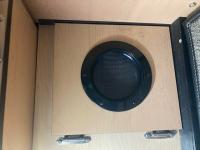
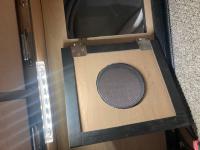
Finished another small project today from a wonderful idea politely stolen from WTW. Last weekend we found the great benefit of cross ventilation by having the fans sucking air out and opening the TB doors on the shady side of the camper. We actually watched the temperature drop inside by 15 degrees in 5 minutes. Only problem was the dang bugs were getting in. Now with these deck plates and screens our problem is solved.
Attached Thumbnails

#276336 The Landscape Photography Thread
 Posted by
on 15 December 2022 - 04:58 PM
Posted by
on 15 December 2022 - 04:58 PM
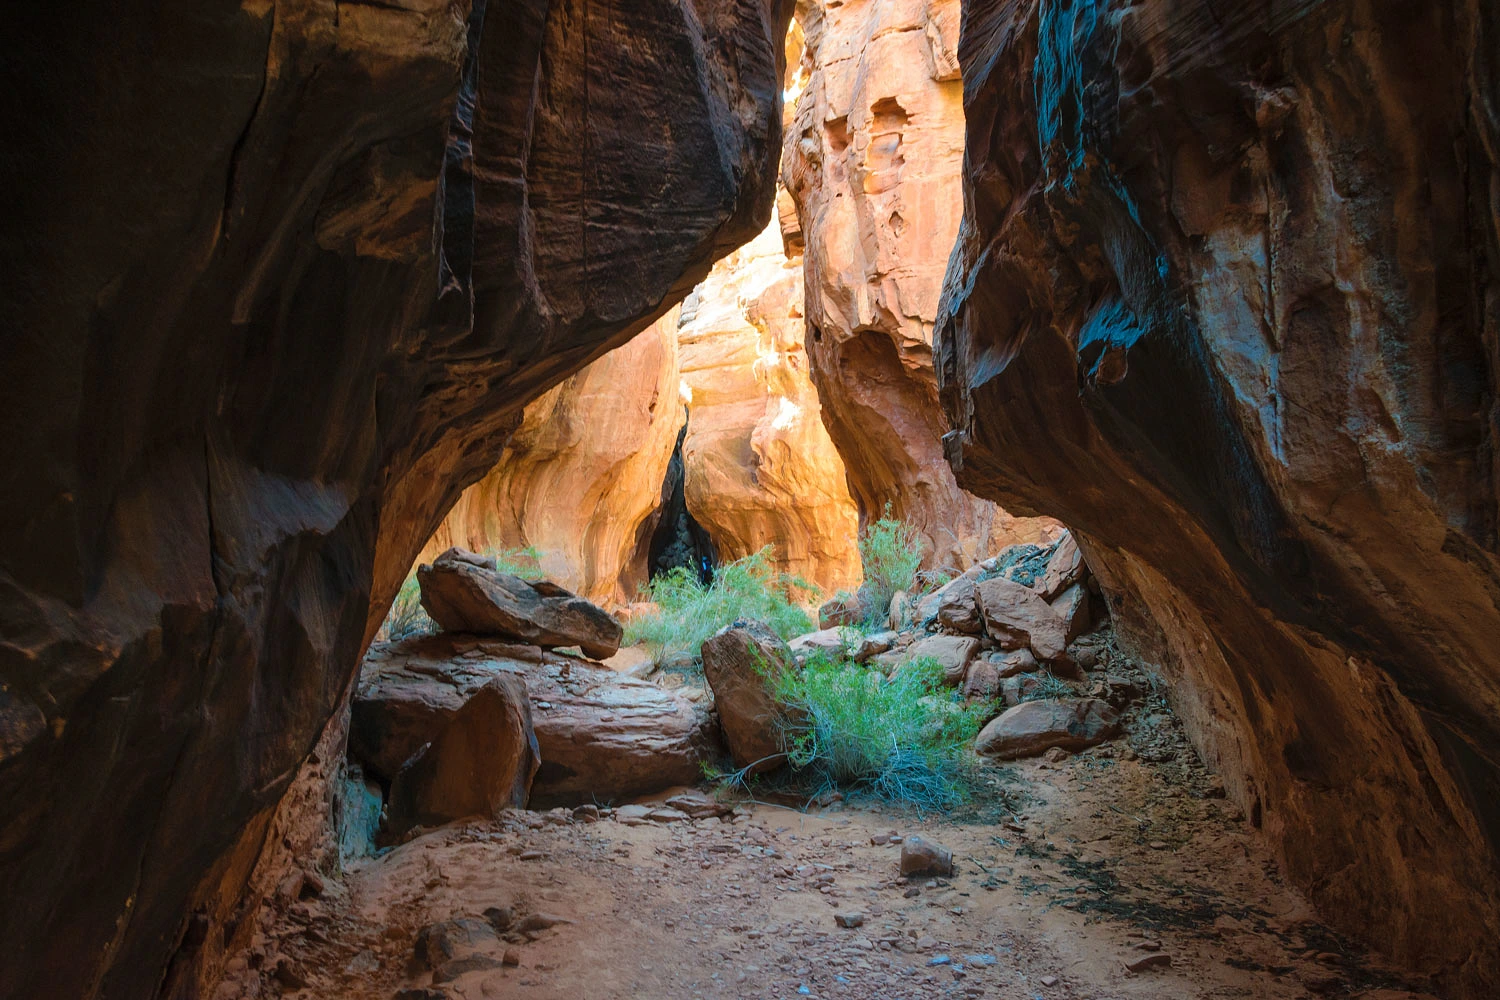
From our recent adventure .......................
#264371 Tipping angle w/ camper?
 Posted by
on 06 January 2022 - 01:02 AM
Posted by
on 06 January 2022 - 01:02 AM
The important thing to note here is that any intelligent person will back off long before the vehicle is in danger of tipping on a static side slope. Most capsizes occur completely unexpectedly when a verge gives way or a tire drops into a hole. Or of course from hooning.
As to that truck and camper on a 30-degree slope. Let's just say that if it really was 30 degrees, I'm impressed, and astonished that a trainer would put a client's vehicle in that position. I've had Jeep Wranglers at a genuine 30 degrees plus, and it's eye-opening even with that vehicle.
In dozens and dozens of drive-alongs with participants at the Overland Expo, on a precisely built course, owners usually start to feel really nervous at around 15 to 20 degrees—and that's a good thing.
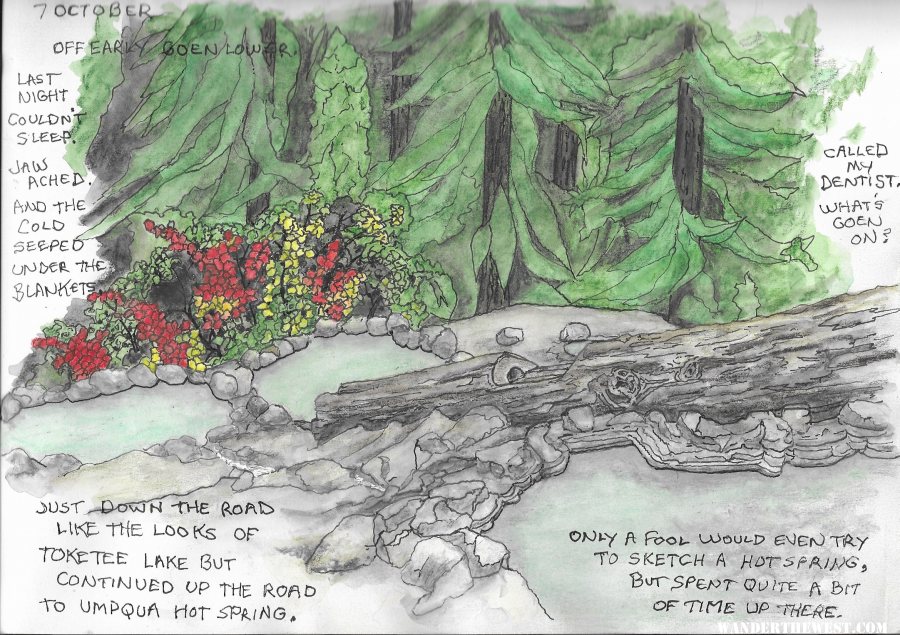
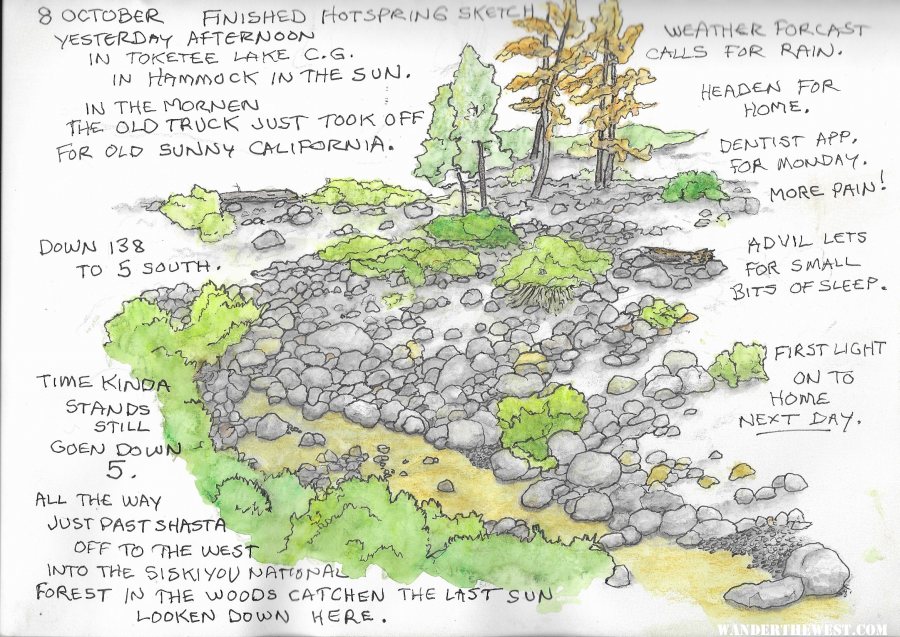
#260833 Milts Bad Trip
 Posted by
on 10 October 2021 - 09:37 PM
Posted by
on 10 October 2021 - 09:37 PM
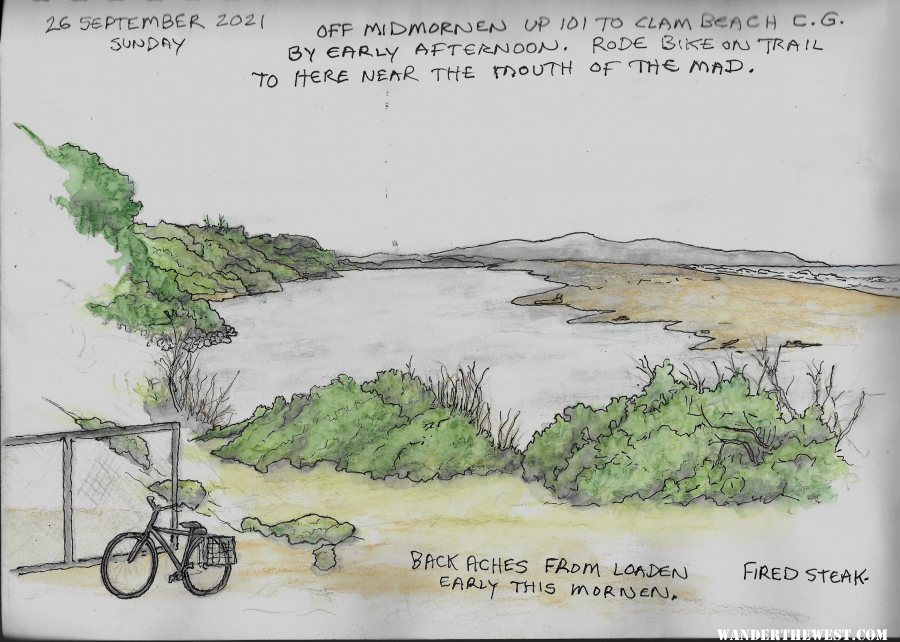
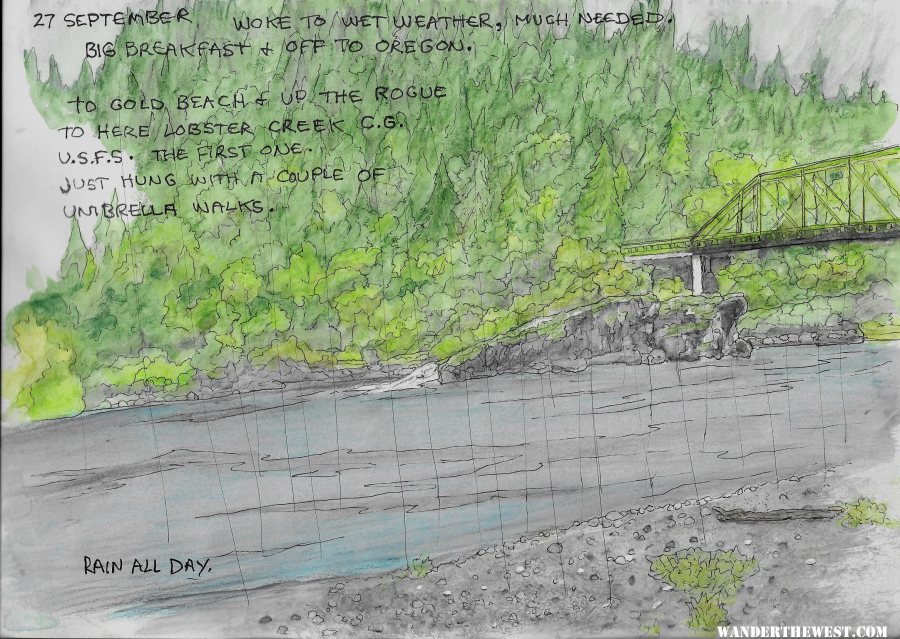
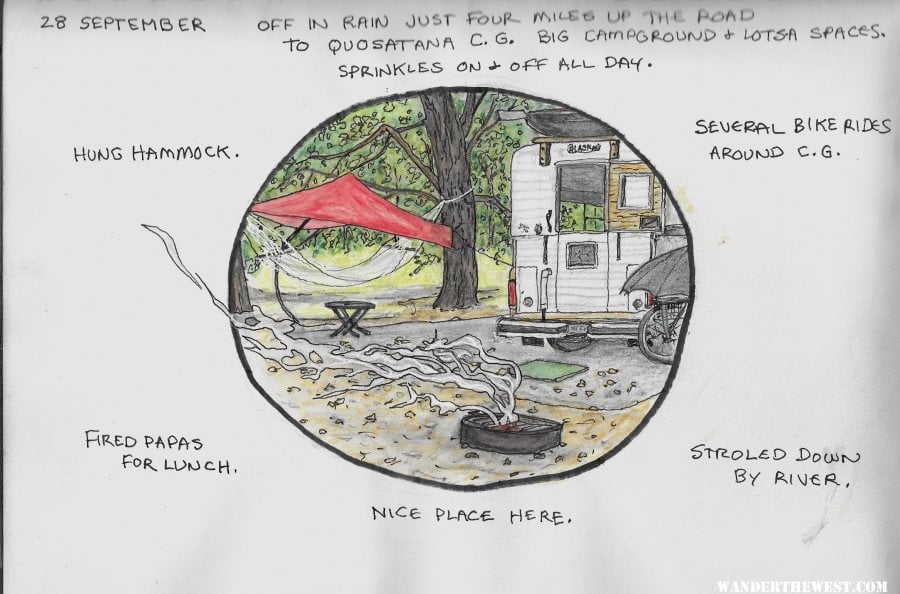
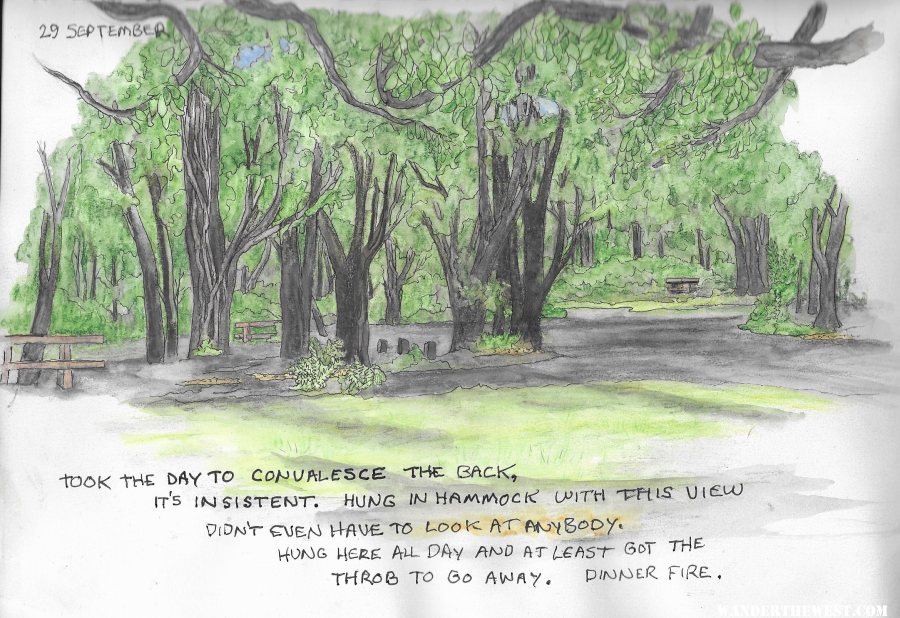
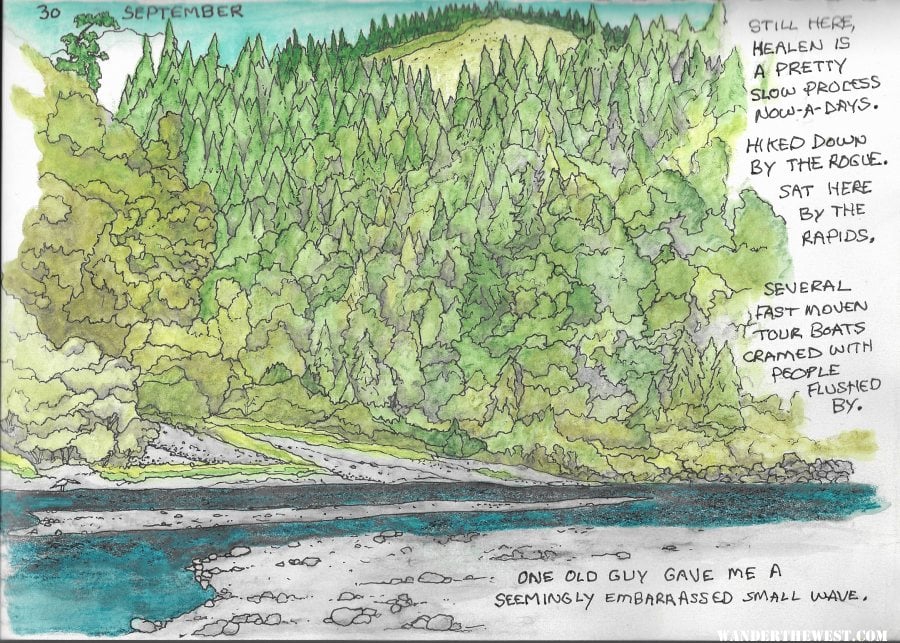
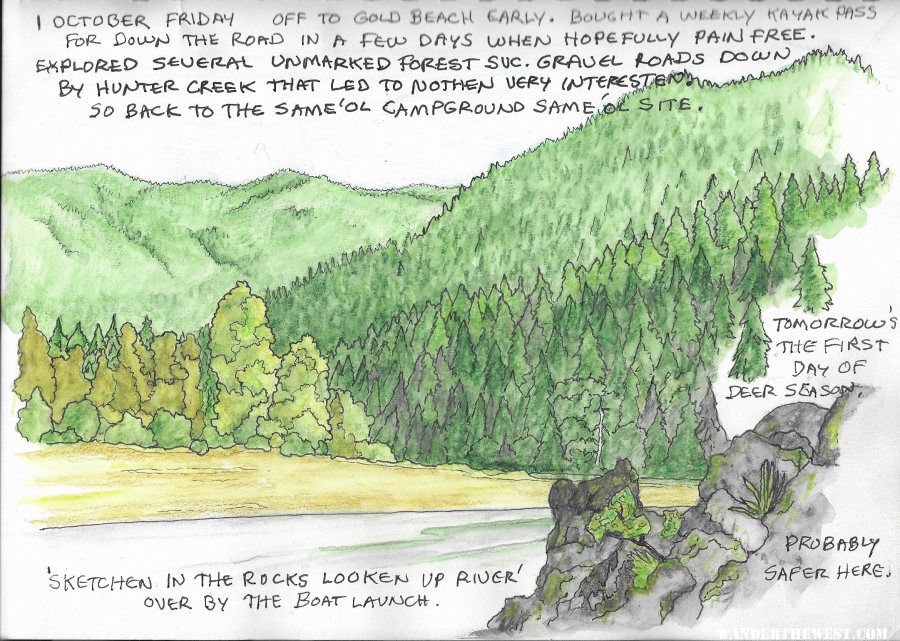
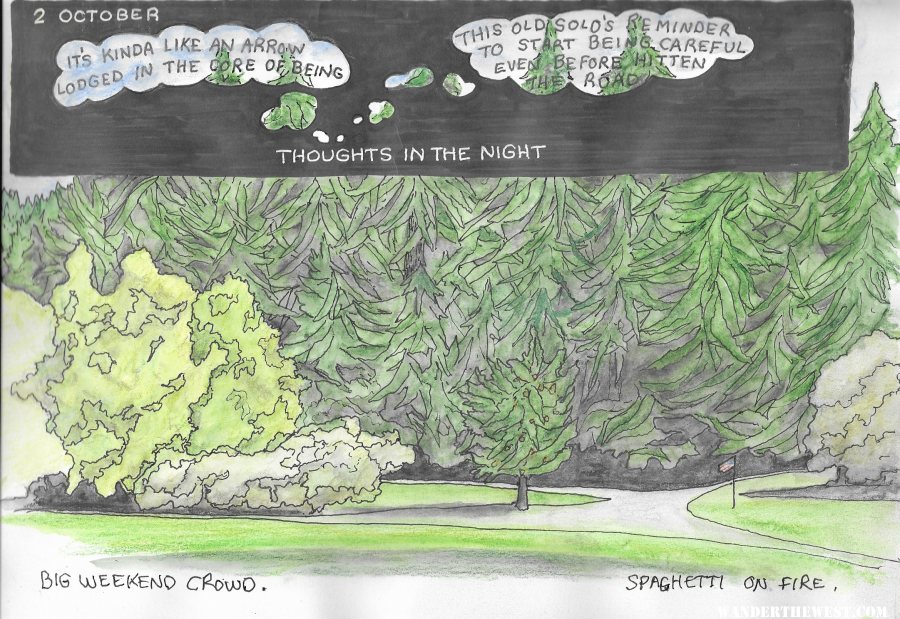
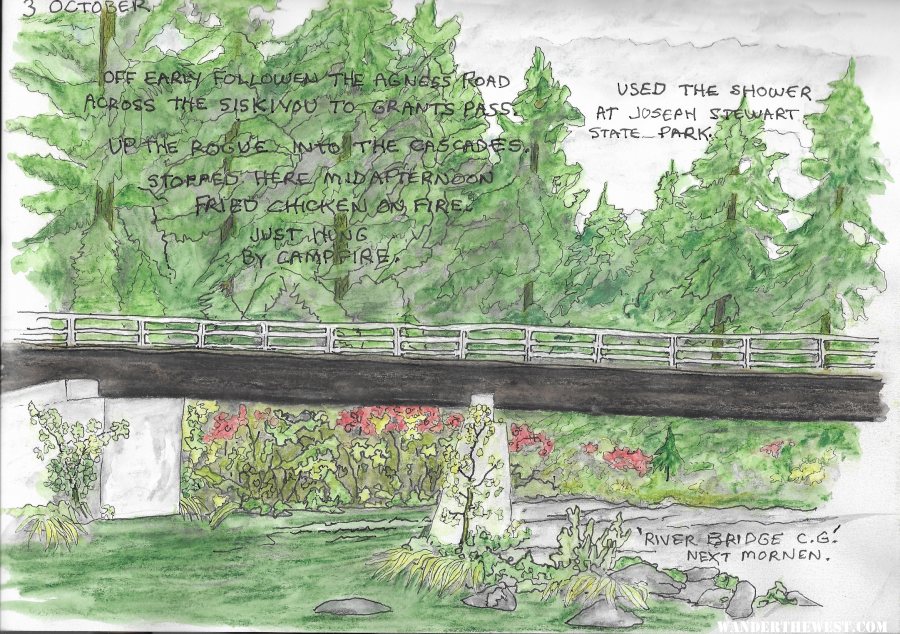
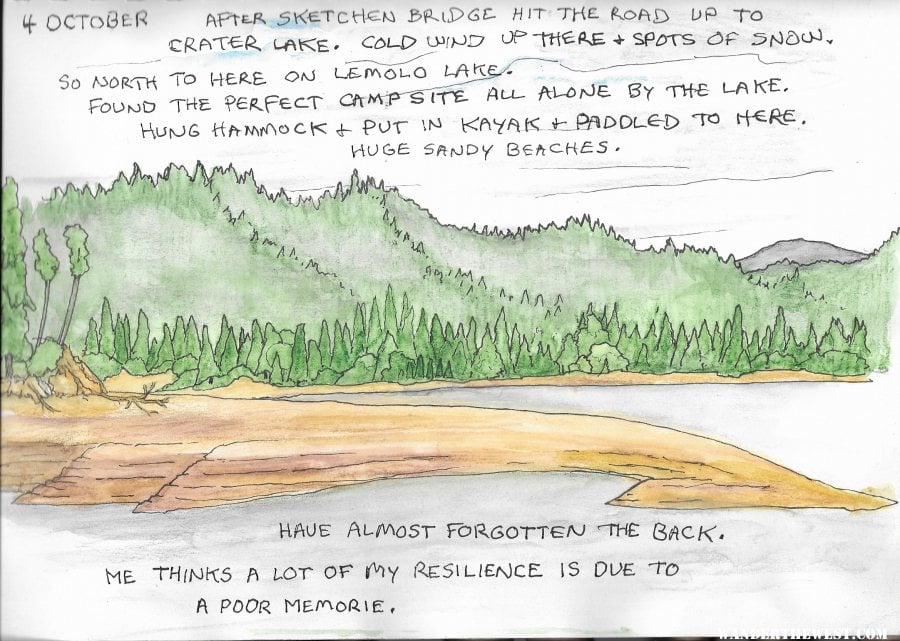
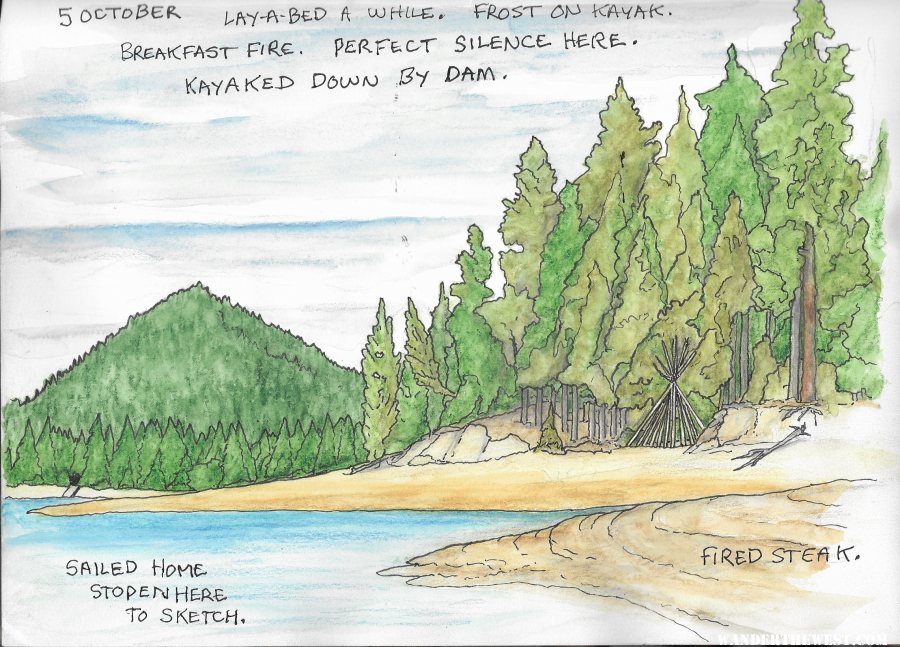
Couple of weeks in Oregon Sufferen

#256425 New gray wolf pack in Plumas County
 Posted by
on 10 July 2021 - 02:19 PM
Posted by
on 10 July 2021 - 02:19 PM
Certainly unpopular with me. I think the livestock industry (particularly cattle) are ruining our public lands and have been for decades. And the government (that is us, the owners) are subsidizing it by low to non-existent grazing fees along with little to no oversight. I'd be much happier seeing more wildlife and fewer cow pies.
This may be unpopular, but I still don't think that we need wolves in the lower 48. My friend in Montana is a government trapper/shooter and he has had to kill over 1,000 wolves in the last 20 years. And those are just the proven livestock killers.It is a mess.
#243750 Mysterious Metal Monolith Found In Utah
 Posted by
on 27 November 2020 - 07:16 PM
Posted by
on 27 November 2020 - 07:16 PM
I hate selfies....it's hard enough to look in the mirror to shave.... what do people do with all the shots of themselves?
#242924 Two week quarantines in CA, OR, WA - no recreation travel
 Posted by
on 14 November 2020 - 03:35 PM
Posted by
on 14 November 2020 - 03:35 PM
I have taken a jaundiced view of government scientists ever since they had elementary school kids hide under our desks to 'protect' us from a nuclear blast.

The difference in the masks shown is the first five are to protect you from breathing something in. The last one is also to protect others from what you breathe out. Most people that catch this flu don't even know it for a week or so, but they are contagious during that time. The mask is to help stop them from spreading it as much as it is to protect you.
I get it, wearing a mask is a PITA. As a cancer patient receiving chemo twice a month, I have a "compromised immune system". And since my cancer has spread to my lungs, it is sometimes a pain for me to breathe without a mask. But I have no choice but to wear a mask when I go to my appointments because so many others aren't wearing one. And while wearing a mask won't kill you, you not wearing a mask can kill me.
#242906 Two week quarantines in CA, OR, WA - no recreation travel
 Posted by
on 13 November 2020 - 11:48 PM
Posted by
on 13 November 2020 - 11:48 PM
My concern in all this is that the recommendations/mandates simply say face covering/mask is required.
There is no mention of any mask ratings/specifications that provide a suitable level of protection for the wearer to avoid infection or to not spread infection. I find no standard for masks or which masks have been tested and proven effective for the purpose. That information is available for dust/various chemicals or pesticides for agricultural/industrial uses and is typically printed on the package. It is missing on packaging for masks being sold for compliance with face covering requirements.
This has made me very skeptical of the face covering requirements especially when seeing neck gaiters or bandanas accepted as meeting the face covering requirements. Far too many times, I see people at half-mask covering the mouth but not the nose and that is accepted as complying.
I use KN95 rated masks without exhalation valves when available and the “TV show surgical masks” when KN95 are in short supply. I suspect that the mask requirement is for show or to keep our stress level high. Oregon was just issued more restrictions to start immediately for individuals but in 5 days for businesses. Why the delay for businesses? Are they less likely to spread the virus?
The governor did tell us that camping is OK unlike this spring when they closed the campgrounds. Either they are not all that smart or we are not all that smart. YMMV, I guess.
By the way, the quarantine period is 4 weeks in Multnomah county but just 2 weeks in adjacent counties.
Paul
There is indeed good data on this. It comes out of Asia from institutions that were primarily measuring pollution, but pivoted their particle counter work to smaller particle sizes. Essentially nearly anything helps some. N95s and most real KN95s block 95% or more. Standard three layer procedure masks block 80%. Single layer cloth...60% give or take. Remember though, that's what's coming IN. The primary purpose of the mask is to reduce the distance of what is being exhaled. If you can reduce the distance the particles travel from 6 feet to 1 foot and watch your distance and time exposure, all is good. There's a reason Japan, a densely populated nation with 126 million people has had fewer cases total than we had yesterday alone. This is not that complicated.
#242032 Atwood Hydro Flame 8516-IV Furnace Repair
Posted by
on 31 October 2020 - 12:17 AM
Our furnace is 7 to 8 years old. We just started to have an occasional issue with the furnace not starting. It would run through the cycle - blower on, click, but no ignition, and the furnace would shut down as it should. Restarting with the thermostat and it would light.
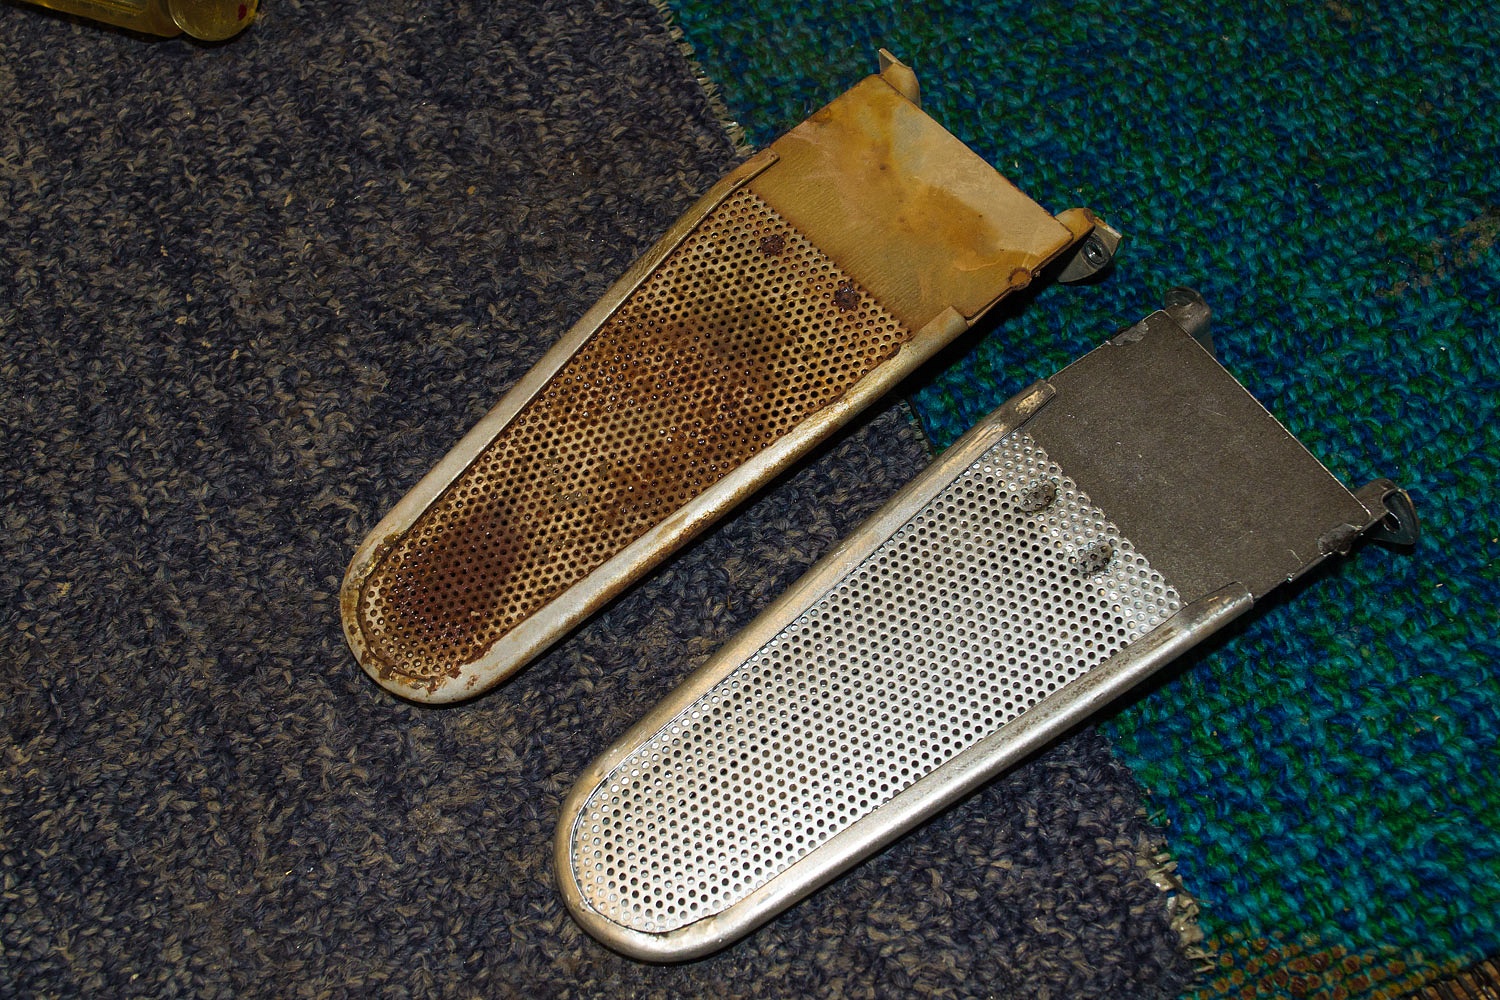
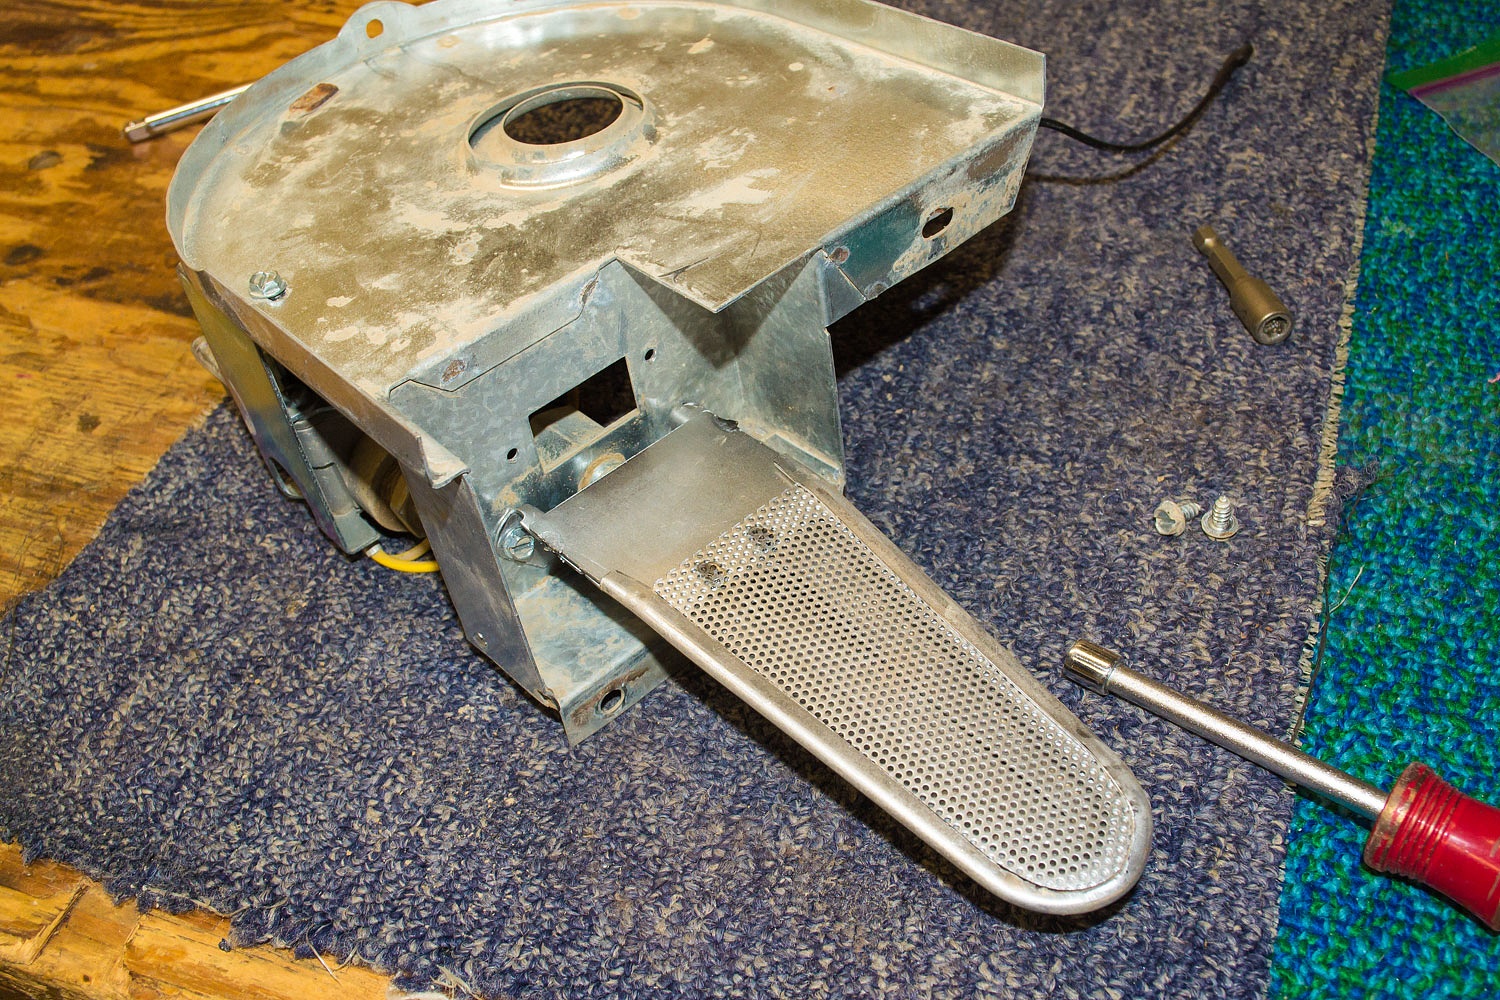
Back home, I did a visual inspection. Nothing was obvious until I pulled out the burner and found it rusty with the holes blocked in the area below the ends of the igniter. This looked like a good candidate for causing the issue.

After a trip to the online furnace parts store, a package arrived with a new burner, igniter, orifice, and sail switch. The burner assembly is easily removed. Unhook the propane supply line (turn it off at the tank first and be prepared for a bit of propane as the line empties), unclip a couple of wire spade connectors, and 4 sheet metal screws.
Out with the old, in with the new.
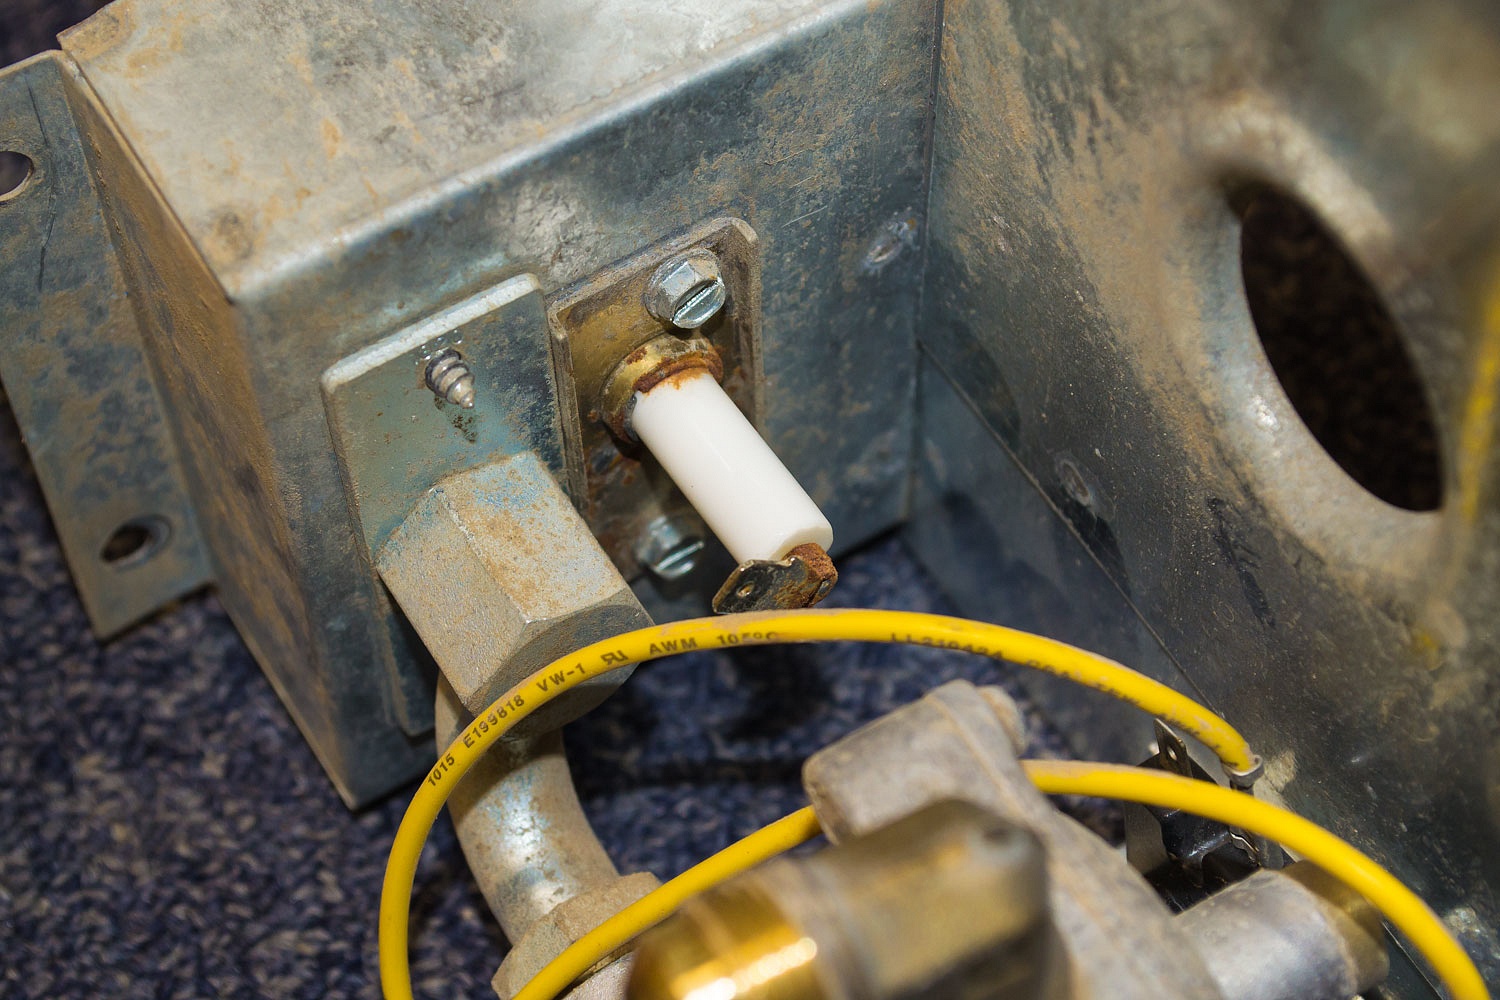
The old igniter had a bit of rust.
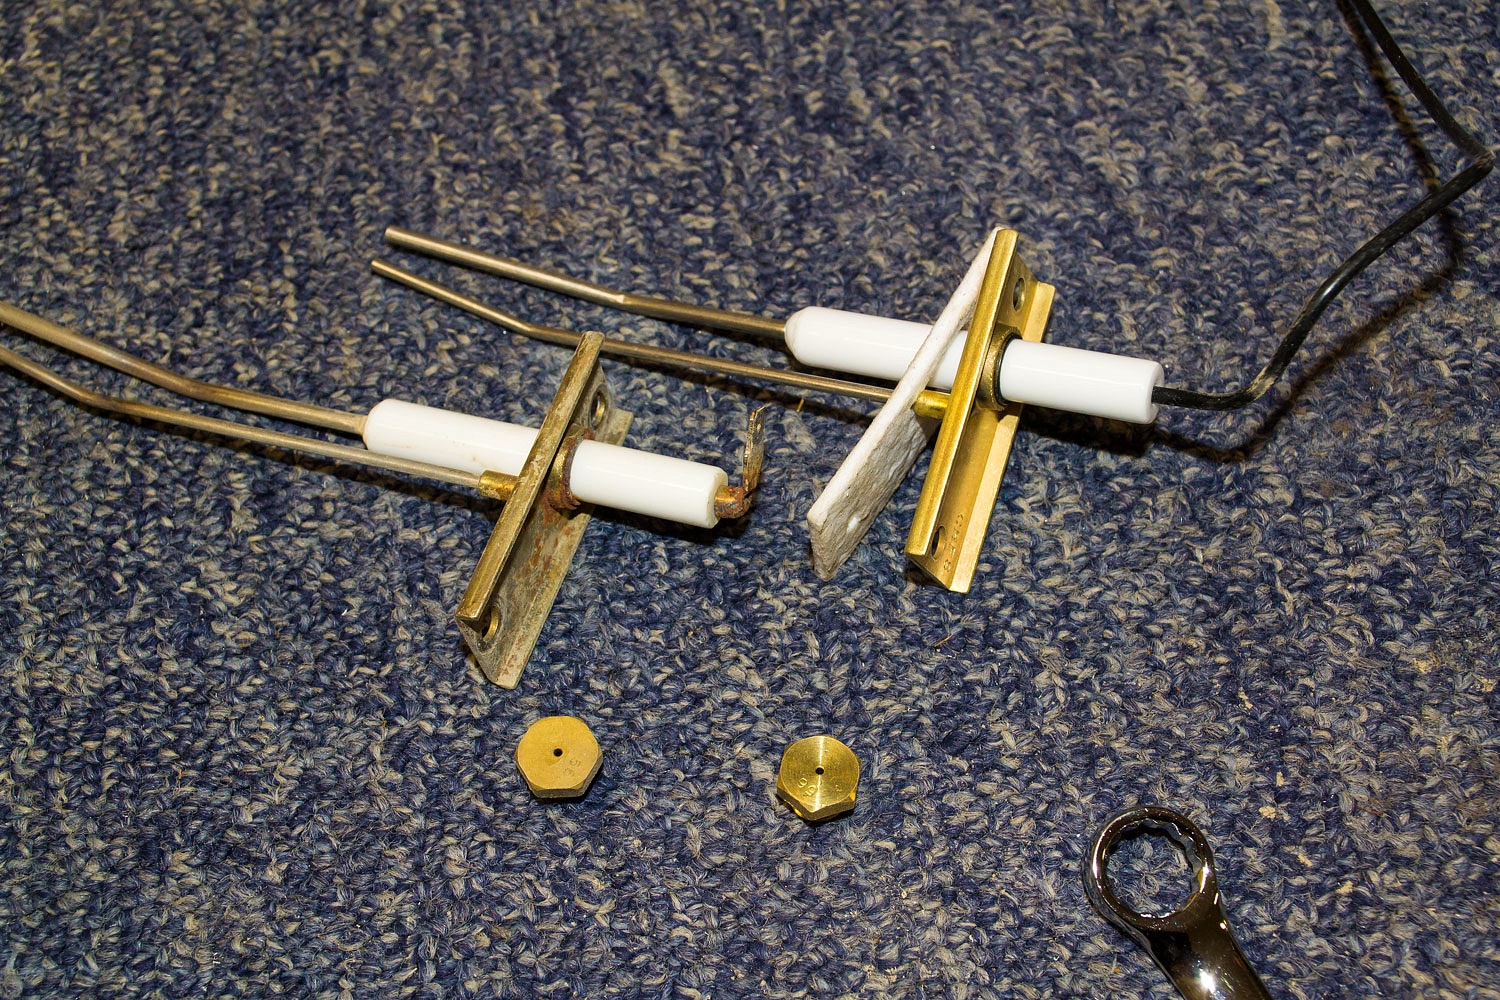
The new igniter came with a new wire (no spade connector) and a felt gasket not present with the original assembly. Also pictured are the old/new orifices.
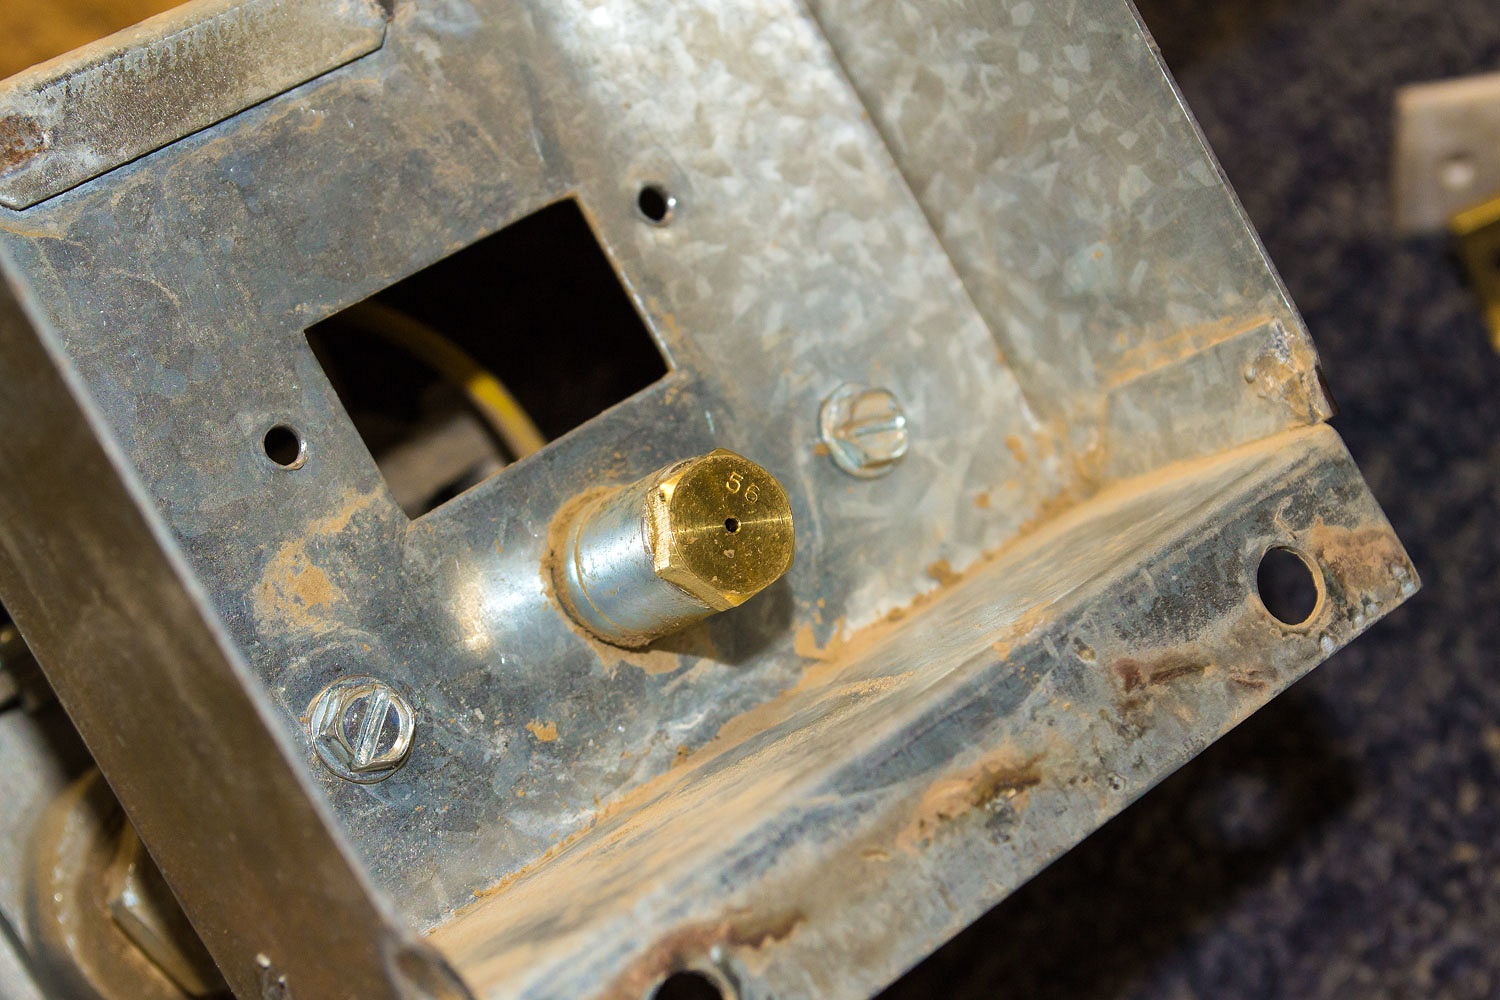
The new orifice installed.
The igniter is installed through the hole above and the two sheet metal screws are the attachment points for the burner.
The new igniter in place. I positioned the ends of the igniter a quarter inch apart and one eighth of an inch above the burner.
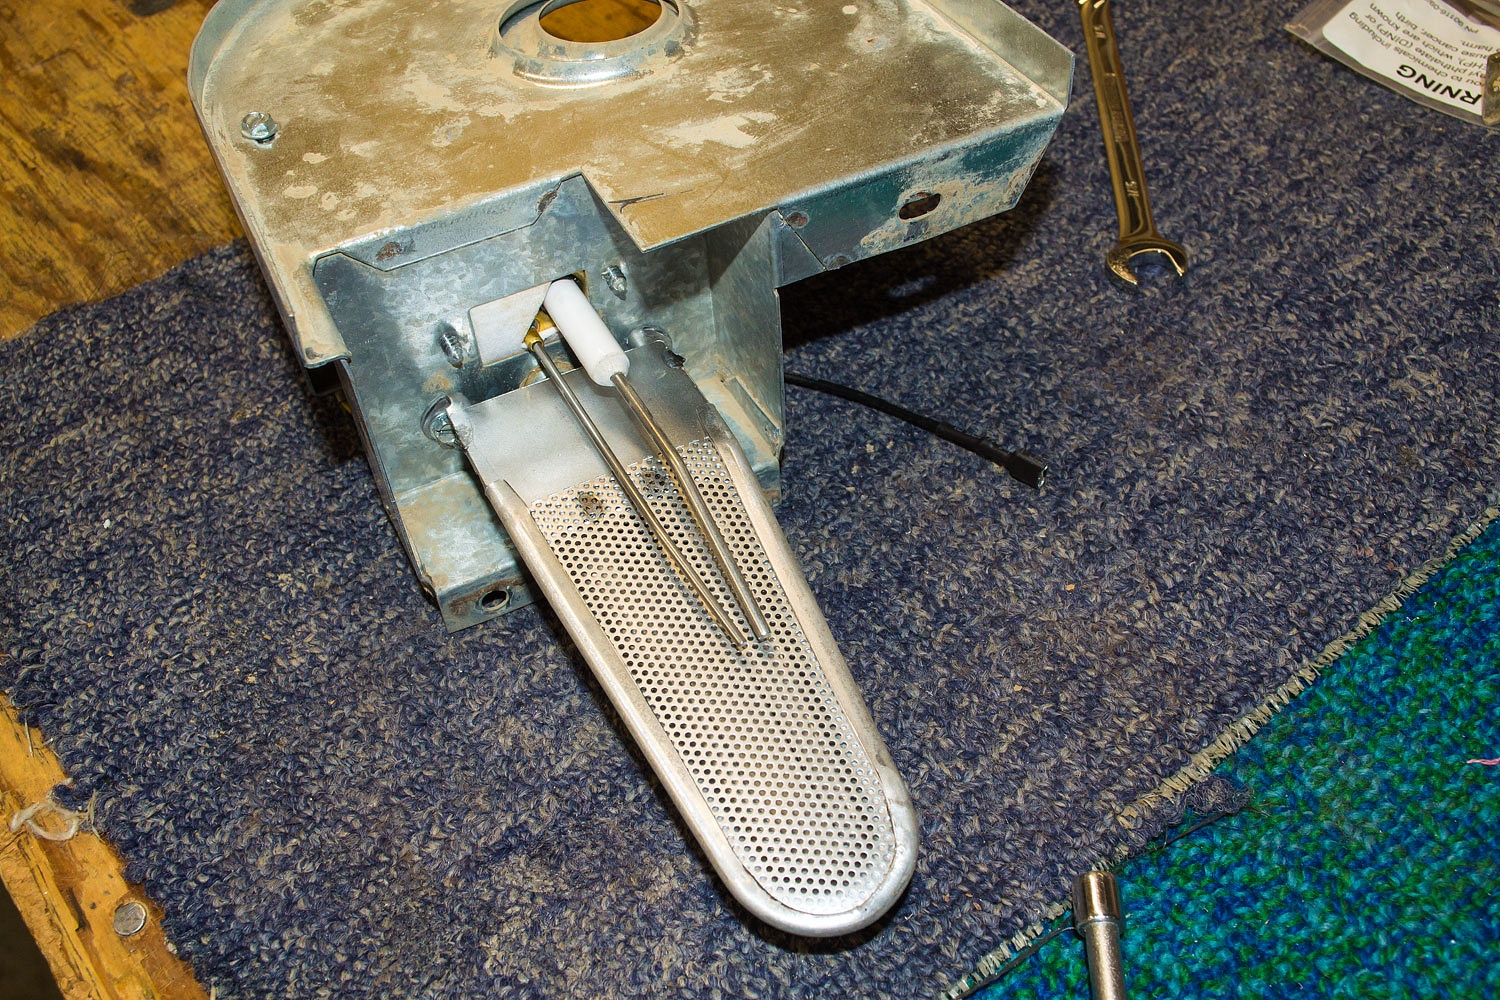
The burner and gas assembly ready to be reinstalled. The black wire is the new wire from the igniter.

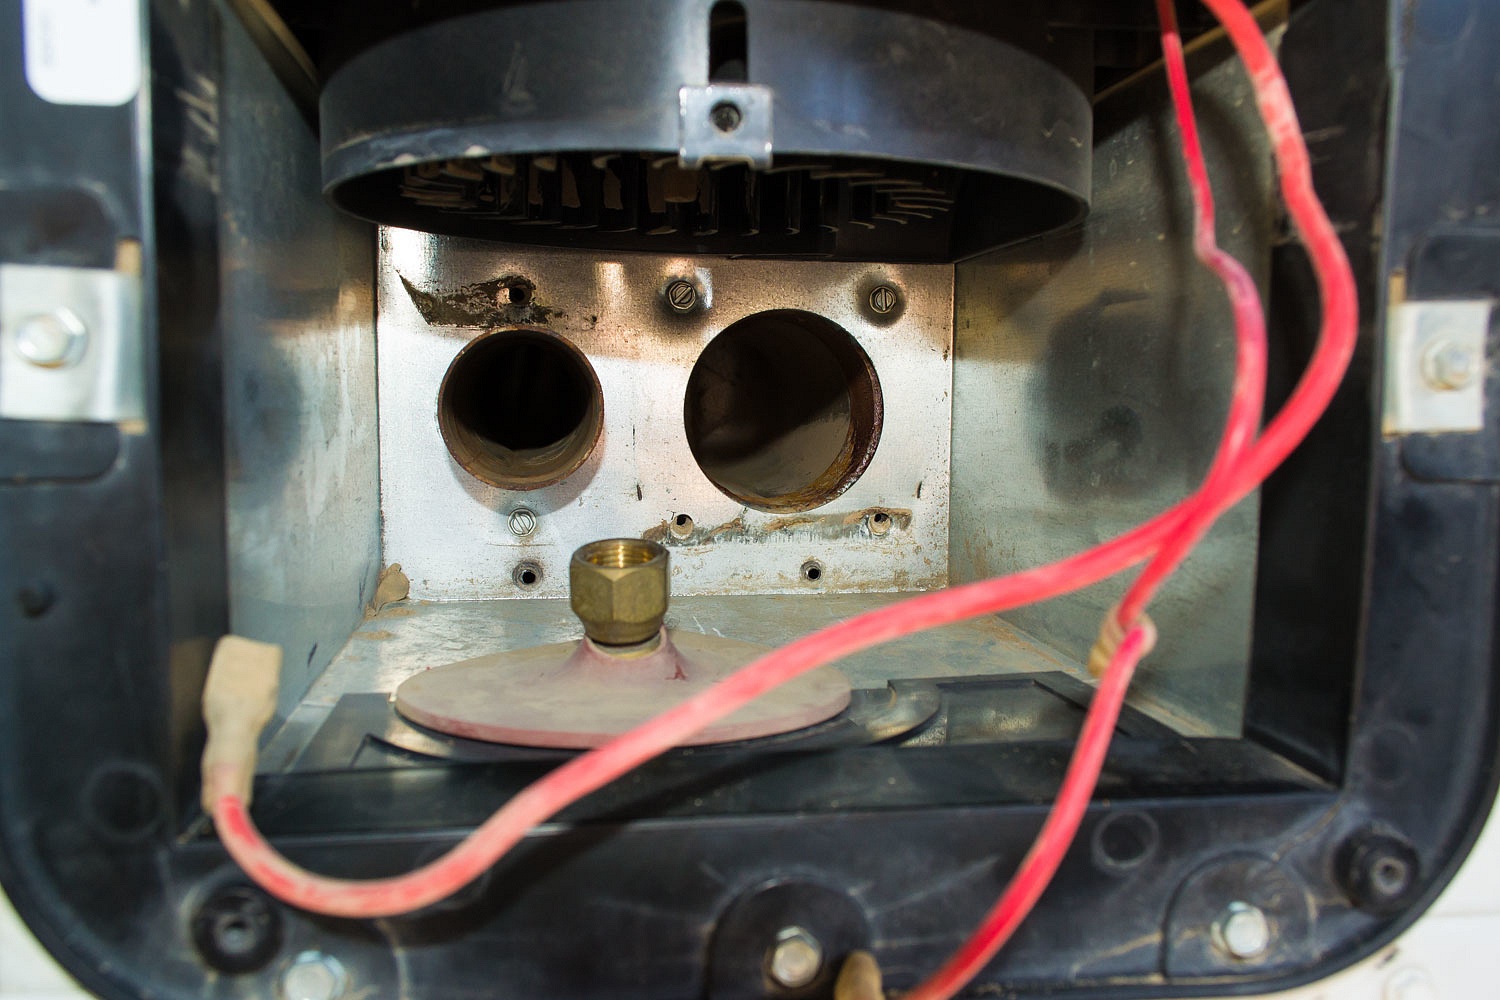
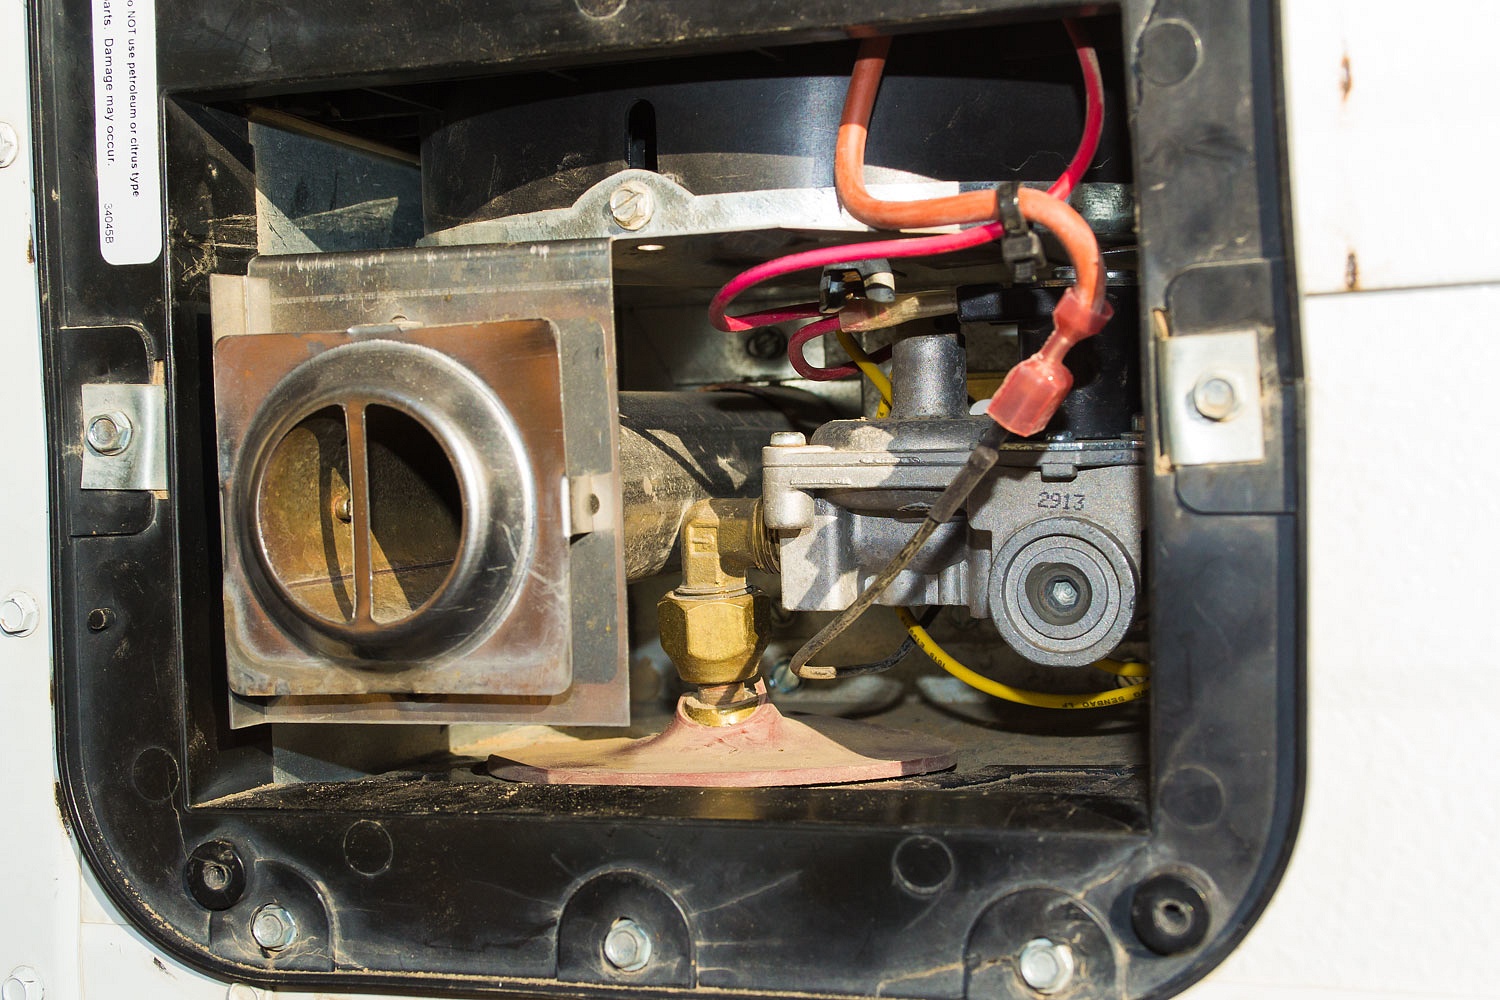
The burner slides in on the right and the exhaust on the left. I found the screws out of the two holes, bottom right and left, empty with the sheet metal screws rolling about. I replaced them with one size larger (#10) screws and they snugged up nice and tight. The pink rubber cover was removed and the supply line fittings lowered out of the way to easily slide the burner in.
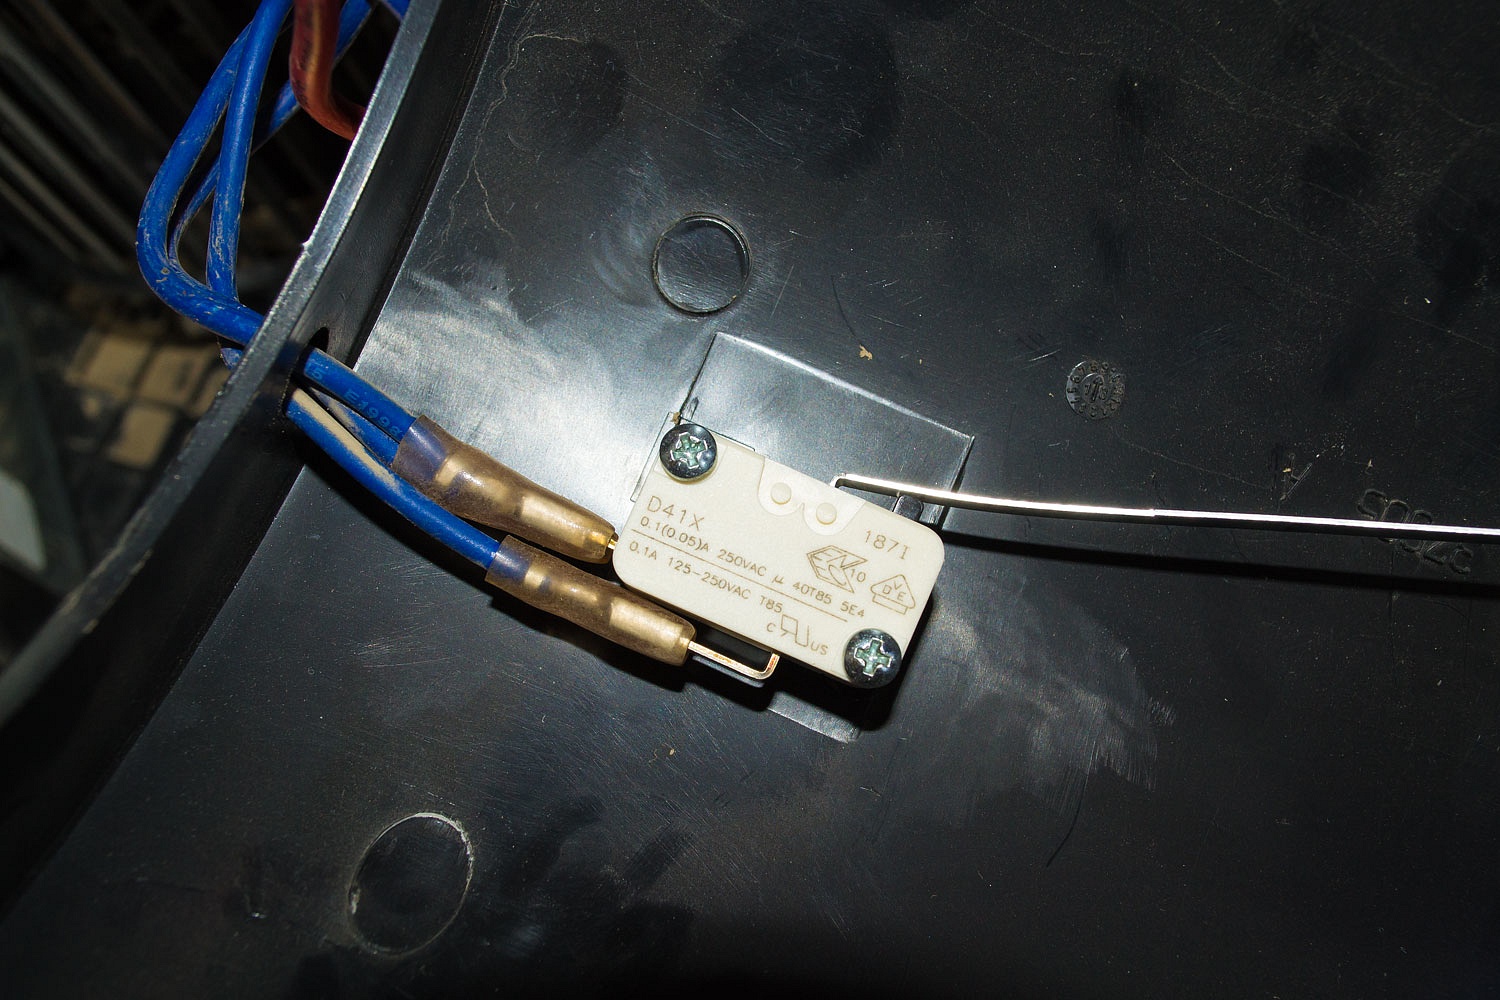
The sail switch is on the inside of the black half cylinder cover. Remove some wires to get them out of the way and the four screws on the four corners. Rotate the cover around and here's the sail switch.
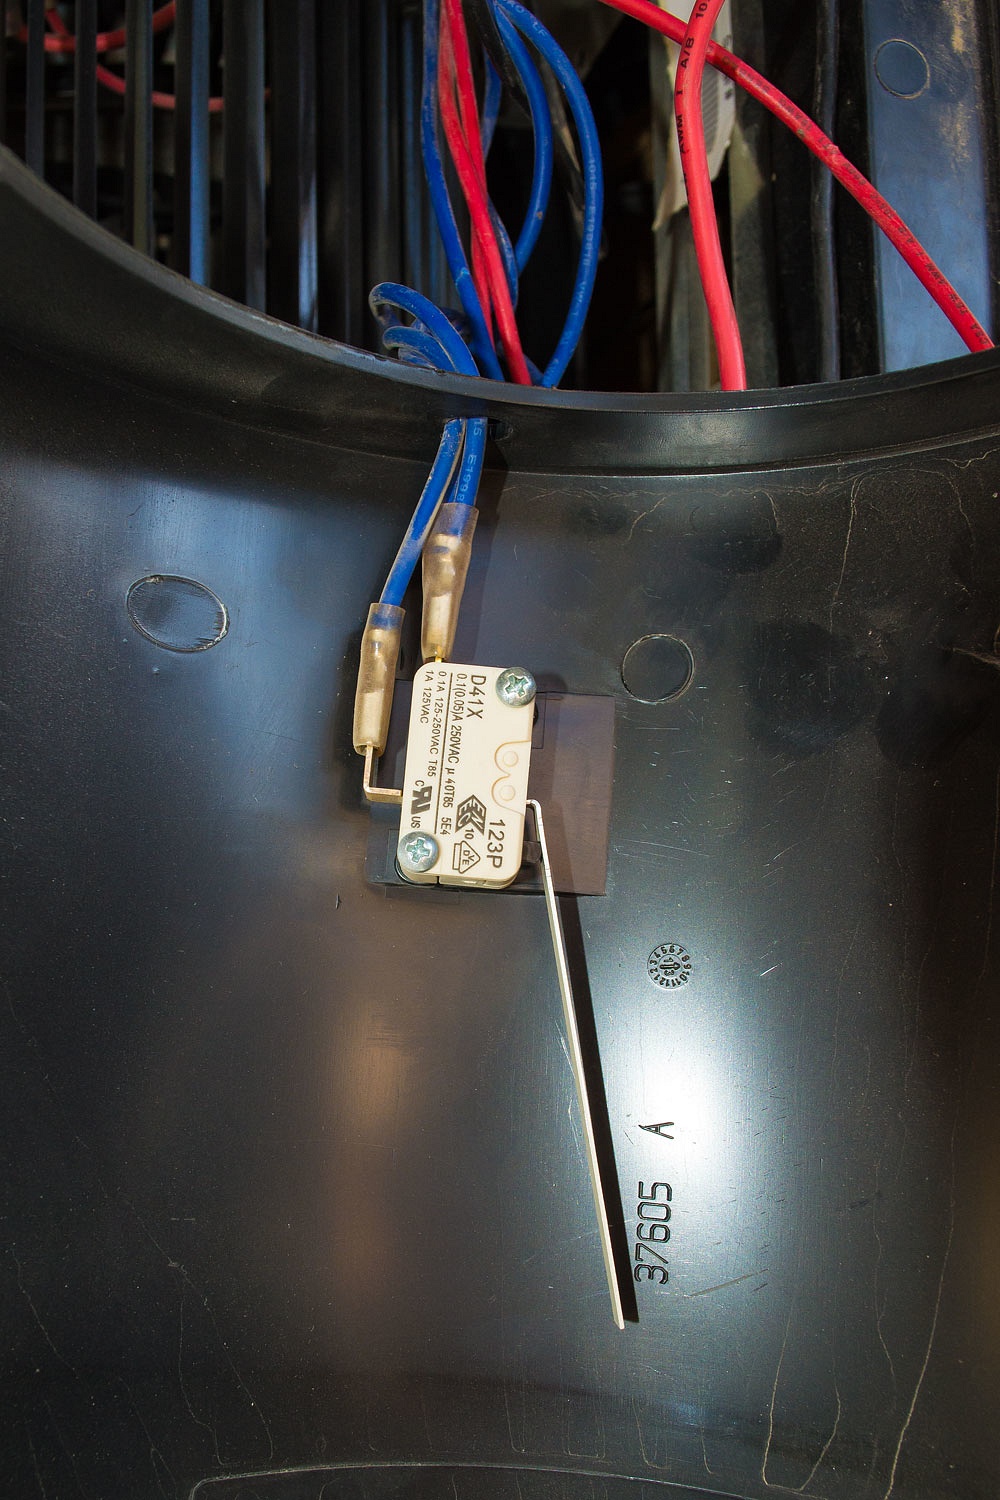
The new sail switch in place.
The burner and exhaust in place. The black igniter wire is attached to the new orange wire from the mother board and a wire tie to hold them in place.
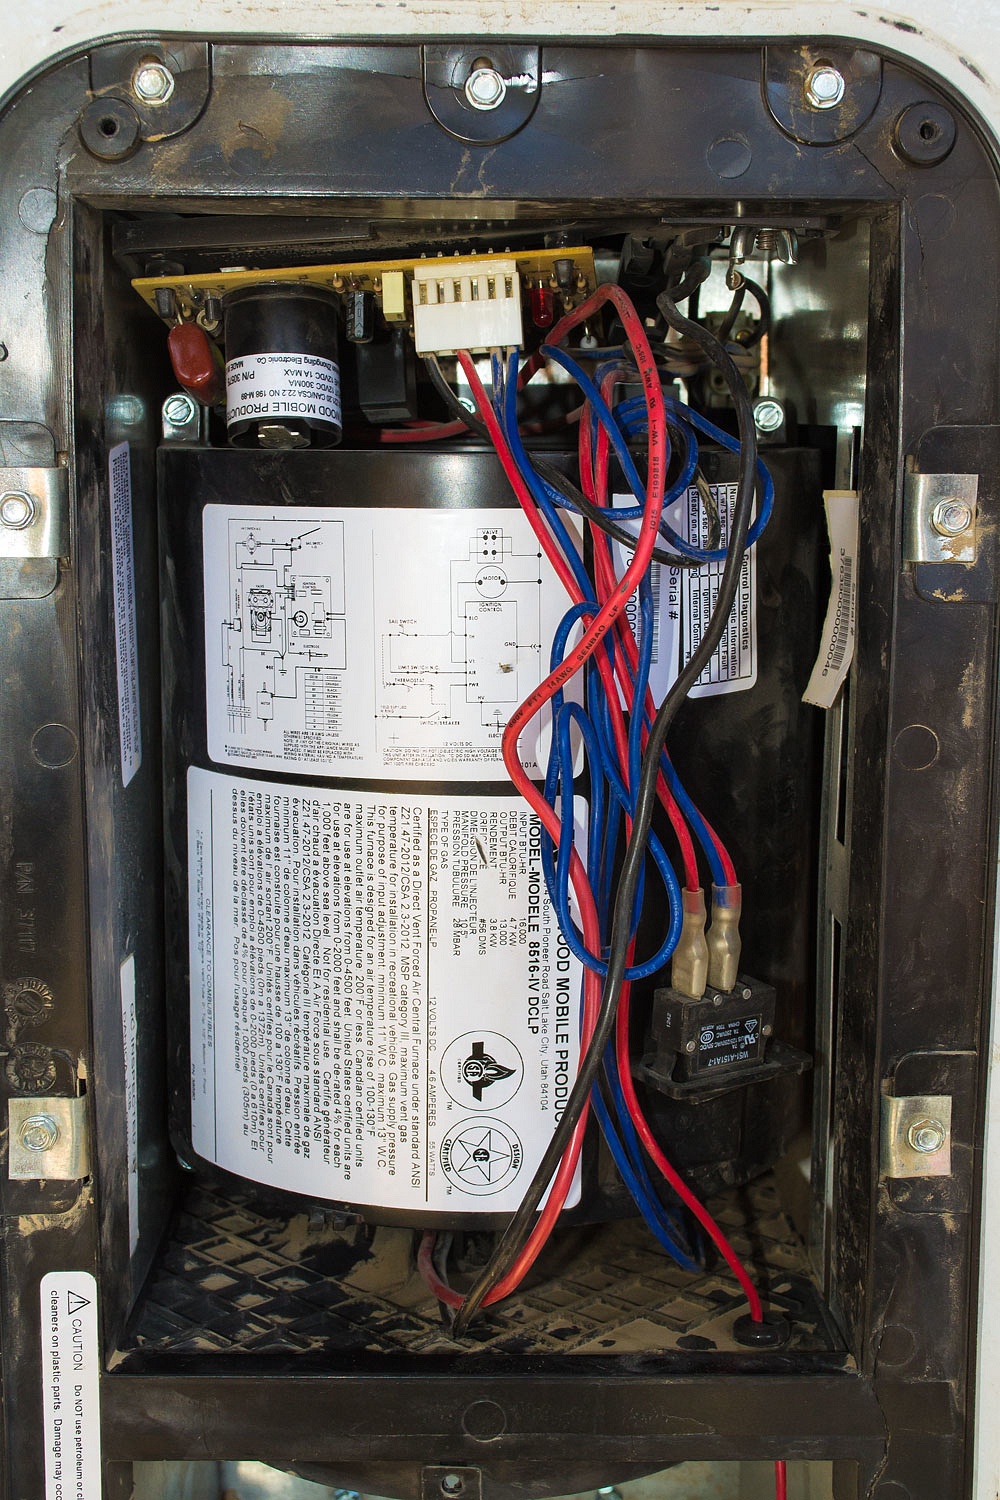
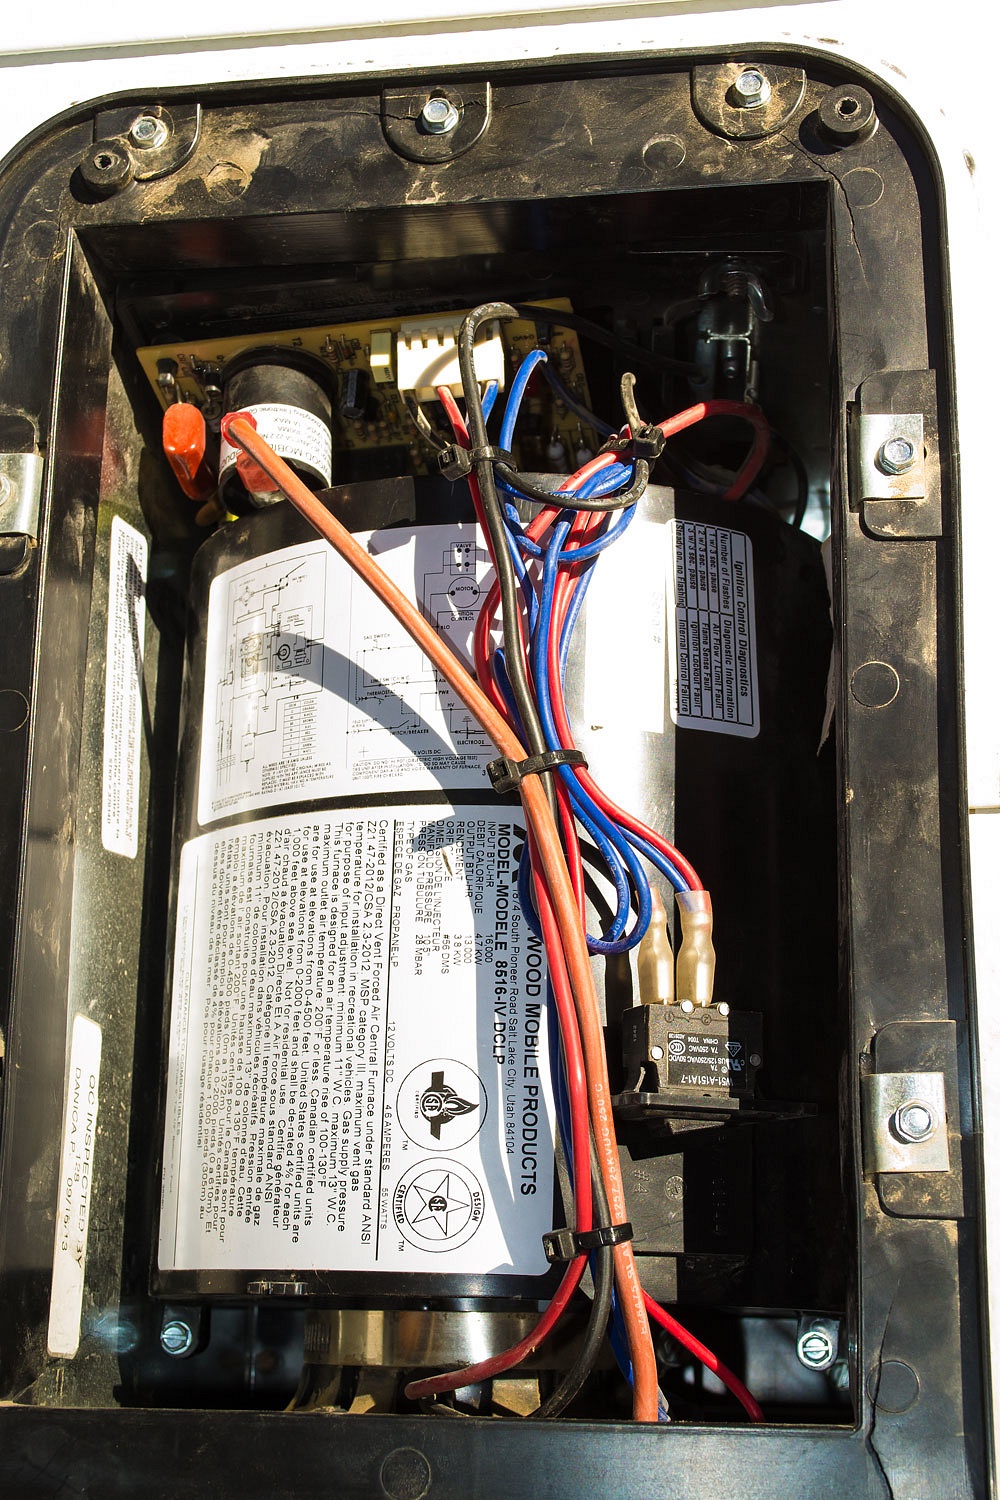
The cover back in place. The wires attached and wire ties in place to keep it all neat. The new thick orange wire (included with the igniter) runs down to and connects with the black wire from the igniter.
We've run it several times, as we would on a trip. It has started up flawlessly every time. It appears to run great. Where shall we go?
I thought this would be of interest, including the photos of the various parts I hear people mention here on Wander the West. I expect that most models of these furnaces are all very similar. Hope it helps and best of luck with your repairs and projects.
#227083 Blue Ribbon
 Posted by
on 05 January 2020 - 12:12 AM
Posted by
on 05 January 2020 - 12:12 AM
Only about 2% of our public land is wilderness where motor vehicles are not allowed. I drive on dirt roads some of the time but I have a hard time supporting a group whose users are inclined to threaten me with things like - oh, death - when I speak in defense of wilderness.
#223762 Thank You
 Posted by
on 24 October 2019 - 03:34 PM
Posted by
on 24 October 2019 - 03:34 PM
I just want to say thank you to the WTW owners, admin, moderators, and members for providing a friendly and civil forum. I used to spend more time over on another forum...you know which one...but over the years it has become more difficult to post anything without inviting the wrath and nastiness of someone who might disagree with you. Not everybody, of course, but enough vitriolic responses to make it unpleasant. It just seems as if more and more people feel free to post comments that they would never say to someone in person. Perhaps this mirrors the polarization we see in politics these days?
Anyway, really appreciate the tone, manners, and content of this forum. 👍
#211370 New batwing awning
 Posted by
on 01 February 2019 - 11:47 PM
Posted by
on 01 February 2019 - 11:47 PM
cvant, I just bought a Batwing and am replicating much of what you did here. I too don’t want to add holes to the camper. Have you made any changes to the design? Also wondering what you came up with for the tightening system at the end. They send what looks like a plastic boat cleat that you would hook to and pull the whole system taught at the end. I’m hesitant to use it and not sure where to mount it anyway. Did you come up with anything for the pop up latch? I’ll try and post pics of what I come up with as mine is being fabbed in steel. Thanks in advance, I know it’s been a while since the last post but there ain’t much out there in terms of a fabbed setup for a 270° awning on our rigs.
JEMiller,
Here are some pics of my install, different awning and camper but might give you ideas. I used 1x2 aluminum for the uprights to clear the roof so that it could be placed higher to clear the camper door. The rear is solid aluminum bar and the front upright is tube. Then, 1x aluminum angle for the awning attachment pieces at the top of the bars.


#199744 Building a Thinsulate thermal pack
 Posted by
on 16 July 2018 - 02:33 AM
Posted by
on 16 July 2018 - 02:33 AM
I needed more insulation in my camper for the climate right AC to keep up here in the hot and humid Midwest. I considered the factory thermal pack, but I question how much it would help in this situation and hesitant to try it because of the price point. I think Reflectix would be effective, but I don't want the hassle of put up and take down. I wanted a light weight thermal pack with insulation that could be left up full time and allow my 5k btu AC to cool the camper to a reasonable temperature.
So, I started looking at fabric options at Seattle Fabrics and ordered a bunch of samples. They stock Thinsulate in three thicknesses, the thickest is 210 gram. I decided this should work, it seemed to compress really well and even folded over on itself a couple times it compresses down to very little. With the insulation chosen I needed a facing material, it needs to be very thin and synthetic to keep it from soaking up any condensation we don't get wiped up in the morning. I found a 1.1 ounce ripstop nylon, also from Seattle Fabrics, that seemed to fit the bill. All together with the insulation, nylon, velcro and shipping totaled $350, inexpensive enough to gamble a home build on.
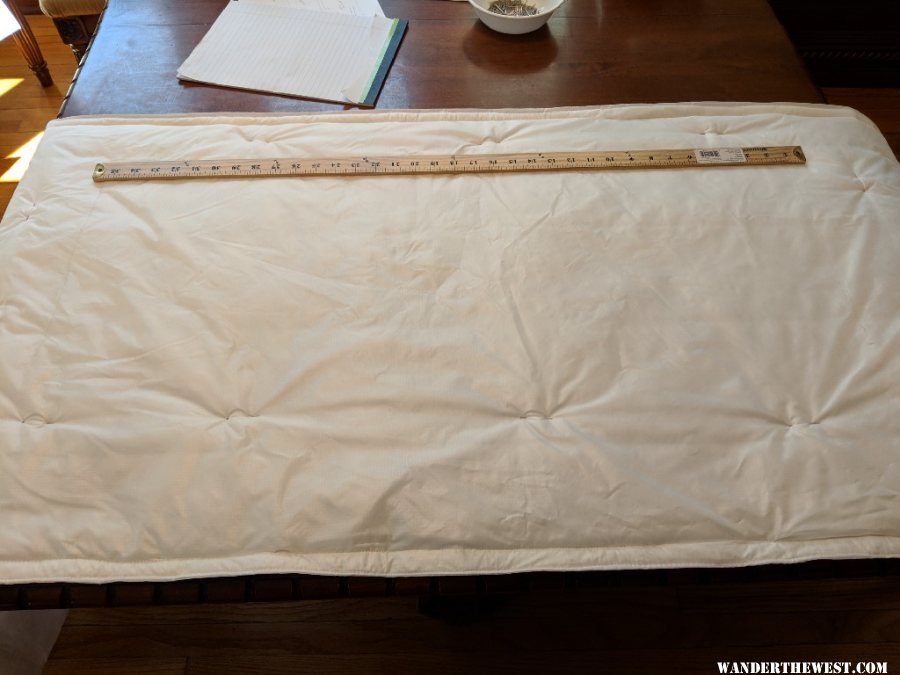
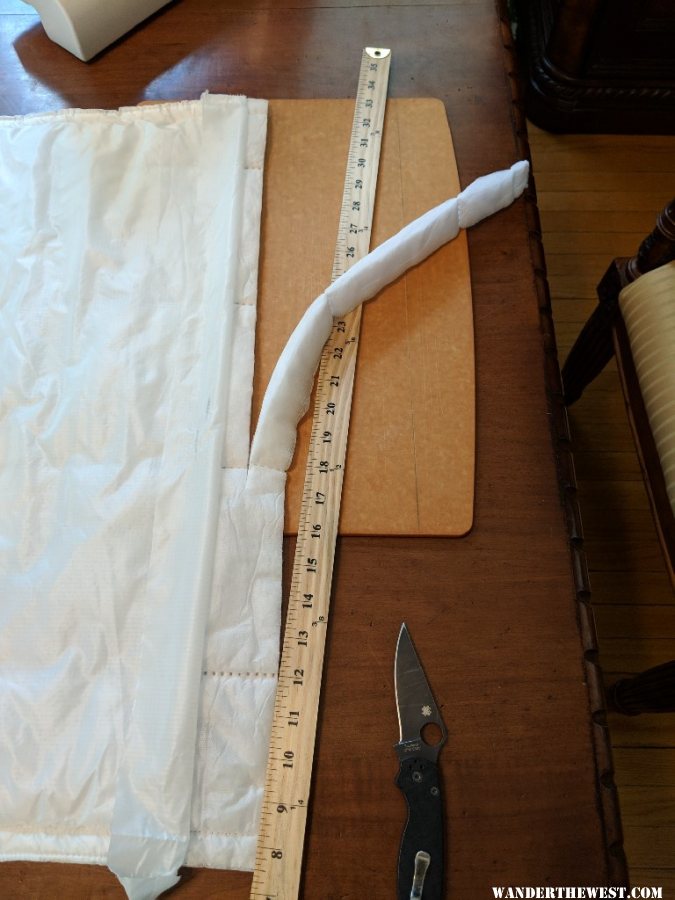
Over a week later (I used the really cheap shipping) a surprisingly small box arrived and I got started. After remeasuring everything I rolled out the Thinsulate and started cutting. Unfortunately this has to be done on the floor, I don't have anyplace else large enough.
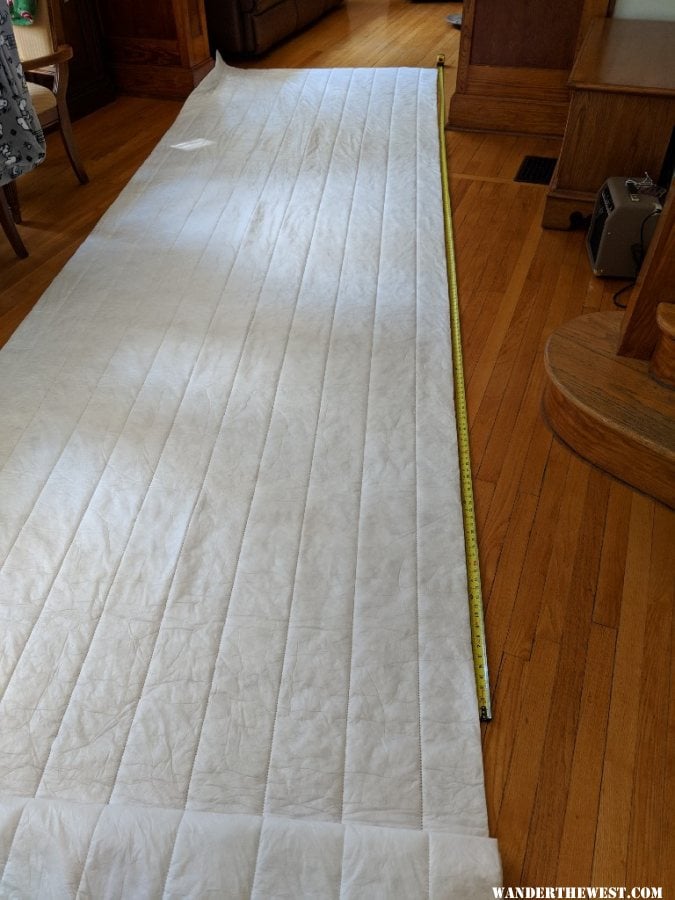
The thinsulate comes 60" wide so two 26" side panels will be cut from it.
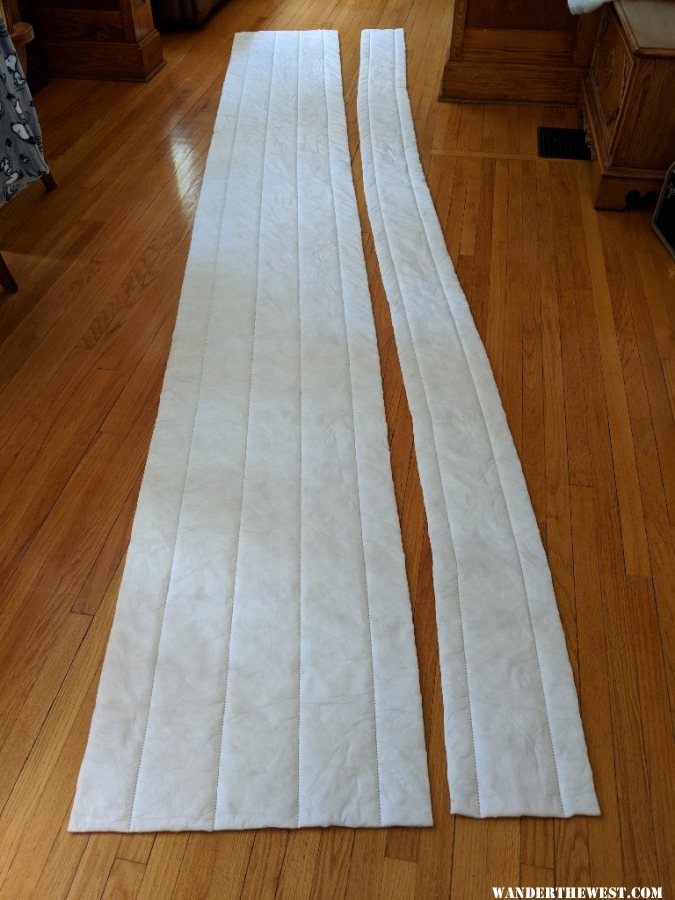
This is the second cut and the remainder, these sections are cut 26" wide and long enough to reach well behind the lift panels and will be cut to the exact length later. Next comes the facing nylon, it is incredibly thin, nearly see through. It is rolled out and the insulation laid on top.
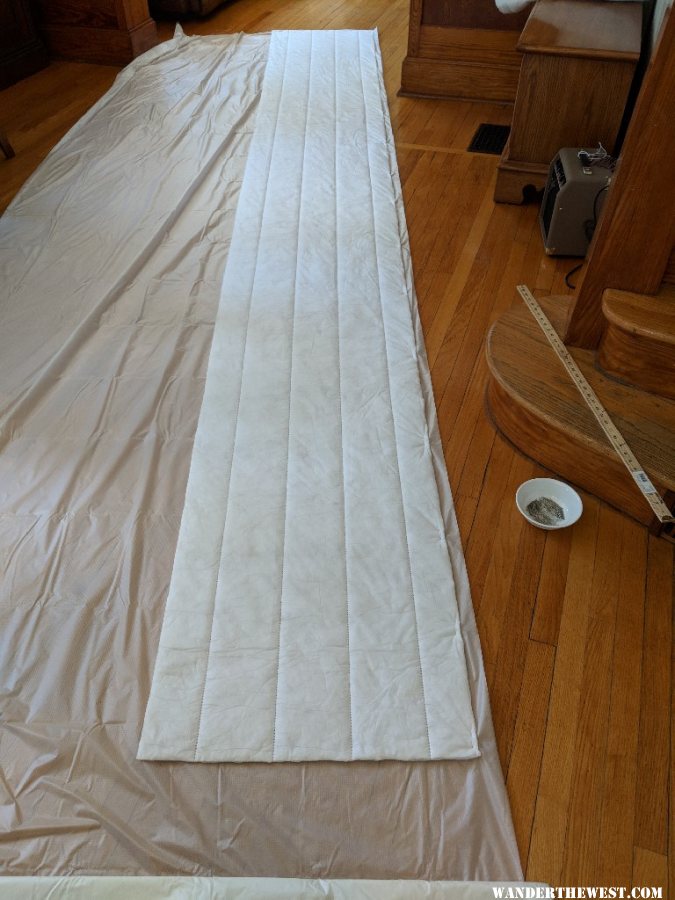
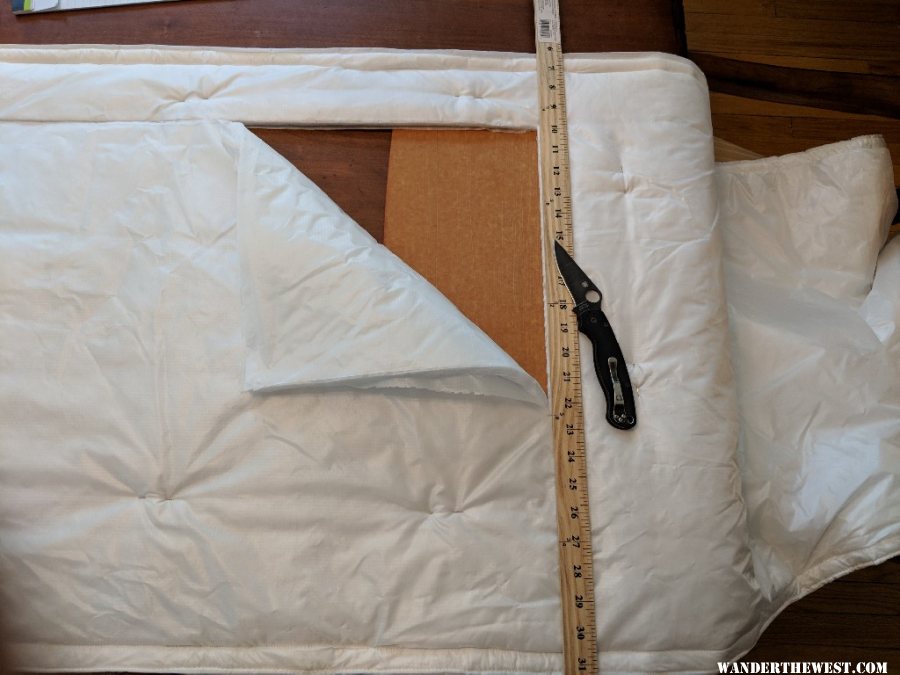
An inch and a half margin is allowed for and the whole thing is folded over itself.
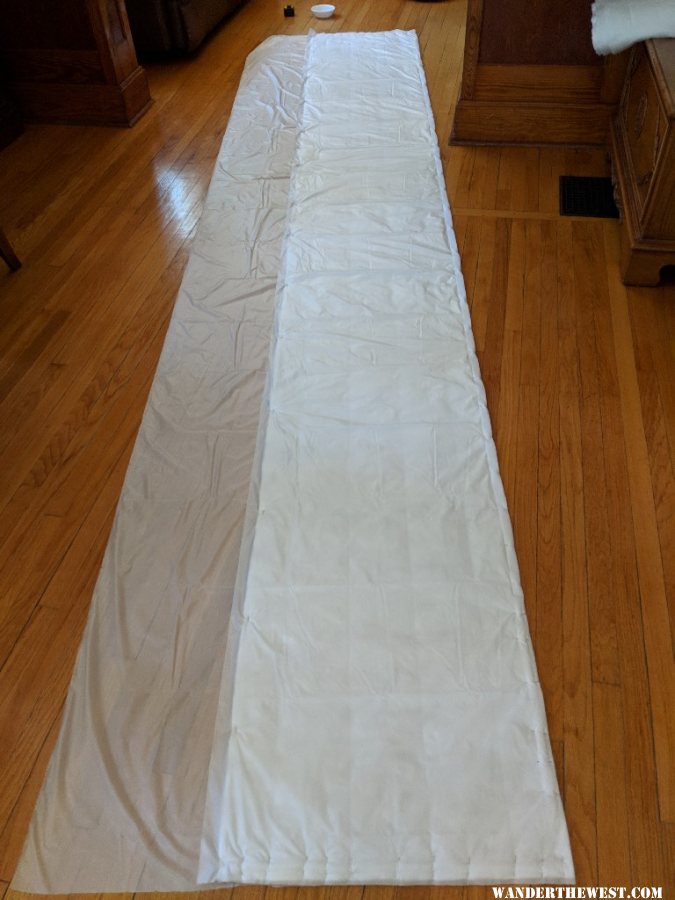
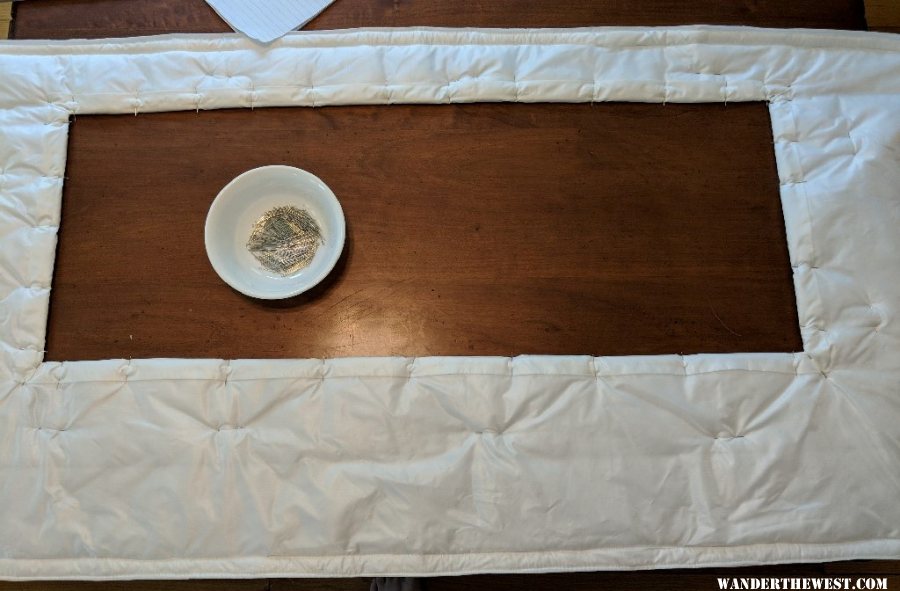
The excess is trimmed off, the edges folded in and pinned every three to four inches. This nylon is so slick I'm afraid it move all over when it is run through the machine. The 1.5" velcro is also pinned on. It is only applied where it is needed. I would normally not pin velcro on, but I want to make sure I get these really long pieces where they need to go. Here it is all pinned up and ready to go through the machine.
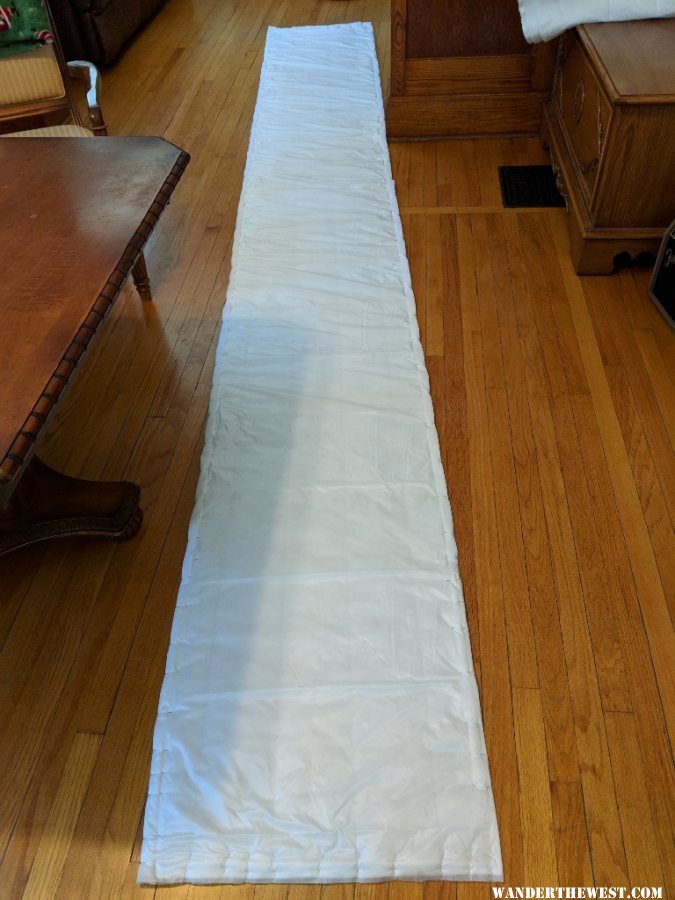
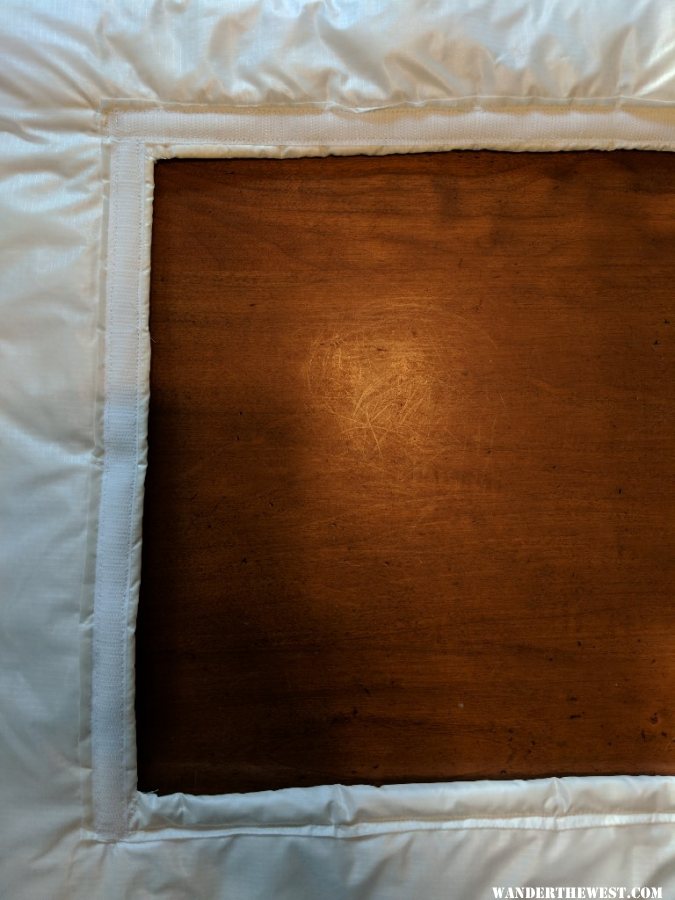
I ran a stitch across each end and two down the long sides on each edge of the Velcro. Then it was taken out to the camper and installed in place (I first had to install the loop side of the Velcro on the camper wall since my camper was ordered with out a thermal pack). With it in position I traced the window locations directly on the nylon with a pencil. You can barely see the marks in the picture below.
Secure the nylon to the insulation with pins all the way around the opening to keep everything in place, then take a deep breath and hope this plan works, it would be a shame to ruin hundreds of dollars worth of material here.
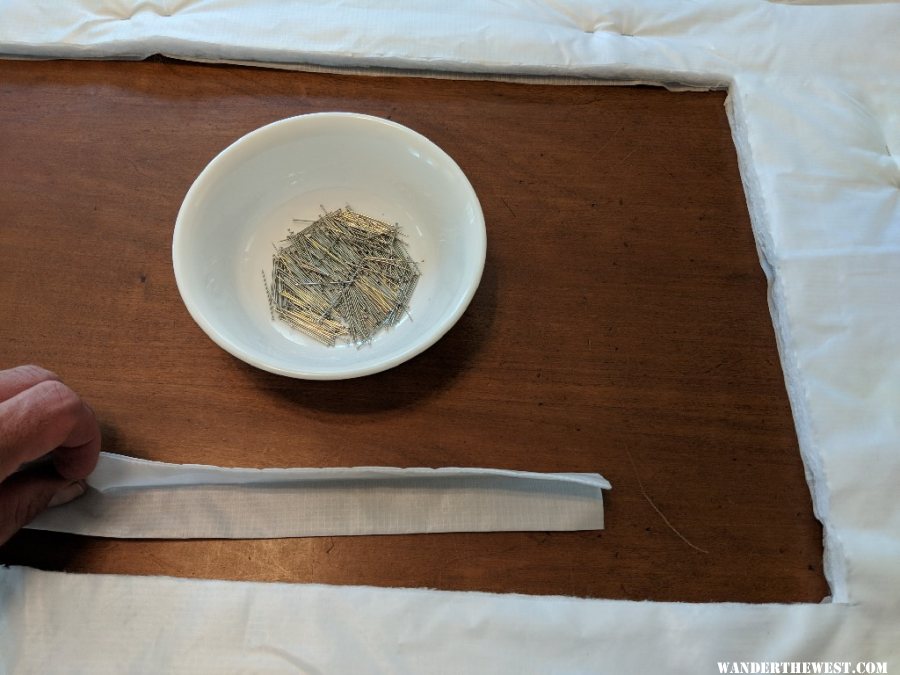
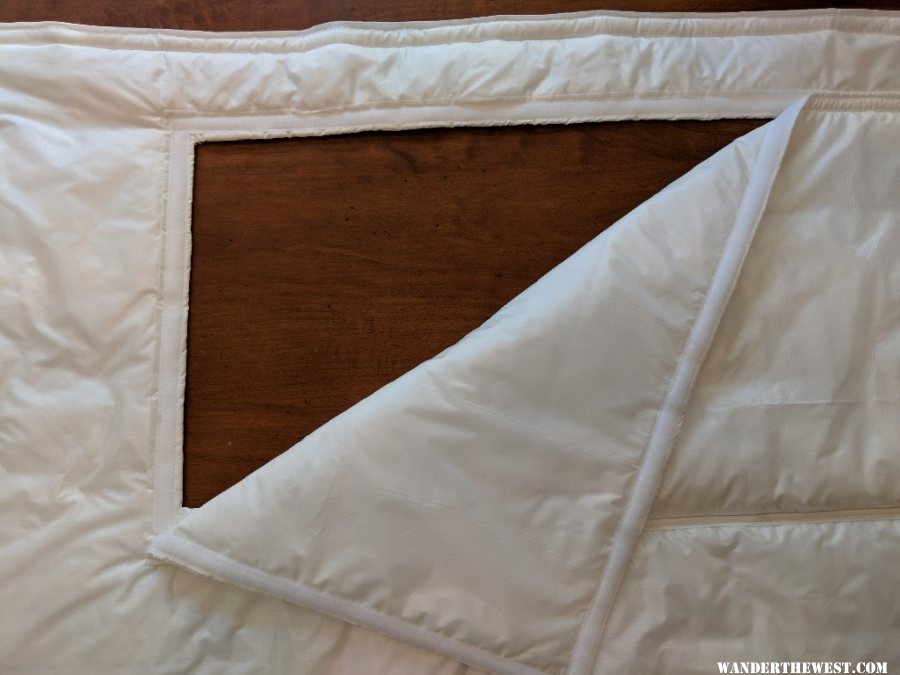
All the windows came out no problem and even in the right spot! A really sharp knife helps to cleanly cut the nylon, I tried a box blade, but had cleaner cuts with the polished edge on my pocket knife. The edges of the window will need to be trimmed out with something. I cut a 5" wide strip of the nylon, folded it in half and stitched it, turned it right side out and then folded in half again and ironed to form the edging.
Pin this all the way around the opening, overlapping the corners.
There is no need to pin the 1/2" Velcro on here, it can be applied when the stitching is done. After running it through the sewing machine it looks like this, note there is no Velcro across the bottom edge.
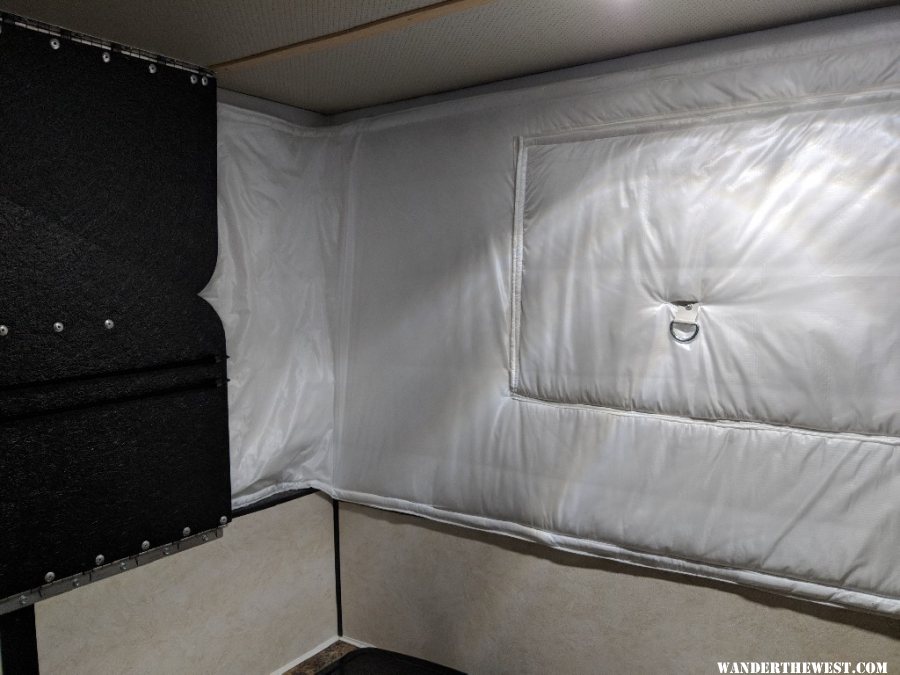
Now we need window flaps. These are built just like the rest of the walls, start with a piece of insulation large enough to cover the window opening plus the edging, I my case that worked out to 36" x 15", then wrap it in the nylon and pin every 3-4".

Velcro is added on the three required edges when it is stitched. Then the stitched window is stuck in place on the wall panel.

Secure the bottom edge to the wall panel and run a couple stitches across the bottom and bam a window!
Then then whole thing is hung in the camper again to mark the button hole location on the windows for the bungee loop and to mark the whole thing for length. I decided to make the over all length long enough to tuck behind the lift panel to the first rivet between the lift panel and the soft wall of the camper. The insulation puffs up enough to pretty much seal the gap between the wall of the camper and the lift panel, so it should help slow the thermal loss there even without running really far behind the lift panel.
1.75" button holes are then sewn on the window flaps, the dark spot is where I marked the location with a pencil when the pack was hung in the camper.
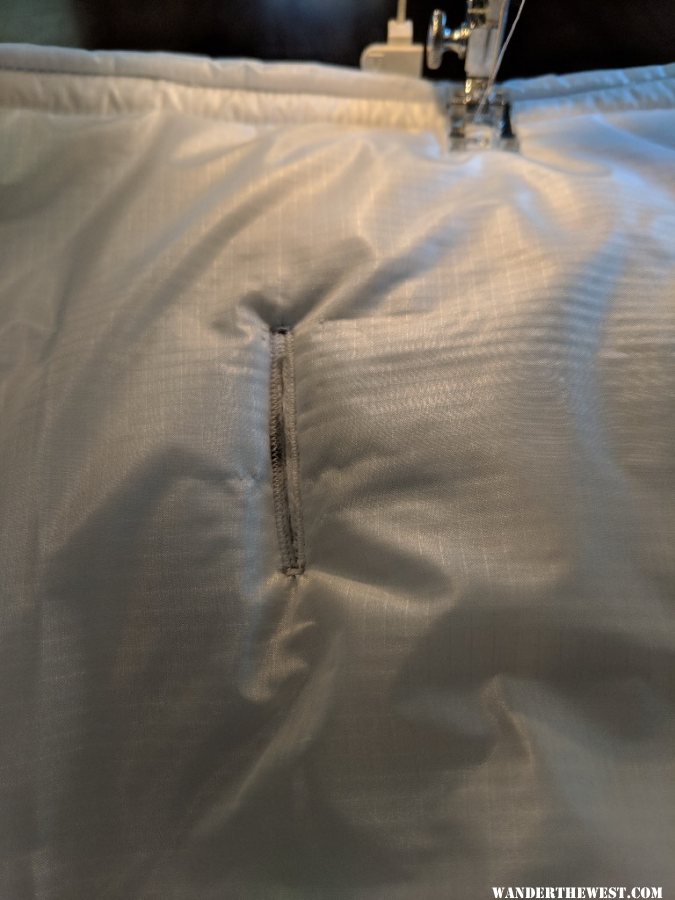
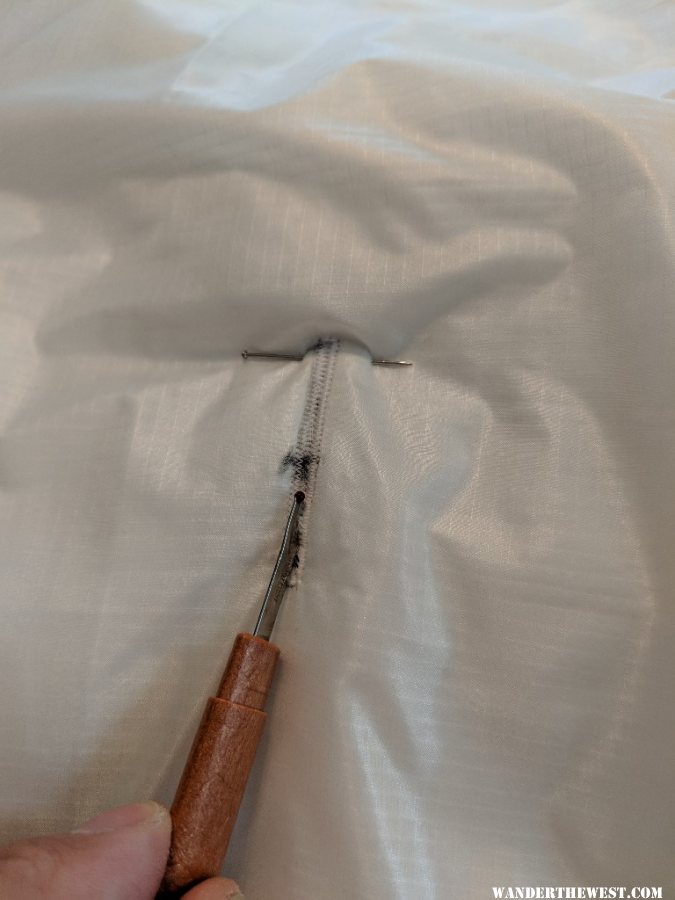
Don't forget the stopper pin across the button hole when it is ripped. It would really sting to ruin it now, so close to the finish.
All that's left is to cut the pack to length and finish the ends. I trimmed the pack down just a little longer than the desired finished length, I just used the width of my yard stick, the rolled the facing material back and trimmed the insulation to the correct length. This allows enough material to create a finished edge.
Here it is stitched.
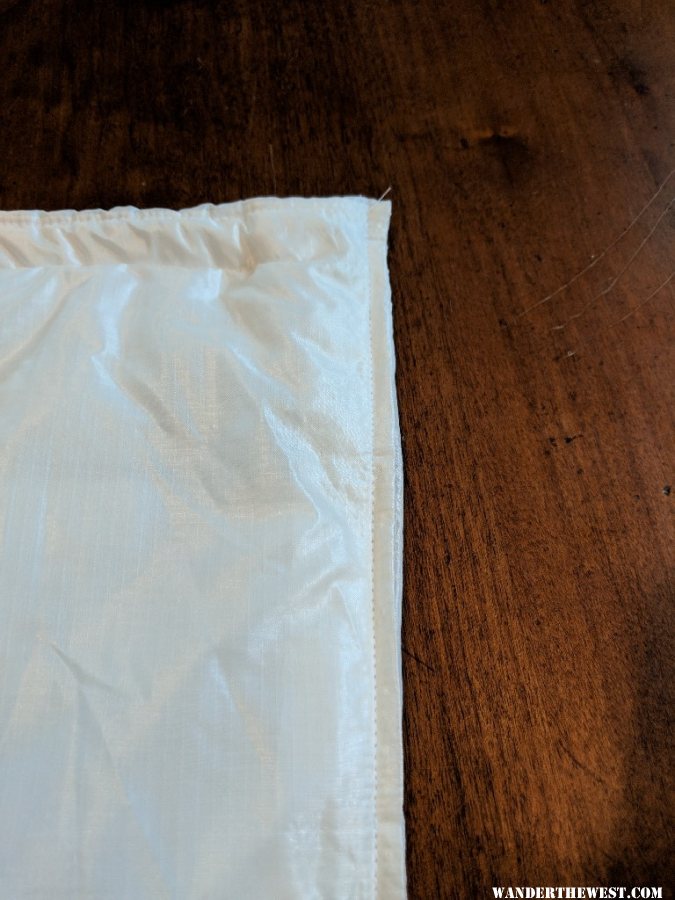
The top and bottom seams will have to be repaired where I had to rip them to create the finished edge, and then it is time to install it in the camper!
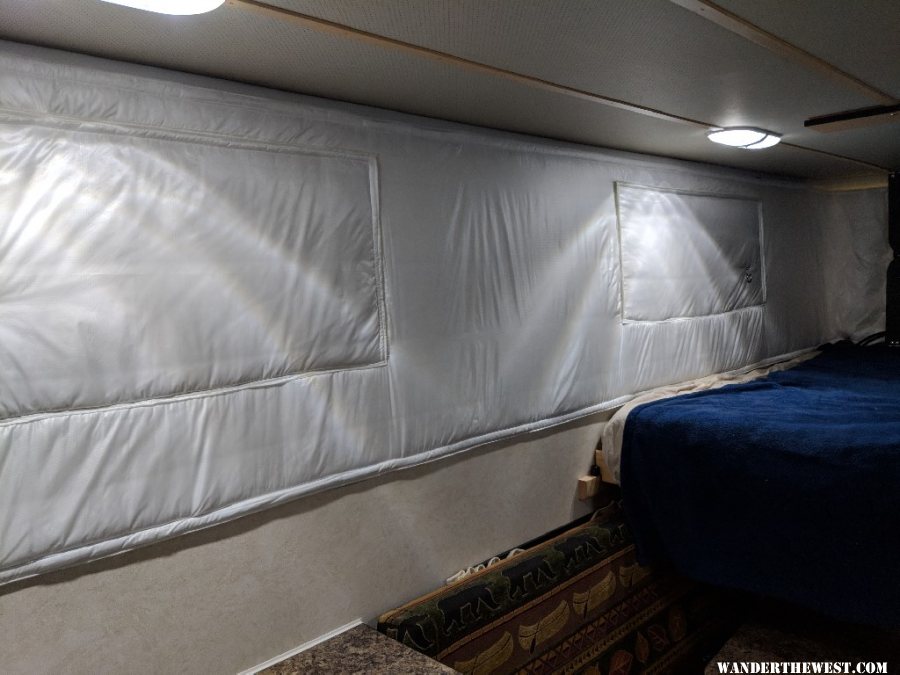
With the thermal pack installed the roof was lowered and buckled no problem. I rolled the camper out of the garage and raised the top to test the effectiveness. Missouri blessed me with a couple of 105 degree test days, if it works in this kind of weather it should work anytime we camp. I left the camper out in the direct sun for two days with the AC on the whole time and checked the temperature every few hours. The AC kept the inside 13-15 degrees cooler than outside while the camper was in direct sun, it did better of course with a little shade and shortly after the sunset with the ambient still in the nineties it pulled the temperature inside down to 73. So far I think it is a success! I look forward to testing it in much cooler temperatures.
#248859 Telescopes
 Posted by
on 24 February 2021 - 08:49 PM
Posted by
on 24 February 2021 - 08:49 PM
I have been designing and building telescopes for spaceborne instruments for 45 years. I have been involved in amateur astronomy on and off for decades.
There are a lot of telescopes of various sizes collecting dust in peoples garages because many telescopes are not very portable and are a bit too specialized to use for much else besides stargzing. After the viewing of the panets and the moon and a couple of galaxies wears off they tend to get used rarely due to that lack of versatility and portability.
If you do not aleady have a good pair of 8 x 50 or 10 x 50 binoculars I recommend starting there. Portability, ease of use and versatility are maximized in that range and they can be hand held (anything with more magification must be supported by a tripod). Either of these sizes would give sufficeint light gathering capability to do some star gazing as well as be handy for use on a boat, while hiking bird watching, wildlife viewing, etc..
I recommend buying a good quality pair with at least 15mm eye relief (more if you want to wear your glasses while using them). You will pay over $200 but you will be happier with the preformance than a cheap pair. Canon and Nikon are good brands, Steiner and Bosch & Lomb, even the higher priced Bushnells, are good enough. I see Vortex popping up on a lot of lists as a top pick - I am not familiar with that brand so don't know about the quality. Do some research on quality and shop around.
For a step up from there my recommendation is to get a decent pair of 15x - 20x binoculars and a sturdy tripod (if it is light enough to take hiking it is probably not sturdy enough) that is at least 72" tall (better if 80 " to use while standing). High power binoculars are more versitile than a telescope and can also be used for viewing distant landscapes and wildlife, etc. You can also buy adapters so you can take pictures through your binoculars.
You can buy a decent pair of astronomical binoculars new for under $400 and used for $200 - $300. Like anything else there is a broad range of prices and quality. The cheaper models (under $700 models) will probably have plastic parts (particularly for the eye piece focus) and because they are relatively heavy you will need to handle them carefully but the Optics should be good enough.
Check ebay for used Zuhmell, Celestron, Meade, Orion, and Oberwerk to name a few.
If you decide skygazing and astronomy is your thing you can always buy an astronomical telescope later. You will probably have a better idea of what you want too.
Aperture size and field of view for telescopes are an important consideration depending on what you intend to do.
There are entire web pages devoted to helping beginners get started in the hobby. Below are links to a few of the many sites out there.
https://www.aaa.org/...ur-astronomers/
https://www.planetar...y-for-beginners
https://www.space.co...nomy-guide.html
In all events opinions will, of course, vary. ;-)
I hope this is helpful,
Craig

