Jump to content


Photo
* * * * * 2 votes

Vic's new 2012 Puma build


  • Please log in to reply
209 replies to this topic

#31 buckland

buckland

    Senior Member

  • Members
  • 3,078 posts
  • LocationNew England

Posted 21 February 2020 - 12:42 AM

Hey Vic ... for what it is worth ... they sell pre-stain products (mostly shellac!) like this:  ( I don't use as I make my own)

https://www.minwax.c...ood-conditioner

Hickory can be found a lot of places ...most 'popular' is Minwax    https://www.minwax.c...inwax-gel-stain


Note Gel Stains are good and easy if you don't follow directions!  After pre-coat seal ...wipe it on and work it in until nearly dry... then just topcoat it with a dusting of spray shellac (aerosol) ...it magically will dry the gel-stain instantly ...no waiting! The  next day a coat of Helmsman (Min-wax) Polyurethane ( a Spar Varnish used on boats) ) and it will be done and ready for spilt wine or beer! 


Hickory is a warm color... like a gunstock. I like lighter like Golden Oak. Danish Oil is actually not an oil per say ...it is actually a varnish. It is a good product. I would though top coat with a Spar varnish (poly) to have a durable surface.  


PS You must be psyched... making what you want having the experience of use. I love mods!


Edited by buckland, 21 February 2020 - 12:49 AM.

  • 0

2016 Duramax 2.8 Diesel long bed Colorado 4WD with 2011 Eagle

Lordwoodcraft  instagram        Rob
The only people who ever get anyplace interesting are the people who get lost.
Henry David Thoreau
"Work to achieve not to acquire"


#32 Vic Harder

Vic Harder

    Doctor Electric

  • Site Team
  • 4,950 posts
  • LocationCalgary, Alberta

Posted 21 February 2020 - 04:01 AM

Hey Vic ... for what it is worth ... 

A lot, actually.  Thanks again for your insights.


  • 0

#33 Vic Harder

Vic Harder

    Doctor Electric

  • Site Team
  • 4,950 posts
  • LocationCalgary, Alberta

Posted 21 February 2020 - 04:32 AM

Hey Vic ... for what it is worth ... they sell pre-stain products (mostly shellac!) like this:  ( I don't use as I make my own)

https://www.minwax.c...ood-conditioner

Hickory can be found a lot of places ...most 'popular' is Minwax    https://www.minwax.c...inwax-gel-stain


Note Gel Stains are good and easy if you don't follow directions!  After pre-coat seal ...wipe it on and work it in until nearly dry... then just topcoat it with a dusting of spray shellac (aerosol) ...it magically will dry the gel-stain instantly ...no waiting! The  next day a coat of Helmsman (Min-wax) Polyurethane ( a Spar Varnish used on boats) ) and it will be done and ready for spilt wine or beer! 


Hickory is a warm color... like a gunstock. I like lighter like Golden Oak. Danish Oil is actually not an oil per say ...it is actually a varnish. It is a good product. I would though top coat with a Spar varnish (poly) to have a durable surface.  


PS You must be psyched... making what you want having the experience of use. I love mods!

OK, so the steps to apply this stuff are:


1) Pre-stain with a brush or rag and then sand with 220 ... while still wet or once dry?

2) Apply stain... gel or otherwise... working it in... with a sander?  000 steel wool?

3) Apply a top coat - I don't want to spray... it would make a mess in the camper unless I tape everything up.  So, with steel wool?


Do all 3 products have to be oil based?


I'm inclined to go with HomeDepot, although Lowes does carry Minwax stuff here in Calgary that HomeDepot does not.  So, thinking of:

- Varathane pre-stain

- Watco Danish Oil in either Natural or Golden Oak

- Watco Wipe-On satin poly.


In my previous build, I used Natural Danish oil on the Baltic Birch and rubbed it in with steel wool after sanding with 220.  I applied two coats.  That's it.  It was not waterproof, but easy to re-apply when desired.  I liked the satin finish vs a gloss.


I'm actually really looking forward to being DONE with the woodworking stuff (for now) so I can get to the electrical and plumbing bits which I enjoy more... but yeah mods.. or building it MY WAY is great fun!


  • 0

#34 buckland

buckland

    Senior Member

  • Members
  • 3,078 posts
  • LocationNew England

Posted 21 February 2020 - 12:17 PM

Still do a test strip.

If you are going to use Danish Oil don't use a Gel stain. (two separate and very different application steps)

So from the above I'd suggest:

1) very light hand sanding 220 or 320 to smooth any burrs.

2) wipe surface (or Vac) to remove dust

3) either Seal coat (dries in a couple minutes) or Pre-stain product.

4) 320 light hand sand (use a block or scrap 2x4) to knock off raised fiber

5) wipe off dust

6) Best way to apply Danish oil is (wear rubber gloves) pour some in a container (tuna fish can is perfect size) and with a folded piece of cotton (an old T shirt).... get a well soaked wad and wipe with grain ... no need to be neat... keep applying until the wood seems saturated .... wait a couple minutes ... then with a clean dry cloth....WIPE OFF ALL excess oil. Allow to dry over night

7) repeat step 6 but it will need far less for second coat. (repeat id you want a third coat.

8) IF you want more coats of protection Wipe-On Poly is a good choice. If so... apply wipe 0000 steal wool same as above ....be sure to dry wipe..... these are thin but very smooth when done and it is easy.... no runs or drips. 


I would only put Spar Varnish on horizontal surfaces.... no need for further protection on cab sides.


Good Luck!!!!


  • 0

2016 Duramax 2.8 Diesel long bed Colorado 4WD with 2011 Eagle

Lordwoodcraft  instagram        Rob
The only people who ever get anyplace interesting are the people who get lost.
Henry David Thoreau
"Work to achieve not to acquire"


#35 BlueSky

BlueSky

    Senior Member

  • Members
  • 159 posts

Posted 26 February 2020 - 01:20 PM

When I did my cabinets with birch plywood from Home Depot I used Minwax stain, sanded with 400 grit, and then applied 3 coats of poly, sanding and tack cloth in between each coat.  I found it extremely important to pay attention to the tiny little wood hairs that stand up when you brush your hand over the wood surface. You will find that when you brush in one direction the hairs stand up, and in the other direction they lay down.  I sanded, cleaned, and applied poly only in the direction that made the hairs lay down. Doing this I got the best results I ever got when working with wood. Funny that in all the woodworking web sites I viewed this was never mentioned.


  • 0

#36 buckland

buckland

    Senior Member

  • Members
  • 3,078 posts
  • LocationNew England

Posted 26 February 2020 - 01:30 PM

Raised fiber occurs anytime one applied a chemical or water to wood, depending on the species for amount. Plywood is cut on a roller and those veneers basically are sheared so very high level of cut fiber ends. Another good use of a seal coat.  


  • 0

2016 Duramax 2.8 Diesel long bed Colorado 4WD with 2011 Eagle

Lordwoodcraft  instagram        Rob
The only people who ever get anyplace interesting are the people who get lost.
Henry David Thoreau
"Work to achieve not to acquire"


#37 Vic Harder

Vic Harder

    Doctor Electric

  • Site Team
  • 4,950 posts
  • LocationCalgary, Alberta

Posted 04 March 2020 - 09:32 AM

OK, many coats later, it is now doing a longer cure before I decide if I want to keep it as is, or add the Wipe-on-Poly.  Looks very nice.  We decided to just go with Natural Watco Danish Oil.  


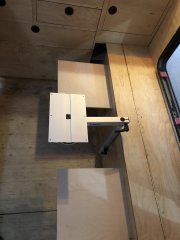
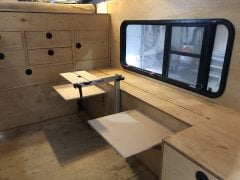
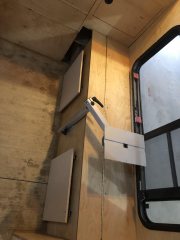
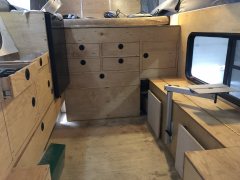
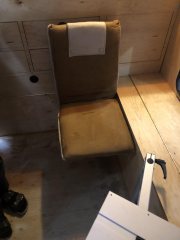
In the meantime, I built my side dinette using a Lagun table leg and 16" flip up hinges and 2 Bonvivo II chairs.  


Here is a view with the seats flipped up and the leg deployed.  Note that the seats themselves are not finished, but just raw maple plywood.  I didn't want the chance of any oil rubbing off on the seats, and may also want to add industrial strength velcro to hold the seats down too.  A table top is yet to come.

Everything in place
 
Another view
another view
 
Seats flipped down and the leg moved aside
Tucked away
 
Another view of it tucked away
another view of it tucked away
 

With a BonVivo II chair on one of the seats

With the Bonvivo II chair in place


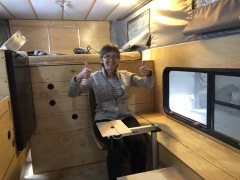
A satisfied customer!

a satisfied customer

 
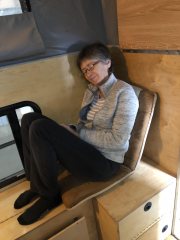
The seats can be moved, and positioned a different angles.  We will fold them flat for travel.  And since we can move them... why not take a nap?
Chairs can be moved easily and used for... napping!

Edited by Vic Harder, 04 March 2020 - 09:35 AM.

  • 1

#38 Vic Harder

Vic Harder

    Doctor Electric

  • Site Team
  • 4,950 posts
  • LocationCalgary, Alberta

Posted 04 March 2020 - 09:48 AM

I have now started on the power part of the build.   Since I was making up cables, I thought I would write up a short process in case anyone else wants to do this.


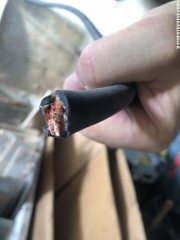
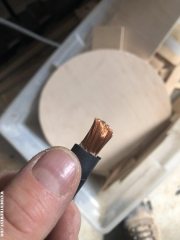
This is the end of AWG 1/0 fine stranded welding cable.  I found 10' of both red and black wire on Amazon for a reasonable price.

1 AWG fine stranded welding cable
 
Stip off 1/2" of the insulation.  I just used a very sharp knife.
1/2" stripped
 
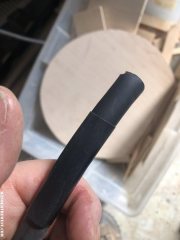
Slip on a piece of snugly fitting color coded heat shrink.  This was super snug and a pain to get on.
slide on a snug piece of heat shrink
 
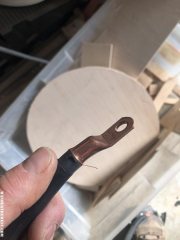
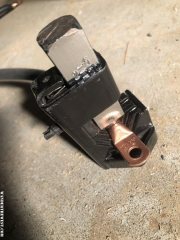
Slide on the right end.  I used high quality copper ends (not purple copper) the right gauge size (once again very snug) and with the right sized hole for the stud they are mounting to.  Notice that because they are so snug, some stray wires may not make it inside.  Snip those off.
fit on the copper end
 
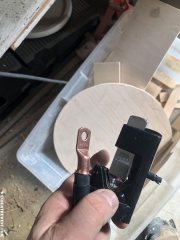
This is the crimping tool I used.  It needs a 5 pound sledgehammer, a very solid surface to place it on, and a well aimed smash to crimp the wire.
this is the crimping tool
 
All in place an ready to smash.  Don't channel your inner HULK here though... aim is more important than force.  It IS soft copper, not steel, and will bend quite easily.
ready to smash
 
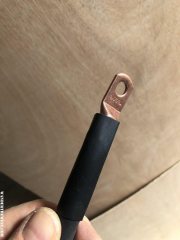
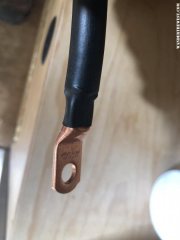
Slide the heat shrink over the crimped wired and end
slide the heat shrink in place
 
Apply heat.  I used a plumber's propane torch... carefully.  Tada!
finished product

  • 1

#39 Happyjax

Happyjax

    Senior Member

  • Members
  • 1,444 posts
  • LocationMaryland

Posted 04 March 2020 - 01:47 PM

Awesome work Vic!


  • 0

2018 Ford F-250. Customized Bundutec Sable :)


#40 buckland

buckland

    Senior Member

  • Members
  • 3,078 posts
  • LocationNew England

Posted 04 March 2020 - 02:03 PM

Your Cabinets came out looking great! I have that same table mount and like it a lot. I did shorten the horizontal bar...having to cut it and bore a hole for the pin (swivel). wasn't hard but it is scary cutting something like that. It worked out better for me as the table top was then more solidly centered on the top plate.

You are doing a terrific job...layout looks real comfortable.


  • 0

2016 Duramax 2.8 Diesel long bed Colorado 4WD with 2011 Eagle

Lordwoodcraft  instagram        Rob
The only people who ever get anyplace interesting are the people who get lost.
Henry David Thoreau
"Work to achieve not to acquire"


0 user(s) are reading this topic

0 members, 0 guests, 0 anonymous users