Bill, you can never take enough pictures, and I am sure I didn't. Internet shopping wasn't fun for me until I ordered the camper. Now it's my new drug. Jay, you just gave away to the world my under cover name. Got any ideas for a new one?

 3 votes
New ATC Ocelot Shell Buildout
Started by
Ambling1
, Jun 11 2014 07:09 AM
75 replies to this topic
#12

Ambling1
-
- Members
-

- 76 posts
Advanced Member
- LocationSonoran desert
Posted 11 June 2014 - 10:06 PM
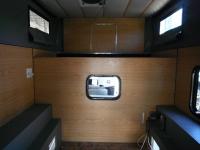
Future electric switches wiring and location. Camper front wall before water tank install.
Attached Thumbnails
#13
Ambling1
-
- Members
-
- 76 posts
Advanced Member
- LocationSonoran desert
Posted 11 June 2014 - 10:23 PM
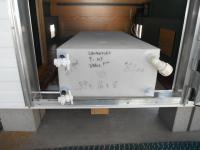
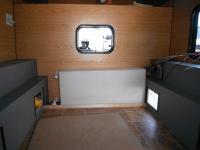
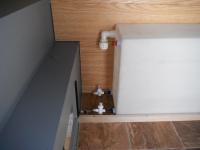
Water Tank
I built a sloped floor under the water tank to help with draining of the tank. Also the tank is NOT tight up against the front wall. It is set away from the front wall so as the water tank fills and expands, there is no pressure exerted to the wall. Water drains out the sidewall of the floor pack and is piped to the rear of the camper.
Attached Thumbnails
#14
Ambling1
-
- Members
-
- 76 posts
Advanced Member
- LocationSonoran desert
Posted 11 June 2014 - 10:26 PM
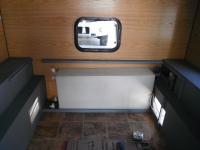
Water Tank
Attached Thumbnails
#15
chnlisle
-
- Members
- 3,811 posts
Post Master
- LocationThe Old Pueblo
Posted 12 June 2014 - 12:33 AM
Bill, you can never take enough pictures, and I am sure I didn't. Internet shopping wasn't fun for me until I ordered the camper. Now it's my new drug. Jay, you just gave away to the world my under cover name. Got any ideas for a new one?
I forgot you were in witness protection. Your secret is safe with these guys.
Special Engel Pricing For WTW Members
Click here to see my ATC Cougar
JayAronowSales.com
(520)579-9610
jayaronow@gmail.com
#16
Ambling1
-
- Members
-
- 76 posts
Advanced Member
- LocationSonoran desert
Posted 12 June 2014 - 12:34 AM
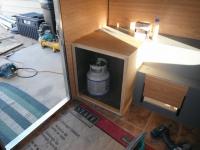
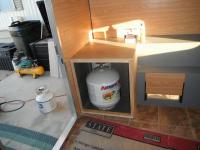
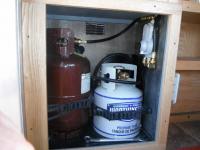
LP Locker
Located the LP tanks on the floor at the rear drivers side corner. The box is built with 1/2" plywood lined with sheet metal and sealed. The access door will be located inside the camper and sealed. Vent holes were cut in the upper sidewall of the floor pack and in the floor at the rear of the camper for ventilation. I designed the box to hold 1-20lb tank, or 2-11lb tanks, or 1-11lb and 1-5lb tanks. A two stage regulator is wall mounted in the box with two feeds. One is for the Wedgewood stove and the other for a future Wave3 heater. I do most of my cooking outside and away from the camper, so I wanted a secure, safe, convenient, and dedicated place to store the more portable 5lb tank and hose. Coleman stove will be stored next to the frig.
Attached Thumbnails
#17
Casa Escarlata Robles Too
-

- Site Team
- 9,285 posts
C'est la vie
- Locationmonterey bay area
Posted 12 June 2014 - 12:42 AM
Starting The Build
I waited six weeks from order to delivery, and during that time followed many WTW build threads and spent serious time internet shopping. Seems the longer I waited for delivery the more I bought and my original modest shell upgrade turned to an almost full build. This is my first pop up truck camper, and even though I had a plan, materials, and ready to start, I was totally overwhelmed on where to begin, so I sat in the camper for a couple days thinking, measuring, replanning. This is when the pictures, and ideas from Bisleybud, Ski3pin, BillHarr (except for the x-ray) builds were invaluable for me. Thank you all! Time to start! First was moving the 12v electric wiring where it came out the front wall, up and over to the side. It was in the way of the water tank. I added a fuse panel.
Ambiling, your going to like that battery isolator Marty uses.
If you get solar when the truck battery needs a charge it will also charge it. It's great when in my case the camper sits on the truck full time and I don't drive it much. During the winter I don't have to worry about the truck battery going dead.
So far so good on your build.
Thanks for the pictures.
frank
2002 Tundra AC TRD 4WD Limited 2009 ATC Bobcat loaded http://sharychic.blogspot.com/
#18
Ambling1
-
- Members
-
- 76 posts
Advanced Member
- LocationSonoran desert
Posted 12 June 2014 - 12:46 AM
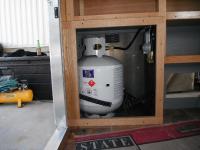
LP Locker with more detailed pictures. You can see the upper vent in sidewall. I used QuickGrip rubber straps to easily hold the tanks and control vibration and noise. Also added rubber mat to floor and sidewall to cushion tanks. I highly recommend the rubber straps, they take care of both vertical and horizontal movement.
Attached Thumbnails
#19
Ambling1
-
- Members
-
- 76 posts
Advanced Member
- LocationSonoran desert
Posted 12 June 2014 - 06:30 PM
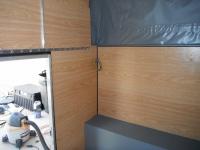
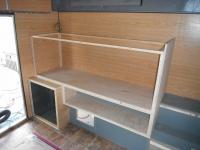
Start of drivers side cabinet. 1/2" oak plywood.
Attached Thumbnails

#20
Ambling1
-
- Members
-
- 76 posts
Advanced Member
- LocationSonoran desert
Posted 12 June 2014 - 06:47 PM
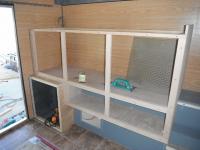
First picture shows 1x2 sub framing for countertop and face frame. Second picture has the oak 1x2 face frame attached with cabinet screws.
Attached Thumbnails


0 user(s) are reading this topic
0 members, 0 guests, 0 anonymous users

