Jump to content


Photo
* * * * * 1 votes

My '04 Hawk

FWC Hawk mods

  • Please log in to reply
59 replies to this topic

#31 wuck

wuck

    Senior Member

  • Members
  • 329 posts
  • LocationPollock Pines, Sebastopol CA

Posted 09 May 2016 - 05:03 AM

So, there I was, sitting in a puddle inside my camper, thinking about wildflowers in the desert, wtw gatherings at Carrizzo, FWC rally at Sugarloaf. Hmm, gotta do something, quick.


But it wasn't to be.


I had decided to reseal everything on the side wall, ditch the dinette, and go camping. Then as I continued disassembly, issues started stacking up. As I removed the jack brackets, I found many broken screws and quite an assortment of replacements. A previous owners had attempted to seal this before. He had used a very tenacious sealer, probably 3M marine adhesive, under the brackets. It wouldn't let go. I applied heat, and slowly the grip was released.

P1030691r.JPG P1030742r.JPG IMG_20160205_142731_018r.jpg P1030699r.JPG


Hey, I had an audience watching intently!


  • 0

Pat

'04 FWC Hawk

'15 F250 SD SuperCab / Short Bed

SuperDuty Mileage (Fuelly)

Trip Photos on Flickr 


#32 wuck

wuck

    Senior Member

  • Members
  • 329 posts
  • LocationPollock Pines, Sebastopol CA

Posted 09 May 2016 - 03:56 PM

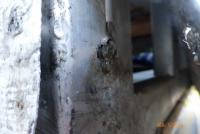
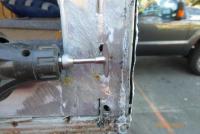
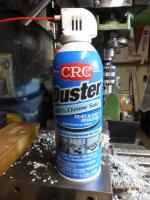
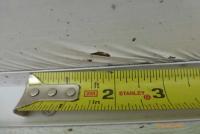
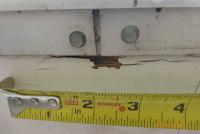
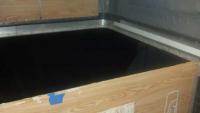
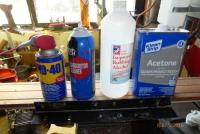
This gooey stuff had been used on the jack brackets, lower siding trim, and the floor pack trim front and rear. Heat and scraping seemed to be the best way to remove it. I tried a few solvents, WD-40 worked well without removing paint.

P1030744r.JPG P1030746r.JPG P1030749r.JPG

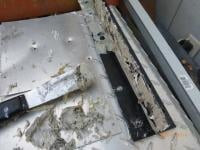
I spent quite a bit of time trying to remove the squeeze out from the siding, but it was a losing battle. The wood-grain texture made it impossible, the heat gun was affecting the paint. Of course that didn't matter under the brackets, but the mess spread out as I tried in vain to remove it. As I looked around at the various dents and dings and goo, I made a new plan.


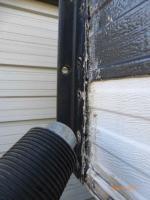
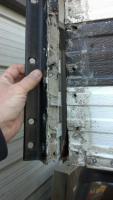
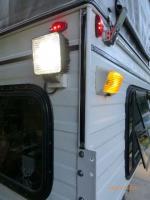
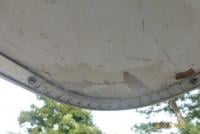
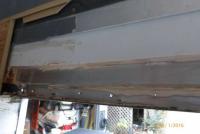
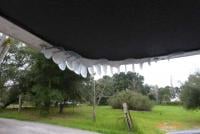
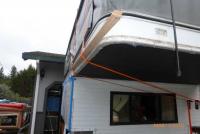
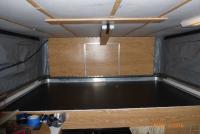
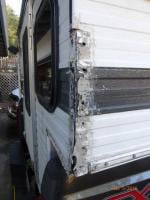
At least I knew the jack brackets weren't leaking, but the upper corner trim was. As it turned out, all four corners had been leaking. The trim around the liner was not leaking, this camper was built around the time FWC changed the procedure for the liner installation, apparently for the better. There was also leaks where the awning was mounted, I hadn't removed the awning to check that out yet.


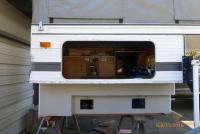
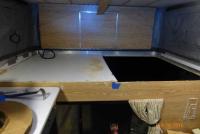
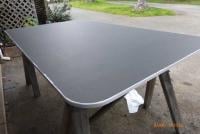
So, my new plan was to replace the siding from the thin gray stripe on down. Git rid of the goo and save many hours of time it would take to clean it up, fix dents, try to repaint it.


I contacted FWC a couple of times, but didn't get an answer on siding price or availability. So, I called ATC and spoke with Jeff about the siding they use. Jeff told me yep, it'll work, there are a few differences.


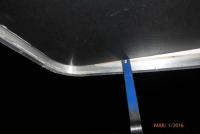
1) The seam is formed slightly different, an "S"-bend as opposed to a "Pittsburg" seam

2) The height of individual sections are different.

3) Pattern is similar (Mesa-Valley), but sized differently.

4) Embossed texture is "Pebbles" vs "Cedar wood-grain"

5) No Gray Stripe available!! They don't do stripes.


I started planning a road trip . . .


Edited by wuck, 09 May 2016 - 04:03 PM.

  • 0

Pat

'04 FWC Hawk

'15 F250 SD SuperCab / Short Bed

SuperDuty Mileage (Fuelly)

Trip Photos on Flickr 


#33 wuck

wuck

    Senior Member

  • Members
  • 329 posts
  • LocationPollock Pines, Sebastopol CA

Posted 09 May 2016 - 04:47 PM

My attention turned to the jack bracket mounting. I found many broken screws, one hole had 2 broken screws and a third screwed in alongside. There was actually another broken screw not visible inside the tube at this location. Broken screws were removed with vice grips, or if that failed, slotting with a dremel tool then using a screwdriver.

P1030753r.JPG P1030761r.JPG P1030762r.JPG


I then removed the awning, and found the mounting screws and rivets had penetrated the seam between two siding pieces in a couple of spots, one of which corresponded to the leak I had previously found inside.

P1030759r.JPG


Last year, I wrote that the bedboard (that lumber-cored plywood under the bed) was sagging. I decided to take care of this while I had the camper apart.


My son and I rode over to Sacramento to visit ATC, I called in advance and Marty had my siding ready on arrival. I bought three sides worth, choosing to not replace the front now (or ever!!!). I also asked Marty about the bedboard, which ATC is now using skid-guard for production. After saying, yeah, I want one of those, Marty cut it to size and shaped it for a perfect fit into the Hawk for me, more time saved and better yet I didn't get the opportunity to screw it up while cutting. Jeff, Marty and crew were quite helpful, we spent quite a bit of time talking while they both added suggestions and procedures to complete these tasks. Thanks guys!


We then stopped in at FWC, I snagged a replacement thin gray stripe for to help repair the awning issue, and a couple other parts. We meandered around the showroom while our parts were gathered, taking in those new camper sights and smells, sigh . . .


  • 0

Pat

'04 FWC Hawk

'15 F250 SD SuperCab / Short Bed

SuperDuty Mileage (Fuelly)

Trip Photos on Flickr 


#34 nikonron

nikonron

    Senior Member

  • Members
  • 576 posts
  • Locationowensboro,ky

Posted 10 May 2016 - 03:12 AM

Keep after it, Pat, your getting there.  Did you try freezing the old caulk to get it off? May make it pop off, just a thought.  Ron


  • 0

#35 wuck

wuck

    Senior Member

  • Members
  • 329 posts
  • LocationPollock Pines, Sebastopol CA

Posted 10 May 2016 - 05:06 PM


Keep after it, Pat, your getting there.  Did you try freezing the old caulk to get it off? May make it pop off, just a thought.  Ron

Thanks Ron,


Didn't think about freezing, hmm, this stuff works pretty good:P1040032r.JPG

If you hold the can upside down, you get pure liquid refrigerant (Careful, it'll give you frostbite in a flash!!)


Meanwhile, spoiler alert!! Camper is looking pretty good these days:


P1030971r.JPG


Edited by wuck, 10 May 2016 - 05:28 PM.

  • 0

Pat

'04 FWC Hawk

'15 F250 SD SuperCab / Short Bed

SuperDuty Mileage (Fuelly)

Trip Photos on Flickr 


#36 wuck

wuck

    Senior Member

  • Members
  • 329 posts
  • LocationPollock Pines, Sebastopol CA

Posted 11 May 2016 - 05:47 AM

Bedboard Replacement


Let's build a camper!


My bedboard (That piece of plywood in the cabover you lay on) had developed plenty of water damage and a bit of a sag over the years. That white coating on the bottom turned out to be a very thin layer, kind of like contact or shelving paper. It had wrinkled along the front wall and broken down other places that left the underlying wood with some water damage.  ColoradoCJ provided a nice write-up for replacement, when I picked up a new board from ATC Marty gave me more advise on how to approach this.

P1030786r.JPG P1030787r.JPG P1030788r.JPG

Marty recommended cutting the side board up a bit for some working room, then simply cutting the old bedboard to lift it out.

P1030792r.JPG IMG_20160228_184240_600r.jpg

For the next part, some help is nice. My son dropped by after work so we could 

fit the new board in. I went ahead and finished all the prep in advance, cutting the sideboard up on the left side, cleaning up the remnant sealer, staples, etc, and finally priming the edges of the new board for protection.

P1030793r.JPG P1030807r.JPG

For the install, I lifted the board from underneath while my son guided it inside. We slipped it into place on one end, then used a bit of persuasion in the form of a wonder bar to drop the other side in. It took all of about two minutes.

P1030809r.JPG P1030812r.JPG P1030814r.JPG

Flush with success, we called it a night!


Edited by wuck, 11 May 2016 - 06:52 AM.

  • 1

Pat

'04 FWC Hawk

'15 F250 SD SuperCab / Short Bed

SuperDuty Mileage (Fuelly)

Trip Photos on Flickr 


#37 wuck

wuck

    Senior Member

  • Members
  • 329 posts
  • LocationPollock Pines, Sebastopol CA

Posted 11 May 2016 - 06:45 AM

Back at it the next day, I raised the new board up a bit and set it on a few spacers, this is where that extra clearance from cutting the sideboards really helps out. Marty recommended sealing the board with silicone/rtv, so I added plenty around the perimeter then dropped the board into place. Maybe a bit too much . . .

P1030819r.JPG

Working quickly I went inside, aligned the bedboard, then fastened it down to the front wall. With the board secured, I used some ratchet straps to pull the side of the c-channel in - the wonder bar had distorted it a bit. Working around each edge, as I pulled the sides and front in I put the remaining screws in from underneath.

P1030821r.JPG P1030824r.JPG

These two came out to inspect my work, both seemed to be in a hurry.P1030836r.JPG P1030838r.JPG


  • 0

Pat

'04 FWC Hawk

'15 F250 SD SuperCab / Short Bed

SuperDuty Mileage (Fuelly)

Trip Photos on Flickr 


#38 wuck

wuck

    Senior Member

  • Members
  • 329 posts
  • LocationPollock Pines, Sebastopol CA

Posted 11 May 2016 - 06:51 AM

I had an idea how to fix my jack bracket issues, so I figured I'd go to Wander The West a bit to think it over.


Carson PassIMG_20160320_140756_650r.jpg IMG_20160320_130837_718r.jpg IMG_20160320_131006_748r.jpg

Sugarloaf Ridge State Park (Yep, that one) IMG_20160312_152119_692r.jpg  Sierra @ Tahoe  IMG_20160316_135406_194r.jpg

Pt Reyes NSIMG_20160229_140720_873r.jpg


  • 0

Pat

'04 FWC Hawk

'15 F250 SD SuperCab / Short Bed

SuperDuty Mileage (Fuelly)

Trip Photos on Flickr 


#39 ski3pin

ski3pin

    Belay On

  • Site Team
  • 15,316 posts
  • LocationSierra Nevada Range

Posted 11 May 2016 - 02:21 PM

Nice wandering wuck! Thanks for the posts on the bedboard. Someday soon I see myself helping Barking Spider replace the one in his 2005 Hawk.


  • 0

2003 Ford Ranger FX4 Level II 2013 ATC Bobcat SE "And in the end, it's not the years in your life that count. It's the life in your years."- Abraham Lincoln  http://ski3pin.blogspot.com/


#40 Vic Harder

Vic Harder

    Doctor Electric

  • Site Team
  • 4,948 posts
  • LocationCalgary, Alberta

Posted 11 May 2016 - 06:14 PM

Bedboard Replacement


Let's build a camper!


Marty recommended cutting the side board up a bit for some working room, then simply cutting the old bedboard to lift it out.


Wuck, can you explain that comment about "cutting the side board up a bit"?  Not sure what that refers to.  Great job on the repair!


  • 0


Also tagged with one or more of these keywords: FWC, Hawk, mods

0 user(s) are reading this topic

0 members, 0 guests, 0 anonymous users