Jump to content


Photo
- - - - -

This old Granby build


  • Please log in to reply
89 replies to this topic

#1 wvtradbow

wvtradbow

    Advanced Member

  • Members
  • PipPipPip
  • 80 posts

Posted 27 June 2015 - 01:25 AM

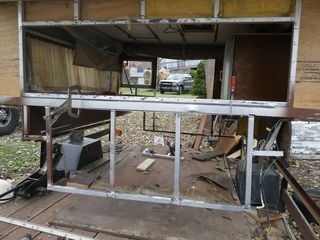
A little history behind this old FWC,I drove to Denver 20+ years ago to get this camper,I was hunting out there and A friend I was with had one and him and his buddies worked part time for FWC.I thought these were so neat,I had to have one.I kept it all this time an about 5 yrs ago with it just sitting since I had long sold the truck to haul it with,i gave it to another friend,he never used it and said he was trashing it if I didn't want it back.I ran across this site and got a renewed interest in it,BUT by now it was in such bad shape,it needed a total redo.i started this project about a year ago realizing I still needed a full size truck to put it on,so this winter I put the camper on hold until I could redo an old truck for it.Now back to the camper.Here's what I started with.camperfront1_zpsda2pq67f.jpg

IMGP1215_zpsf6ffib6c.jpg<iframe src="https://bill-davis.s...ansitionSpeed=2" width="800" height="600" frameborder="no" scrolling="no"></iframe>


IMGP1214_zpsfehf3zhi.jpg


Edited by wvtradbow, 21 July 2017 - 08:43 PM.

  • 0

#2 wvtradbow

wvtradbow

    Advanced Member

  • Members
  • PipPipPip
  • 80 posts

Posted 27 June 2015 - 01:33 AM

I really didn't know where to start so I just started taking the front and rear aluminum panels off and the rotted floor pac.To much dismay when I took the front off all the aluminum support frame fell out.IMGP1305_zps0tb0cawf.jpg


camperfront_zpssazcf7s2.jpg

Luckly I was able to take it to my work and get a lower frame welded,the original was too thin to weld so I had to buy some alum.square.Then I started on the floor pacfloorpac_zpsfxmuetbz.jpg


Edited by wvtradbow, 27 June 2015 - 02:00 AM.

  • 0

#3 wvtradbow

wvtradbow

    Advanced Member

  • Members
  • PipPipPip
  • 80 posts

Posted 27 June 2015 - 01:41 AM

The floor was a little easier than I expected,just measure cut and stain IMGP1324camperint_zpsrif9ahqd.jpg

At this point I just wanted to get it all closed in again,so I went to a local scrap yard to find some aluminum for the damaged front and lower half of the rear,I was able to get a 4x8 sheet of 1/16 aluminum,It was a little thicker than original but that was fineIMGP1328_zpsooufwox5.jpg

IMGP1329_zpsremqqvhi.jpg


Edited by wvtradbow, 27 June 2015 - 12:36 PM.

  • 0

#4 wvtradbow

wvtradbow

    Advanced Member

  • Members
  • PipPipPip
  • 80 posts

Posted 27 June 2015 - 01:54 AM

I hated to stop for a while but I found A truck that I did bed off restore.IMGP1446_zps5o9fyq8i.jpg

Now back to the camper,(these two projects consumed my life besides working 50 hrs a week,wifey hasn't seen me much.)with it basically closed in I insulated some of it and found that if I sanded the cheaper 1/4 plywood that had some kind of coating and used a water base poly it actually turned into a pretty neat panelling IMGP1467_zpsi8wo27qd.jpg

IMGP1466_zpsxlsogkkr.jpg


Edited by wvtradbow, 27 June 2015 - 01:54 AM.

  • 0

#5 wvtradbow

wvtradbow

    Advanced Member

  • Members
  • PipPipPip
  • 80 posts

Posted 27 June 2015 - 02:16 AM

This is where I'm at now,I removed the liner and took kmcintyre advice from another post and took the roof off also to redo it.The old liner was all moldyroof%20mold_zpsu94h2x25.jpg

I got some 1/4 foam insulation(I can't remember who to thank for that tip but I seen it here) and another hatch up front I also ran new wires for lights and a fan if I put one in.roof%20in%20progress_zpsenmg1x1y.jpg


  • 0

#6 wvtradbow

wvtradbow

    Advanced Member

  • Members
  • PipPipPip
  • 80 posts

Posted 27 June 2015 - 02:27 AM

i skipped a step!! I got 11yds of 18 oz Vinyl coated polyester off ebay (great price) and cut it 24" and tacked it around the camper to see where to put the windows measure%20liner_zpsvvx51zyl.jpg

liner%20measure_zpswqdeviio.jpg

I guess I made a mistake cutting the windows in,the guy I tried to get to sew the screen and velcro,covers in wouldn't do it cause he said it was too hard that way "I should've pinned everything together first and cut the vinyl last.I had to sew it myself with my home machine(and i'm not that good) but I think it turned out Okay but I used regular thread and sure hope it holds up.I tried everywhere around here to get it sewn and either they were too busy or just don't mess with campers.


  • 0

#7 wvtradbow

wvtradbow

    Advanced Member

  • Members
  • PipPipPip
  • 80 posts

Posted 27 June 2015 - 02:38 AM

I wanted to paint the camper before I put the liner on(hopefully this weekend) but I did have to make the flip panels and I did that this week and its causing me a great deal of stress cause the roof doesn't seem to want to line up even though I basically put them back in the same holes. Marty  says that once I get the front mattress in it should let the back down.I sure hope so..back%20panel_zpselqv2qdy.jpg

IMGP1500_zps8ps1czut.jpg

IMGP1504_zps5bgmygyn.jpg


  • 0

#8 kmcintyre

kmcintyre

    Senior Member

  • Members
  • 1,381 posts
  • LocationBoise, ID

Posted 27 June 2015 - 02:59 AM

Amazing.  I've done a lot of work on my camper but this is a step or two more than I tackled.  Looking good and to think you were the original owner!  That's cool.


  • 0

Boise, ID

2022 Chevy 3500 HD

2023 FWC Flatbed Hawk


#9 marty

marty

    Senior Member

  • Members
  • 338 posts
  • LocationSacramento, California

Posted 27 June 2015 - 01:56 PM

It would be a good idea to put a spacer under the front panel to make it level before you go any further. Just to make certain it works. We use small cardboard boxes sitting on the bed board. You will also want to make sure the camper is square from the front corner on the driver side to the rear corner on the passenger side on the top of the body frame. Then from the front passenger side to the rear driver side.


  • 0

#10 billharr

billharr

    Senior Member

  • Members
  • 2,823 posts
  • LocationStockton CA

Posted 27 June 2015 - 02:03 PM

Looking forward to your build. Thanks for posting it up.


  • 0


0 user(s) are reading this topic

0 members, 0 guests, 0 anonymous users