Jump to content


Photo
- - - - -

"The Turtle Shell" - '91 Hawk Rebuild

Shell Hawk FWC Rebuild Floorpack Paint Roof

  • Please log in to reply
20 replies to this topic

#1 TurtleShell

TurtleShell

    Newbie

  • Members
  • Pip
  • 8 posts

Posted 06 January 2016 - 03:25 PM

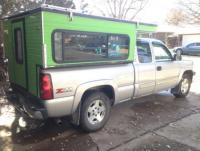
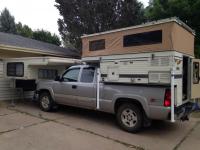
Before getting into our rebuild it’s worth mentioning our motivation for going the route we did. My wife and I are backcountry skiers, and love to travel! After we finished college in WI we moved to CO and took a year off before I started graduate school. She found work in her field and after a couple years we conjured up the idea of taking an early retirement trip after I finished my dissertation (estimated spring 2017). This trip includes several parts but the pertinent one for this forum is chasing winter to Alaska skiing as much as we can along the Canadian Rockies. We will then stay in AK for the summer and mosey back to the lower 48 in the fall, in total it will be an ~8 month trip. I had bought my father’s truck before leaving WI because he simply wouldn’t allow me to take my 1992 Silverado (6cyl, 5sp, 2WD) out west, named "Ol’Blue." Thus the upgrade to the "Renegade" which is a 2004 Silverado Z71. Over the years we’ve spent many nights sleeping in the bed of the truck on a raised platform but figured that was no way to live our epic trip. We started thinking about buying a van or a truck camper and since the truck was already paid off it made most sense to get a truck camper. We happened to score an awesome deal on a Lite-Craft in January 2015! 


1.jpg 2.jpg 3.jpg


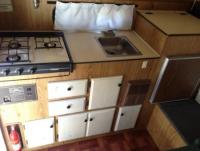
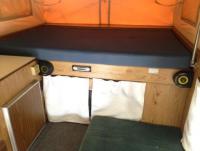
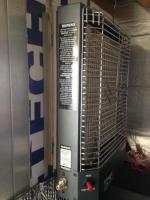
We bought a memory foam mattress and a new deep cycle battery. The thing was great; heater worked wonderfully but the interior was very limiting for storing our adventure gear. Spring skiing we discovered that the roof vent leaked and we tried sealing it up but it really just needed to be replaced. The camper was also pretty heavy as it was framed entirely with wood and with all the unnecessary appliances, which made the truck feel a bit sluggish. Winter camping means no plumbing, thus the water tank, hoses, pump, and sink were all unnecessary. The stove had three burners, two is at most we’d ever use. The fridge didn’t work and was a huge space waste. We thought we might be able to mount a roof rack for storing gear but with a 60lb trial of weight on the roof there was no way we could lift it (later I found out about struts). Another option for skis might have been to build an under the camper storage unit, but that still didn’t solve all the extra space alongside the camper as it was actually designed for a mid-size truck.


With all these thoughts in our heads, this is when we started to rethink our approach. We talked more about the van option, selling the truck and buying a ¾ ton, revamping an enclosed trailer, Wildernests or other rooftop tents, and even just sleeping in the back under the topper. The cheapest option would be to use the truck as is, but we knew the raised platform was too limiting for head room. We decided to try out a lower bench option by using the built-in slots in the bed for a platform. This was great as it provided much more headroom but then we didn’t know how we would organize our gear underneath? Where do we put the cooler? Where do totes go? After a weekend trial trip we scratched the idea, even if the dog loved it. 


4.jpg


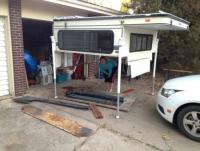
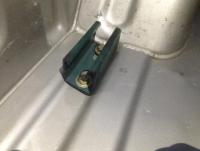
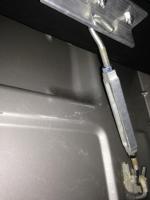
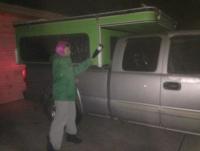
Back to the drawing board we decided that again we wanted to go with what seemed to be the cheapest option forward by buying a different truck camper that was lighter, fit the truck properly, and we could gut the inside to rebuild for our specific needs. This is when we came across Four Wheel Campers and there began countless hours of research. Do we buy a new(er) one? Do we buy an old one that requires additional work to fix it up? Searching CL we eventually came across a 1991 Hawk about 2.5 hours away. It was already partly gutted and in rough shape. After a little negotiating we bought it for $900. Using some NRS straps to connect it to the truck for transport, we headed home and immediately posted the Lite-Craft truck camper on CL. It only took a couple days to sell which allowed more room in our driveway for working!


5.jpg


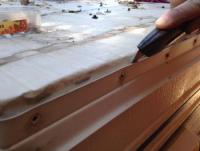
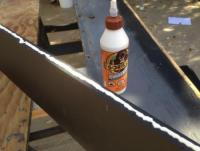
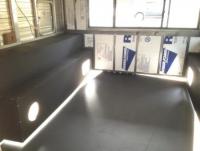
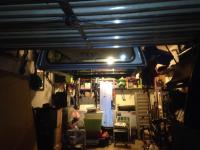
Our first step moving forward was to assess the condition and what all needed to be done. The floor pack was rotted through in two places and really squishy in several others. This had to be replaced! Although finding out about different wood hardeners was cool, and it would be a good option if your wood is just starting to rot.


6.jpg 7.jpg


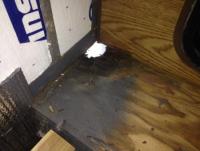
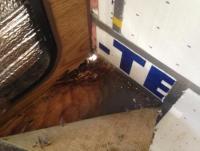
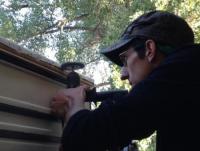
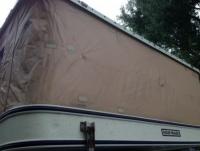
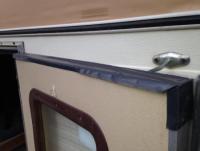
We noticed some mold on the front lift panel which made us suspicious of a leak and additionally while sitting in the driveway after our first rainstorm there was some moisture in that front corner.


8.jpg


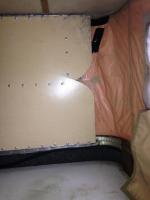
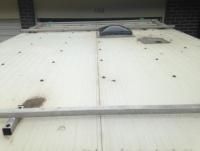
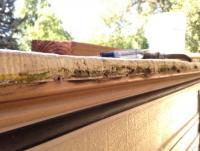
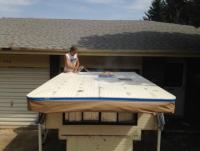
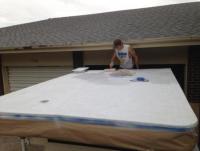
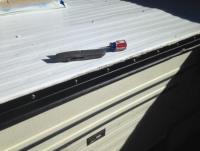
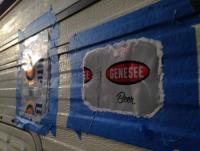
That front corner also had substantial cracks in the canvas and a few patches. Since the moisture came in when the top was down, we assumed that it was the roof itself that leaked. We decided it would be best to address resealing the entire roof and also repaint it.


  • 0

#2 TurtleShell

TurtleShell

    Newbie

  • Members
  • Pip
  • 8 posts

Posted 06 January 2016 - 03:33 PM

This was our first project and like any project, KEEP IN MIND IT TAKES MUCH LONGER THAN ANTICIPATED! We initially planned a weekend where Saturday would be devoted to the roof and Sunday would be for the floor. The roof took the entire weekend, a few weekdays, and a lot of beers to complete. But damn did it look good! To remove the old trim we used a razor blade and a wire brush wheel attached to the drill to clean up the old gunk. We used some 2x4s to support the roof while we climbed around. We used two cans of an aluminum spray primer first and then a quart gallon of white gloss Rust-Oleum. For the trim we settled on flat black Rust-Oleum and under the trim we used butyl tape for a good seal. After everything was in place we used Sikaflex to caulk the edges. The Sikaflex is super stiff coming out of the tube, so be prepared for pumping out your forearms! 


9.jpg 10.jpg 11.jpg 12.jpg 13.jpg 14.jpg 15.jpg 16.jpg


All the screws were replaced with #8 x ¾” stainless hex washer head machine screws. As Stan@FourWheel noted in a different forum, these are softer metal and if you’re not careful they will break! We had two break on us, which thankfully I had the tools on hand to remove and replace without drilling.


17.jpg


We then moved on to replacing the floor pack. On the FWC website they mention using a Skid-Guard plywood but we couldn’t find that locally, so we ended up going with 5/8” AC plywood. Three sheets cost $145 from a local lumber store. We also bought a gallon of Behr Marquee in flat black. We started by using the old wood pieces as templates to cut the new wood. Thanks to some friends they let us use their table saw, but if you have to do this yourself I would recommend using a table saw with a larger table. We applied two coats of paint on each side of the wood. For installing we began on the outside edge and worked our way to the center board, using #8 x 1" screws to connect to the aluminum frame and we used phillips flat head wood screws for the wood-to-wood joints. Between joints we used a quarter of a 18 oz. bottle of Gorilla wood glue. This process actually went quite a bit easier than expected but getting the boards cut to the same exact size was not feasible for our setup so there’s a little bit of mismatching going on that’s not visible until you’re up close.


18.jpg 19.jpg

20.jpg 21.jpg


Since we replaced the wood, it only made sense to replace the brackets on the camper, thus we bought some aluminum that a local shop cut for me; I took the time to drill and round the corners out with an angle grinder. The idea came from the newer brackets which Billharr illustrated.


22.jpg


For the cracks in the canvas we decided to seal them with Coghlan’s 8880 airstopNote that the hard plastic piece that comes with it sucks, so my wife sacrificed a makeup brush, which worked much better. Also this stuff dries really fast, which leads to clumping on the brush. Also a warning if you are doing this inside a confined area, ventilate ventilate ventilate! We then cleaned all of the canvas with 303 Aerospace Protestant


23.jpg


For the door we had go to a local RV salvage place (Five Star RV Salvage in Henderson, CO) to get door trim which we cut and fit to size. We also had to buy a door stop as the door didn’t have one. 


24.jpg


On the driver’s side of the truck we had two openings that we wanted to more permanently seal up, thus more drinking! Someone on another forum mentioned using an aluminum can to patch a hole, which adopted using a regular sized Genesee beer can and a Miller Lite tallboy.


25.jpg 26.jpg


  • 0

#3 TurtleShell

TurtleShell

    Newbie

  • Members
  • Pip
  • 8 posts

Posted 06 January 2016 - 03:49 PM

With the exterior all cleaned up and the trim removed we moved on to painting the camper. Of course it doesn’t make sense to paint the camper just any old color unless you have a good name for it. While on a 4-day backpacking trip we were tossing around all sorts of ideas and the one that stuck, as you may have guessed already, was “The Turtle Shell”! We picked out a green that we both liked (compromised on) from Home Depot and bought a gallon of Behr Premium Plus Ultra. After a couple coats of paint The Turtle Shell came to life!


27.jpg


As whitewater folks, we already had one Jack’s Paco pad and it was just a matter of finding another one online at a reasonable price. These are pretty pricey but for a truck camper they’re super awesome because they are modular and allow for making the bed up top, making benches and backrests down below, and are multi-purposeful as they are nice for outdoor lounging, rafting and can withstand a beating. At this point we were itching to get out and use the camper that we’d been spending so much of our free time working on. We planned a four day ski trip for a week later, November 13-15th. This basically gave us just over a week to finish prepping. The only problem was that the camper still had no way to be attached to the truck… Having neither heat nor electricity was secondary.


In order to progress to attaching the camper to the truck we had some friends come over and help with lifting the truck topper on to some eye-hooks and straps I mounted in our garage. This actually went really well!


28.jpg


Our truck already has factory D-rings mounted in the bed of the truck in all four corners and given that they seemed to hold up with the old camper and have a ~1”x2” steel backing we figured they would hold for the new setup as well. Note that when we had the old camper on the turnbuckles came loose several times adding to the force applied to the rings as the camper shifted around on some 4WD roads. The only problem was that with the new camper there is very little room along the sides at the rear, so we had to build brackets in the bed to attach the rear turnbuckles. For the rear brackets we followed a suggestion by BillM and Elle.


29.jpg 30.jpg


As an engineer, I found the forum discussing turnbuckles and points of failure quite comical. Designing a failure point in the system when other parts of the system are more important/valuable can be a good thing. In other words I would prefer my turnbuckles broke than my truck or camper, it’s much cheaper to replace hardware. At the same time I can’t think of a good time I would ever want my camper to come flying off either! Personally I like the idea of closed mounting attachments, but given that I already have the regular TBs I’m sticking with them. BTW, turnbuckles were installed with righty-tighty to the top and we used backing nuts on the turnbuckles, held in place with clear fingernail polish (cheaper than Loctite), to keep the turnbuckles from coming loose. 


31.jpg


For a heater we looked over the Ultimate Furnace, and ultimately decided to try out the Wave 6 catalytic heater. We were drawn to this option as it does not require power and runs quietly, but most importantly we wouldn’t have to worry about it not working at high elevation like the Mr. Buddy. Checking CL we found a used one for $200 that came with a #20 lb tank. For mounting the heater we followed a suggestion from ski3pin.


32.jpg


Eventually we’ll end up going the solar panel route, but in the mean time we just setup our power bank so that the battery can be easily removed and brought inside for charging/keeping warm. We bought an Optima BlueTop 8016-103 D34M battery and picked up a tray to hold it in place, which arrived the evening before our maiden voyage! We also bought a propane detector and carbon monoxide detector. As suggested by others we bought some pipe insulation to seal off the gap between the camper and the truck bed rails. We installed these to the camper using staples and zip-ties. 


33.jpg


In the front we used a wood board and a rubber mat to provide the necessary gap so the camper didn’t rest directly on the upper part of the bed rail.


34.jpg


The last thing we did before our trip was to cut up the old floor to sit between the camper and the rubber mat. We chose to do this so that the easily disposable wood sitting on the bed could rot away while the wood we worked so hard to replace on the camper will last longer.


35.jpg


Boom, all that done over a week timeframe and ready for our first adventure! 


36.jpg 37.jpg


The first night was the coldest, getting down to the single digits. We actually only used the heater the first evening and the next morning. The other nights temperatures were double digits but still below freezing, and it didn’t feel necessary to heat. As usual with winter camping we had a ton of condensation even with moderate ventilation. I recall reading someone using their Fan-Tastic vent overnight and that helped a lot. Maybe it’s just our model (3350?) but it seems that the motor for the power lift always spins unless the dome is all the way open, even in manual mode. Does anyone know what I’m talking about? This seems stupid as what if I want my fan to be on but only have the dome part way open? The lift motor is just sitting there wasting battery and working that motor.


We realize that we will need to purchase an inverter one of these days for our Swix iron but in the mean time we liked the route of buying the correct power cords for our appliances to directly hook into the 12V power (reference http://www.wanderthe...rs/?hl=inverter). For the connections we bought this guy. We also bought the necessary cables for our laptop and Bluetooth speaker, and will soon be purchasing one to charge our camera batteries.


We will soon be building the interior. Our end goal will be to have a platform covering most of the interior at the same level as the highest part of the floor pack. roof struts to make lifting the roof a bit easier, especially once we put the solar panel up. Does anyone know the correct size struts needed for the older Hawk models?


This rebuild, although not finished, has been influenced a lot by the guidance and experience of others. Below are links to some of those we found extremely useful. We’d also like to give a shout out to all the contributions from ski3pin! You seem to have a valuable input on every topic.


http://www.wanderthe...ood#entry112330


http://www.wanderthe...ild/?hl=rebuild


http://www.wanderthe...urb/?hl=rebuild


http://www.wanderthe...uild#entry85146


http://www.wanderthe...ing/?hl=rebuild


http://www.wanderthe...down-on-camper/


http://www.wanderthe...eyebolt-source/


http://www.expeditio...hlight=isolator


http://www.travelama...of-3-the-truck/


  • 0

#4 billharr

billharr

    Senior Member

  • Members
  • 2,824 posts
  • LocationStockton CA

Posted 06 January 2016 - 06:17 PM

Nice work on a really big job. Well documented on what you have done.


  • 0

#5 norcalhusky

norcalhusky

    Advanced Member

  • Members
  • PipPipPip
  • 96 posts

Posted 06 January 2016 - 06:17 PM

Well done!
  • 0

#6 TrapperMike

TrapperMike

    Advanced Member

  • Members
  • PipPipPip
  • 74 posts
  • LocationNW Wisconsin

Posted 06 January 2016 - 06:34 PM

Wow, nice work!


  • 0

2016 FWC Hawk Shell

2011 Chev Silverado 1500 4x4 ext cab

2018 Chev Silverado 2500 4x4 ext cab 

Super Springs

Helwig Sway Bar


#7 longhorn1

longhorn1

    Ouch, that stings!

  • Members
  • 2,826 posts
  • LocationCarmel, Indiana

Posted 06 January 2016 - 06:58 PM

Nice job.


  • 0

http://texaslonghorns01.blogspot.com/


Ford F-250 Long bed, 2014 Grandby


#8 ski3pin

ski3pin

    Belay On

  • Site Team
  • 15,316 posts
  • LocationSierra Nevada Range

Posted 06 January 2016 - 08:48 PM

You guys really dug into a big project! Looks like you did a great job. Thanks for documenting your project so well and sharing with us. We look forward to hearing about your travels. Best of luck!


I'm starting to miss Wisconsin more and more.


  • 0

2003 Ford Ranger FX4 Level II 2013 ATC Bobcat SE "And in the end, it's not the years in your life that count. It's the life in your years."- Abraham Lincoln  http://ski3pin.blogspot.com/


#9 takesiteasy

takesiteasy

    Senior Member

  • Members
  • 2,588 posts
  • LocationMinnesota

Posted 06 January 2016 - 09:27 PM

Nice work- I enjoyed reading about your project. I look forward to hearing about the interior finishing too. Happy camping!


  • 0
2011 Tacoma AC TRD
ATC Custom Shell

travelswithrockythedog.blogspot.com

#10 Kolockum

Kolockum

    Still Wandering

  • Members
  • 622 posts
  • LocationWashington

Posted 06 January 2016 - 11:22 PM

Nice job. I look forward to seeing how you finish the interior.
  • 0

------------------------------------------------------------------------------------

2017 Toyota Tacoma with 2000 FWC Eagle


"The nut behind the wheel is the most important one. Don't forget to snug yourself up every once in a while." John D & ri-f


Also tagged with one or more of these keywords: Shell, Hawk, FWC, Rebuild, Floorpack, Paint, Roof

0 user(s) are reading this topic

0 members, 0 guests, 0 anonymous users