My last trip through the desert wind was blowing like Key Largo, the white vinyl on the underside of the bed overhang was torn off in several places and plywood got soaked. Now dry I need to tap the collective wisdom of this group to decide what to recoat with. I was going to heat gun the remaining vinyl off and then... Either new vinyl from local sign place or prime and paint with what?
Sent from my iPhone using Wander The West


Exterior vinyl repair
Started by
hebegebe
, Jan 17 2016 07:09 PM
7 replies to this topic
#1

hebegebe
-
- Members
- 234 posts
Senior Member
- LocationLA and San Diego
Posted 17 January 2016 - 07:09 PM
#2
Oryguntroutbum
-
- Members
- 396 posts
Senior Member
- LocationCentral Oregon
Posted 17 January 2016 - 09:01 PM
Maybe consider using a 4 x 8 sheet of bathroom stall panel. Only 1/16" thick.
http://www.homedepot...E2347CF536571F1
2014 Dodge 2500 4x4, Cummins TD2021 FWC Hawk<p>
#3
longhorn1
-

- Members
- 2,826 posts
Ouch, that stings!
- LocationCarmel, Indiana
Posted 18 January 2016 - 12:19 AM
What year is your camper?
Sent from my SM-G900V using Wander The West mobile app
Sent from my SM-G900V using Wander The West mobile app
#4
hebegebe
-
- Members
- 234 posts
Senior Member
- LocationLA and San Diego
Posted 18 January 2016 - 05:14 AM
My hawk is a 2004 model
Sent from my iPhone using Wander The West
Sent from my iPhone using Wander The West
#5
Old Crow
-
- Members
- 1,059 posts
Searching....
- LocationSouth Central PA
Posted 18 January 2016 - 02:21 PM
I don't have any specific experience with the cabover vinyl surface so take my comments with that in mind.
It seems to me the vinyl shouldn't have come off unless its bond to the plywood was compromised by moisture or perhaps excessive heat (and that seems an odd place for the latter). Do you have any idea how the separation got started and whether there may be more damage than is apparent? Does the inside surface look and feel OK?
How you refinish depends somewhat on your tastes. I'm pretty sure I'd be happy with a painted plywood surface so I'd try stripping the vinyl, testing for residual moisture with a wood-moisture meter, patching up any minor imperfections with a latex spackle (probably 'Ready Patch'), priming with a primer-sealer (probably Glidden Gripper like this), then applying a coat of 100 per cent acrylic latex (probably Glidden Premium Exterior satin like this). (I mention those paints because I used them for my floor-pack)
You may also want to read through this 2007 thread on this subject if you've not already done so.
-OC
PS- I wish I knew more about the cabover floor material. This thread has photos showing the edge of the board used in ski3pin's build by ATC (posts 2 and 13). Not sure if that would have been used in an 04 Hawk, though.
Edited by Old Crow, 19 January 2016 - 08:13 PM.
'01 FWC Hawk shell on a '13 Tundra Double-Cab + '19 Ford Transit van with Quigley 4x4 option
#6
hebegebe
-
- Members
- 234 posts
Senior Member
- LocationLA and San Diego
Posted 18 January 2016 - 03:33 PM
Hi OC The material used is 3/4 plywood with the vinyl laminate on 2 sides. I had a few minor surface blemish on the exterior and between the severe wind,rain and truck speed it shredded a portion like flames on the driver side. It is now dry my first thought was to use the white rustoleum I had coated the roof with but not sure. Thanx for your input
Sent from my iPhone using Wander The West
Sent from my iPhone using Wander The West
#7
Alley-Kat
-
- Members
- 989 posts
Elder Statesman
- LocationPacific Ocean
Posted 19 January 2016 - 06:34 PM
What with the possibility of water damage to the bed overhang material, you may need to replace the entire piece.
Have you looked at how the bottom of the bed overhang is attached from the INSIDE?
You may want to call Marty or Jeff at All Terrain Campers as you year camper was probably built by Marty & Jeff and if at least not built by them, they know how they were built as they used to work at FWC.
Here's some of my ideas to prep you for the job (maybe), and so you can talk to Marty & Jeff with some idea of what it may take to replace the entire unit.
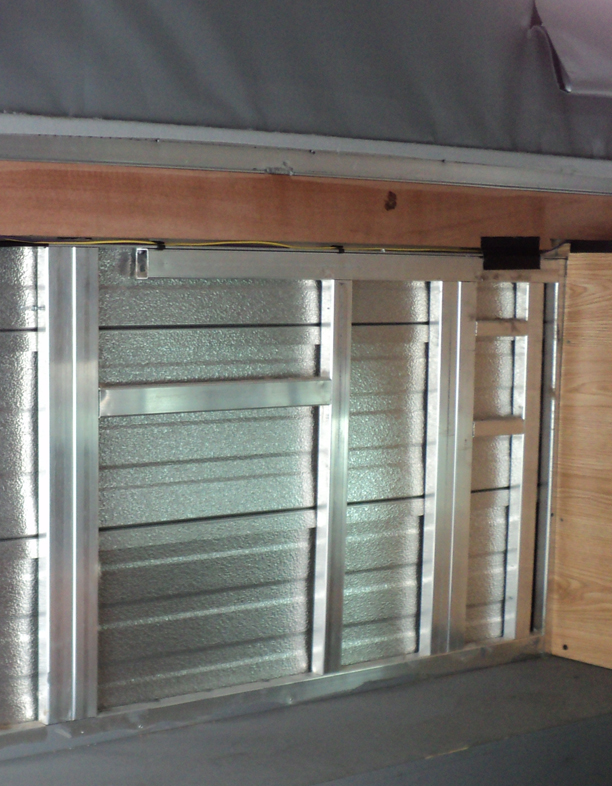
You'll need to remove the small piece of side paneling in the bed overhang area as shown in the image below.
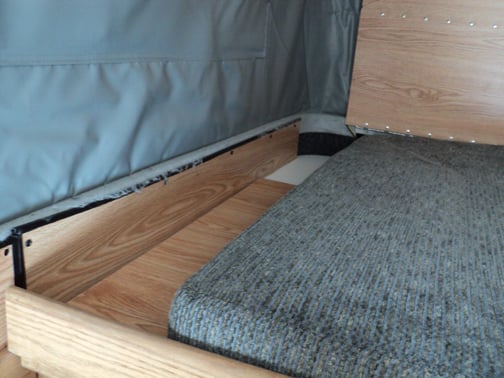
Here's an image under the paneling.

See how the bottom of the bed overhang is resting in the side "C" channel and on top of the camper front wall, with a countersunk screw going into the aluminium front wall of the camper? There are more of these screws across the front wall of the camper.
From outside the camper, I think there are a lot of screws that go UP, into the "C" channel and into the bottom of the bed overhang, all the way around the front of the camper. All of those screws would have to be removed.
Now for the hard part (I think).
For support of the bed overhang there is a wood 1x4 or 1x5 on each side of the camper in the "C" aluminium channel as shown in the image below. The wood does NOT go around the front curve or the front of the bed overhang. I think that may have to be removed on at least one side to remove and replace the bottom of the bed overhang. Doing just one side and you could then lift up that side and slide the other side out from under the opposite wood piece. It may take two people to do it carefully and get it into the back of the camper, turned and out the door (I hope).
However, I'm not sure how it is held in place. Maybe screws down from the top of the "C" channel, it does look to be tight against to the top of the "C" channel, I don't have any images of that. Marty & Jeff would know.
If you can get all of that done, then use the old bed overhang as a template to make a new one, and reverse the process.
Look for something better than what was used originally for the hard surface on top and bottom of the bed overhang, maybe melamine and use something to waterproof seal the raw cut edges, so you don't ever have to do this again.
Edited by Alley-Kat, 19 January 2016 - 06:38 PM.
#8
hebegebe
-
- Members
- 234 posts
Senior Member
- LocationLA and San Diego
Posted 20 January 2016 - 01:41 AM
Hi A-K
Thanks for pics it is interesting to see the bones. I pulled the hawk in the garage after this episode and left a fan on for a week I didn't discover any de-lam inside or out although the inside surface is all scratched up. looking for some foil to recover that. Guess I need to finish prep and just prime and paint exterior it will more an likely last my lifetime
Thanks, Dave
Sent from my iPhone using Wander The West


0 user(s) are reading this topic
0 members, 0 guests, 0 anonymous users

