Living the dream! Looking good and nice to see you're not afraid of tearing into a project. The water tank top tube is a breather and overflow. The outside fill port has a breather/overflow hole next to the main fill.


84 Fleet - 09 Tacoma - Project
Started by
Living The Dream
, Mar 07 2016 07:29 AM
420 replies to this topic
#21

ski3pin
-

- Site Team
- 15,316 posts
Belay On
- LocationSierra Nevada Range
Posted 03 May 2016 - 05:42 AM
2003 Ford Ranger FX4 Level II 2013 ATC Bobcat SE "And in the end, it's not the years in your life that count. It's the life in your years."- Abraham Lincoln http://ski3pin.blogspot.com/
#22
WestCoast
-

- Members
-

- 79 posts
Advanced Member
Posted 03 May 2016 - 05:04 PM
Right on buddy! I'm in the same boat, but it's building out a new shell...so maybe not the same boat, but a boat none the less.
It's posts like these that inspired me to pull the trigger on a shell and build it out myself! So stoked for next winter!!!
Sent from my iPhone using Wander The West
It's posts like these that inspired me to pull the trigger on a shell and build it out myself! So stoked for next winter!!!
Sent from my iPhone using Wander The West
#23
Living The Dream
-
- Members
- 464 posts
Senior Member
- LocationFront Range, Colorado
Posted 17 May 2016 - 03:17 AM
Thanks for the positive feedback all. A small and brief update.
Living the dream! Looking good and nice to see you're not afraid of tearing into a project. The water tank top tube is a breather and overflow. The outside fill port has a breather/overflow hole next to the main fill.
Thanks 3Pin. Ill make sure to have all those when I put it back in for proper system. On a quick test, I think someone sent some screws into my tank at some point in time. So if it is more than half full it leaks. Does anyone know of an epoxy that is safe for drinking water vessels?
On to the updates:
On Sunday I got to what hopes to be the bottom of the tare down. The rear wood panel is a difficult one as the lifting panel many screws go through the wood paneling. So I had to support the roof in the rear, detach the lifting panel, rip out wood panels, then reattach the lifting panel. I am thinking when I put in new paneling I will make this part two sections so I won't run into this problem again if I do something like take out the panel to add wiring or fix a leak.
Only one quick photo today
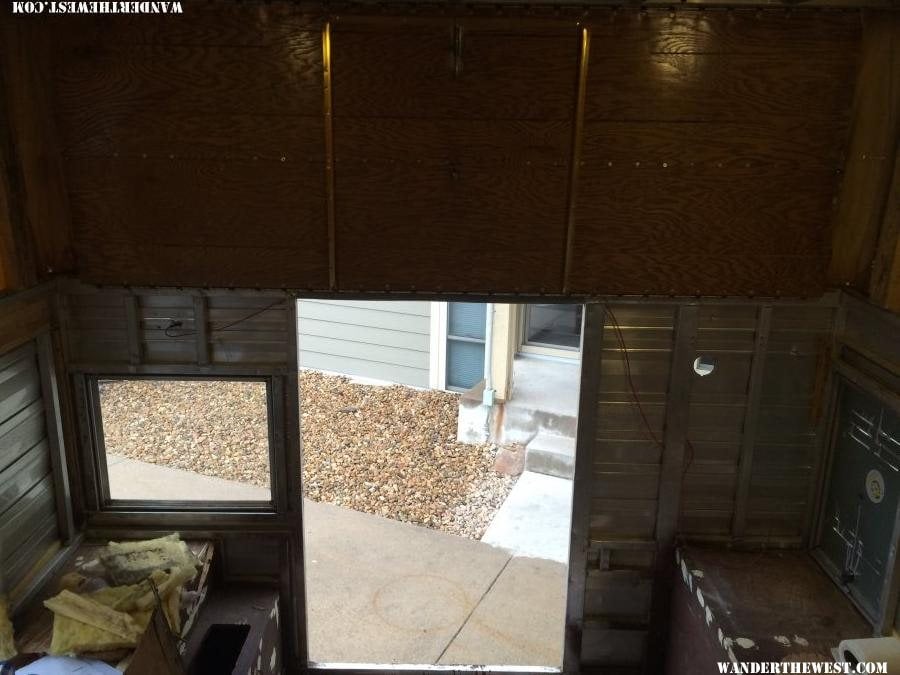
I also had to remove the door to salvage the interior door trim. Not a big of deal if not for the one rusted and stipped bolt that require a dremel and a drill, and the rain while the door was off the camper. Had to quickly bolt it back in with a handful of screws. Spent the rest of the day prepping the exterior rear for paint. I am simple tacking the doors and windows on with a few screws while I work my way around. Once all painting is done and it is ready for final steps use the butyl tape
http://www.amazon.co...e/dp/B001FCB4JS
Also, I finally got around to adding a fourth pass through for the final tie down. Happy to have four secure points now
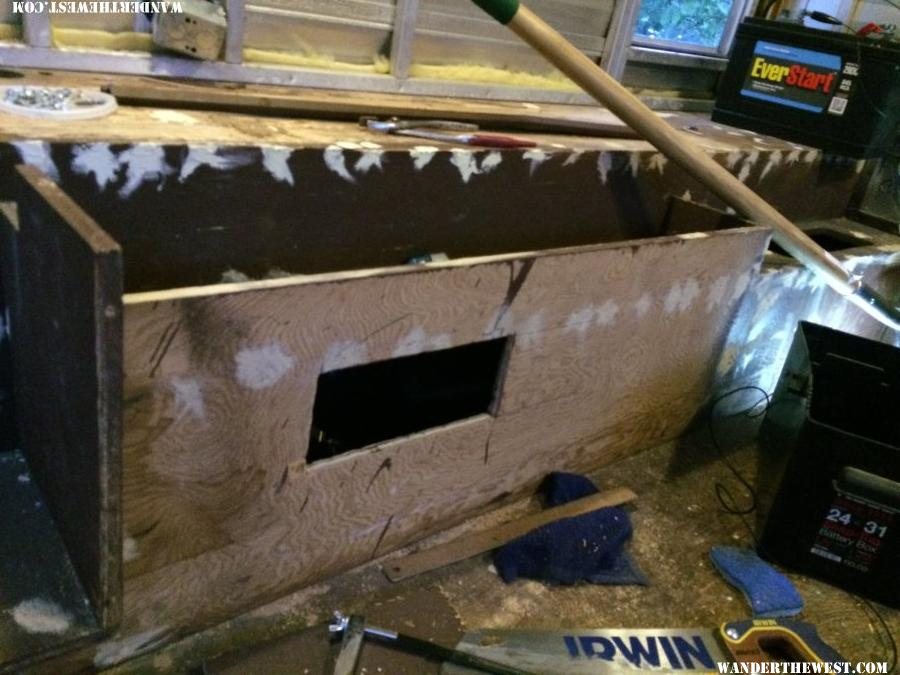
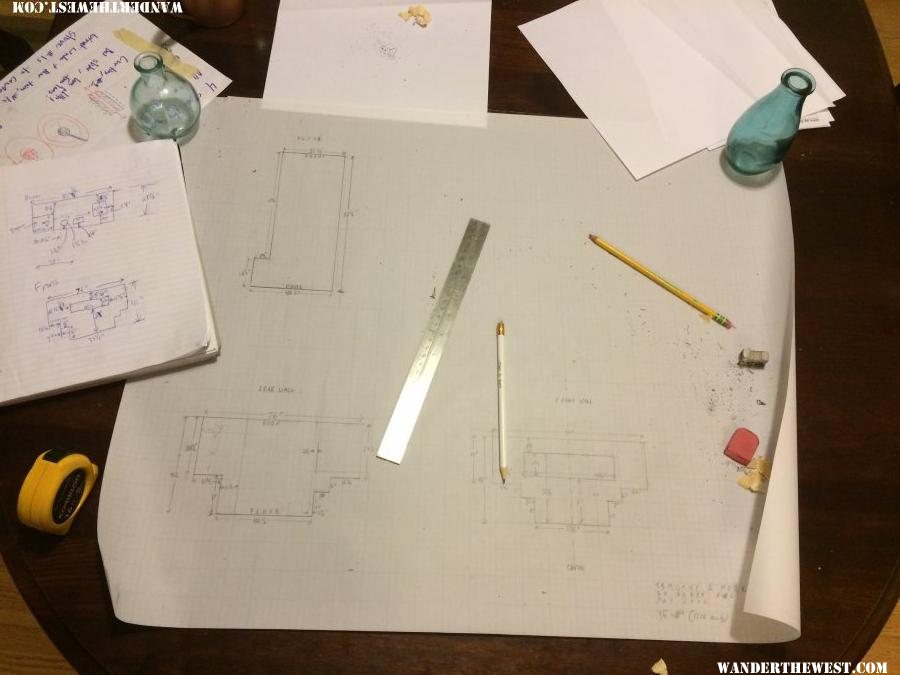
It might not seem like the most productive weekend but it was a good one. Got a lot of little things done in the camper. Hoping to start putting it together soon, rather than taking it apart. Next up is sanding and painting the floorpack (I think I said that last time too) and insulating and paneling interior. Have been laying plans too, trying to make as little costly mistakes as possible. I need to pick out some new interior panels soon. Anyone have a suggestion and source. Hoping to go for a more modern look like the newer samples rather than the classic wood:
My youtube channel about my Four Wheel Camper - https://www.youtube.com/c/timmorrissey
All about my camper - https://www.tgmorrissey.com/camper
Item I used in my build- http://bit.ly/TGMorrisseyParts
#24
PokyBro
-

- Members
- 467 posts
Senior Member
- LocationLas Vegas, Nevada
Posted 17 May 2016 - 04:39 AM
Living the dream, nice to see some more progress on your camper. Regarding your water tank, if I caught it right, it's got some screw holes. I went back a few photos, and I see your tank appears the same shape as the original water tank in my former Grandby, which I'm replacing. You're welcome to it, if it will fit. I'd love to see it go where it can be used, so just let me know. I'll snap a photo for you to see tomorrow. You have my contact info on the PM I sent you. Just trying to help out someone in my own shoes.
Sent from my iPad using Wander The West
Sent from my iPad using Wander The West
1999 F250 crew cab SRW, 7.3 Powerstroke TD
1981 Grandby shortened to a Hawk
Build thread / https://www.wanderth...by-into-a-hawk/
#25
PokyBro
-
- Members
- 467 posts
Senior Member
- LocationLas Vegas, Nevada
Posted 17 May 2016 - 04:45 AM
Regarding the paneling, if you don't mind the distance, Menard's in Cheyenne has the biggest selection of wall paneling I know of around here. They have some that looks like what would be found in the newer campers. Maybe you can see it online, I haven't checked. Their prices are pretty good as well.
Sent from my iPad using Wander The West
Sent from my iPad using Wander The West
1999 F250 crew cab SRW, 7.3 Powerstroke TD
1981 Grandby shortened to a Hawk
Build thread / https://www.wanderth...by-into-a-hawk/
#26
Living The Dream
-
- Members
- 464 posts
Senior Member
- LocationFront Range, Colorado
Posted 17 May 2016 - 05:21 AM
Hey PB. I was actually going to reach out to you last weekend I was up your way on Saturday. But my other projects took the full day and I didn't have any spare time. I will definitely get in touch when I am up again, which should be sometime the next few weeks.
Yes the water tanks has screw holes in it. I may just take you up on your offer. Snap some photos and send then my way and we can go from there. Thanks in advance. What tank are you going with instead? I am trying to think of a way to located the tank lower like the new system but still have a hand pump to handle the pumping and proper drainage for when empty. You may want to consider this too. Apparently with the new model, the lower and closer inside the wheels you can get your heavy tank, the better.
3:30 in this video
Talk again later.
My youtube channel about my Four Wheel Camper - https://www.youtube.com/c/timmorrissey
All about my camper - https://www.tgmorrissey.com/camper
Item I used in my build- http://bit.ly/TGMorrisseyParts
#27
Qcamper
-
- Members
-
- 29 posts
Member
Posted 19 May 2016 - 12:24 AM
LTD,
Looking great! I am up in Conifer and will be replacing my lift panel with the EMT conduit method. Any thoughts or changes since you have had it in and working for awhile?
I had a leak in my water tank as well. Mine was a crack at the drain. I went to a place down in Arvada and the guy replaced the drain by friction welding a new one in. They also make custom tanks etc.. He only charged me 2$ for the new drain fitting. I will track down the name and let you know.
Q
#28
Living The Dream
-
- Members
- 464 posts
Senior Member
- LocationFront Range, Colorado
Posted 19 May 2016 - 03:34 AM
Qcamper, on 18 May 2016 - 6:24 PM, said:
LTD,
Looking great! I am up in Conifer and will be replacing my lift panel with the EMT conduit method. Any thoughts or changes since you have had it in and working for awhile?
I had a leak in my water tank as well. Mine was a crack at the drain. I went to a place down in Arvada and the guy replaced the drain by friction welding a new one in. They also make custom tanks etc.. He only charged me 2$ for the new drain fitting. I will track down the name and let you know.
Q
The conduit continues to perform well! I like how I have the bottom section with more horizontal bends to make the lower hinge. This is different then the granby on wtw has but I think mine works really well to be less intrusive into the bed area. Only issue is it a bit of pain to make those final bends with the conduit bender. You can see one of mine is a bit over bent. Only other suggestion I could offer is 1. Make sure you support your roof with a nice rigid piece of wood at the full height when you remove whatever lift panel you have right now. Do not let any slack in the roof as you do not want that from your emt lifter. And 2. I would put a solid piece of wood between the exterior aluminum and the interior paneling. Mine had not paneling up there so I am not sure what yours has, but you want a solid piece of wood to mount this to on the bottom hinge.
Let me know if you have any other questions about the emt lifter. I am going to do my rear with one too soon.
Is the place you mention five star rv? I plan on getting down there sometime soon to see what parts I can find on the cheap.
http://www.fivestarr...g=salvage_parts
My youtube channel about my Four Wheel Camper - https://www.youtube.com/c/timmorrissey
All about my camper - https://www.tgmorrissey.com/camper
Item I used in my build- http://bit.ly/TGMorrisseyParts
#29
Qcamper
-
- Members
-
- 29 posts
Member
Posted 19 May 2016 - 05:29 PM
Glad to hear it is still performing well. Thanks for the additional tips.
A few questions.You say it is less intrusive into the bed, but is it possible to leave the mattress there? Could you snap a photo of the mechanism with the top down? Not sure if it is possible, but I would like to keep the mattress in place instead of pulling it down.
Lastly, do you have any measurements on where you made the bends? I assume that you used an 8 foot stick and that determined how wide overall you could go.
I have been meaning to go to fivestarr, but haven't had a chance. The place that repaired my tank is called the Metal company
55th and Harlan
http://www.themetalcompany.com/
I might check with them and see if they have any other ideas for lift panel materials other than the wood laminate.
#30
Living The Dream
-
- Members
- 464 posts
Senior Member
- LocationFront Range, Colorado
Posted 20 May 2016 - 04:47 AM
Ill try to get a photo if I get into it this weekend. For measurments, I do not have any good ones, I really felt it out as I got into it. The width can really be whatever, I made mine as wide as possible (4 feet) thinking it would be most supportive. The most important is that the hinging pivot is in the middle of the entire roof height!!!!! If it is not, the roof will not go down all the way. It makes stupid clear sense after I messed it up the first time. My roof height was 25 1/4 inch. Then you need to consider the thickness of pipe and where you mount you lowest pivot area.
Yes I think they were 8 foot conduit. You'll need a hacksaw too.
It was actaully my first time bending conduit and I managed alright. A good conduit bender has all the marking you may need, and there are plenty of youtube tutorials too.
It does stick into the bed area a bit. My camper is far from stock so I do not know if we have similar mattresses. What I have found with my ~2in foam mattress. If my bed is pulled out and the mattress is only 2", yes the top can go down. However if the mattress if folded over (that is what I do with mine, it is one piece), the camper will not go down.
I would guess this is fixable by making the top piece of conduit lay flush with the roof when folded. To help with this I would make the bottom pivot as high on the bed area as possible. If you look back at my photos you see my bottom pivot is mounted to some wood and maybe 1.5 inches below the lip of the main camper body. Pushing this up higher might help the conduit fold flatter with top down.
Sorry I can not be clearer. As you can tell, I really shot from the hip. I have confidence you could make it work really well.
My youtube channel about my Four Wheel Camper - https://www.youtube.com/c/timmorrissey
All about my camper - https://www.tgmorrissey.com/camper
Item I used in my build- http://bit.ly/TGMorrisseyParts


0 user(s) are reading this topic
0 members, 0 guests, 0 anonymous users

