Jump to content


Photo
* * * * * 1 vote(s)

Full build - Reconstructing a 1981 Grandby into a custom Hawk!


  • Please log in to reply
306 replies to this topic

#281 PokyBro

PokyBro

    Senior Member

  • Members
  • 467 posts
  • LocationLas Vegas, Nevada

Posted 25 November 2018 - 05:21 PM

Aha, so you used L brackets to hold everything together to get it to the welder for all the welds? Did he use a Tig machine? 


Ouray, you got it on the L-brackets. In the tear down I saved all the 1/4" screws and L-brackets, and purchased more L-brackets at Home Depot. I did quite a bit of extra work on the aluminum tubular frame. I put three vertical columns on all four corners, and on each side of the corner (Total of 5 per corner)  to give a solid mount for the jacks. I redid the window sizes, and added height to the inside by building up the top and bottom of the frame, increasing interior height by 4 inches, and of course moved the front wall back one foot to fit my short bed pickup. I either held things in place with tape or L-brackets until I got it to the welder. I used acetone to clean all the places where I wanted welds (which I marked with a sharpie pen), and that got the metal clean and ready for welds. I had the welder run beads on both the inside and the outside of the frame, so it should remain pretty sturdy.


I went to a local welding shop and they quoted something like a $100 an hour which was a no go, but searching on Craigslist found a guy who did it out of the back yard for $50 Hr. Because of how much I remodeled the frame it cost quite a bit ($700), but in my case I got the camper for free, so my overall expense wasn't that great. He used a Lincoln Tig welder to do my job. I got to watch him  on one of the days, and he really made it look easy, but he was truly a master at his craft. There was no burn through on any of the welds, anywhere. After spending that much, I wondered if I could have purchased my own machine and been able to learn how to do it, but I'm sure it turned out better the way I did it in the end.


Poky


Edited by PokyBro, 25 November 2018 - 05:30 PM.

  • 0

1999 F250 crew cab SRW, 7.3 Powerstroke TD

1981 Grandby shortened to a Hawk

Build thread / https://www.wanderth...by-into-a-hawk/


#282 Ourayphotography

Ourayphotography

    Senior Member

  • Members
  • 146 posts
  • LocationColorado

Posted 25 November 2018 - 05:54 PM

Ouray, you got it on the L-brackets. In the tear down I saved all the 1/4" screws and L-brackets, and purchased more L-brackets at Home Depot. I did quite a bit of extra work on the aluminum tubular frame. I put three vertical columns on all four corners, and on each side of the corner (Total of 5 per corner)  to give a solid mount for the jacks. I redid the window sizes, and added height to the inside by building up the top and bottom of the frame, increasing interior height by 4 inches, and of course moved the front wall back one foot to fit my short bed pickup. I either held things in place with tape or L-brackets until I got it to the welder. I used acetone to clean all the places where I wanted welds (which I marked with a sharpie pen), and that got the metal clean and ready for welds. I had the welder run beads on both the inside and the outside of the frame, so it should remain pretty sturdy.


I went to a local welding shop and they quoted something like a $100 an hour which was a no go, but searching on Craigslist found a guy who did it out of the back yard for $50 Hr. Because of how much I remodeled the frame it cost quite a bit ($700), but in my case I got the camper for free, so my overall expense wasn't that great. He used a Lincoln Tig welder to do my job. I got to watch him  on one of the days, and he really made it look easy, but he was truly a master at his craft. There was no burn through on any of the welds, anywhere. After spending that much, I wondered if I could have purchased my own machine and been able to learn how to do it, but I'm sure it turned out better the way I did it in the end.


Poky


Yes, I finally found your page about the welds. Agree, buying a new tig machine might be doable. What is holding me back is the large amount of alum that would be required to rebuild mine. The cost of aluminum alone would be a big expense. Yours came out very nice, much beefier. I have been quoted $100/hr as well by the only shop I could find with any interest. If my steel frame plan works out, I could later take it to a tig shop to strengthen all the messy aluminum at a later date. I am waiting for my new mig machine to arrive, but still debate looking for a multi process machine.

Thanks again!

Michael


  • 0

#283 PokyBro

PokyBro

    Senior Member

  • Members
  • 467 posts
  • LocationLas Vegas, Nevada

Posted 27 April 2019 - 10:59 PM

Well, thought I'd add an entry of something I did last year that might be useful to others in the how-to department.


When I was building my side dinette, I was struggling with the decision of how to do my table support. I knew I wanted to use the table for a bed support when taken off, but I needed a way to support the table when in use. I had on hand a common RV circular tube with a base and table attachments, but wasn't excited about a tube in-between my legs and the other person facing me setting together in the side dinette seats. It would have been in the way of our feet, and our knees.


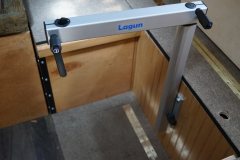
I had seen pictures of the Lagun table support, but sort of felt that it was kind of pricey and was hesitant to go that route. But as the dinette came together it became obvious that the Lagun support was the way to go. At the time, I think it was around $175.00, but decided I would forget about the price if it worked out well, so I decided to go ahead and order it.


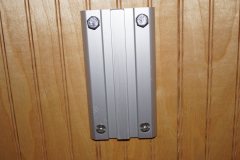
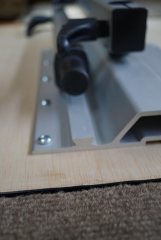
It comes with an attachment plate for the side wall you intend to attach it to, along with screws, nuts and washers, a backing plate of plywood, predrilled, and a plastic wedge if you need to adjust for vertical levelness, as well as the plate to mount under the table top.


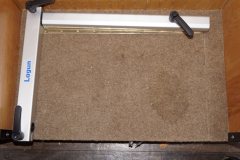
Lagun Table mount base
 
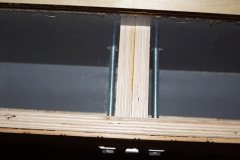
Lagun attaching screws


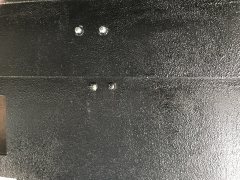
The side wall I created had a pocket hole for storage as I took the wall straight up from the step on the floor pack. It wouldn't be strong enough by itself, so I used some 8 inch bolts to go through the wall plate, and the storage compartment, to the outside wall of the floor pack. The two screws that came with the base were plenty long enough to go through bottom holes of the base plate, and again to the outside wall.
 
Herculiner texture
 
Getting the base plate correctly vertical was the most critical part, but went in without a hitch.
 
The rest is easy, you just assemble the two parts for the table support, and it's ready to go.
 
Lagun Table swivel mount


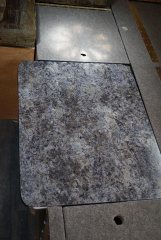
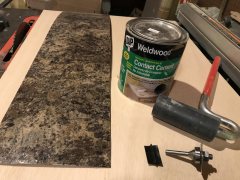
The only other part to assembly is attaching the base plate for the bottom side of the table top. It came with six holes, but I decided to add four more since  I had a bag of ten #12 screws, and wanted it to be plenty strong. I used 3/4" plywood for the tabletop, and used formica for the top surface, rounded the corners, and then used a slot cutter router bit, and installed plastic t-molding around the edge, for a very clean look, and something that will stand up to extended use.
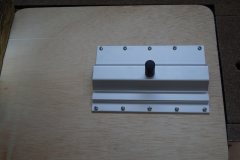
 
Table attachment plate
Table in place for bed support
Plastic Laminant
 
There are several things I really like about the Lagun table support.
 
The obvious is that it allows you to swivel/ move the table top out of the way when not in use, or when you need to get up out of the seat.
 
It is also adjustable for height up and down.
 
It also comes apart so you can store the arm and leg of the mount out of the way at night when the bottom bunk is in use.
It's really a clever set up, and is made with heavy duty extruded aluminum parts.
 
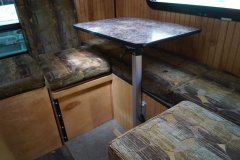
Here are some pics of the table moved out of the way, and two different ways I can store the leg. There is a channel on the bottom of the table base plate that the leg slides onto, and will hold itself in place when the table top is in place, right side up for the bed support. Or a faster method is to leave the two parts together, and set the L-shaped combo under the table top on the floor underneath. Either way works great.
 
Table moved to one side


Additional method of storage
 
Swivel leg storage
 
So, all in all, it was a fun easy project, it's very nice looking, and looks like a factory installed set up. It's less cumbersome for the seating arrangement, and lastly, well worth the cost. No looking back!
 
So if anyone is trying to think of a good table support set up, and maybe even trying to think of a way to build something, you might give the Lagun swivel mount some serious thought, I'm glad I did.


Poky


https://www.lagunusa...4xoCYucQAvD_BwE


Edited by PokyBro, 27 April 2019 - 11:03 PM.

  • 0

1999 F250 crew cab SRW, 7.3 Powerstroke TD

1981 Grandby shortened to a Hawk

Build thread / https://www.wanderth...by-into-a-hawk/


#284 Ourayphotography

Ourayphotography

    Senior Member

  • Members
  • 146 posts
  • LocationColorado

Posted 28 April 2019 - 01:15 AM

Good to see you are still at it, cool to go look at your old pictures 


  • 0

#285 Living The Dream

Living The Dream

    Senior Member

  • Members
  • 464 posts
  • LocationFront Range, Colorado

Posted 28 April 2019 - 03:31 AM

Looks like a professional table, perfect for the professional grade build you put together. 


  • 0

My youtube channel about my Four Wheel Camper - https://www.youtube.com/c/timmorrissey

All about my camper - https://www.tgmorrissey.com/camper

Item I used in my build- http://bit.ly/TGMorrisseyParts


#286 Overlander47

Overlander47

    Newbie

  • Members
  • Pip
  • 1 posts

Posted 11 August 2019 - 11:03 PM

Hey Poky!


I've been reading your build and LOVING IT!  I just purchased an 80's Grandby and I'll be doing a build very similar to yours.  I live in Orem, Utah!  I was wondering if I could stop by and see your camper sometime?


  • 0

#287 PokyBro

PokyBro

    Senior Member

  • Members
  • 467 posts
  • LocationLas Vegas, Nevada

Posted 12 August 2019 - 04:27 AM

Hi Overlander47,

Congratulations on your new to you Grandby. You’d be welcome to come by and take a look and ask questions. Glad to help.

PM sent!

Poky
  • 0

1999 F250 crew cab SRW, 7.3 Powerstroke TD

1981 Grandby shortened to a Hawk

Build thread / https://www.wanderth...by-into-a-hawk/


#288 a8ksh4

a8ksh4

    Senior Member

  • Members
  • 109 posts
  • LocationSacramento, CA

Posted 12 August 2019 - 04:24 PM

Hi Poky, when you put the trim back on your roof, what combination of sealants did you use?  Butyl tape with silicon along the edge?  


  • 0

#289 PokyBro

PokyBro

    Senior Member

  • Members
  • 467 posts
  • LocationLas Vegas, Nevada

Posted 13 August 2019 - 01:45 AM

a8ksh4


To answer your question I'll just review how I assembled the roof. The headliner under neath was wrapped around the periphery tubes first while upside down. when flipped back over top side up, and when I was installing the side liner, I measured 1 inch all the way around the top of the side liner, and then tucked that up underneath the rooftop aluminum sheeting, which was then bent down over top of the side liner material in a shingle type arrangement, and stapled to the periphery tubes of the roof frame, prior to installing the outer trim ring.


All the above to say that I did not use butyl tape on the inside of the roof trim pieces, because it didn't seem needed, and also because I had never picked up on any idea it might be done that way. The original side liner, fastened over top of the roof sheeting, sandwiched between the roof sheeting folded over and the roof trim pieces did not have butyl tape when installed in 1981, just sealant to cover the gap, which often failed and caused internal leakage common with the older campers if not kept up regularly. That being said it might not be a bad idea, but it would be rather messy if you ever had to take the trim pieces off for a side liner replacement. 


After the trim rings were on I sealed the gap on mine between the roof trim and the sheeting with Proflex by Geocel, which has held up so far.


Hope that helps!


Poky


  • 0

1999 F250 crew cab SRW, 7.3 Powerstroke TD

1981 Grandby shortened to a Hawk

Build thread / https://www.wanderth...by-into-a-hawk/


#290 a8ksh4

a8ksh4

    Senior Member

  • Members
  • 109 posts
  • LocationSacramento, CA

Posted 13 August 2019 - 06:27 PM

Thanks, Poky.  Yeah, that helps a lot!  I'll get a tube of proflex to do the edge after I install the trim.  The last tool I've been stalling on buying was a stapler, but it seems like it makes pinning the material a lot easier. I might just go for it and buy one (and an air compressor) to finish this up. 


  • 0


1 user(s) are reading this topic

0 members, 1 guests, 0 anonymous users