Jump to content


Photo
- - - - -

New Hawk owner

hawk 2500HD 8.1L

  • Please log in to reply
66 replies to this topic

#21 wuck

wuck

    Senior Member

  • Members
  • 329 posts
  • LocationPollock Pines, Sebastopol CA

Posted 05 October 2016 - 04:27 PM

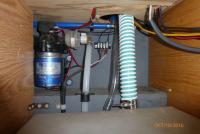
As any manufacturer will do, the tank you have is preassembled with a few fittings/hoses etc to make final assembly faster. The Tee was my clue for the drain, current production FWC include a valve or two to enable draining the water heater along with the water tank for winterization. Check out pages 8-12 in the owner's manual for details.


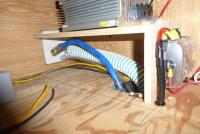
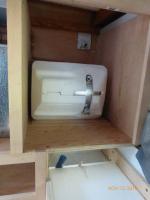
My tank has a different form factor from your new one, it's a few inches shorter in height, plenty of room above it. My "Settee" cabinet is also taller than norm from what I can tell. But, the fill/drain vent hoses emerge under the refrigerator cabinet, lots more room to bend as they make way up to the fill hatch on the front left corner. I happen to be in the middle of reassembling that section now, I'll get a few pics for you today. 


edit: Changed fill/drain to fill/vent


Edited by wuck, 12 November 2016 - 05:56 PM.

  • 0

Pat

'04 FWC Hawk

'15 F250 SD SuperCab / Short Bed

SuperDuty Mileage (Fuelly)

Trip Photos on Flickr 


#22 CougarCouple

CougarCouple

    Senior Member

  • Members
  • 1,376 posts
  • LocationLas Vegas

Posted 06 October 2016 - 02:00 AM

Hello wuck
Looking at your picture, why is the drain on top. Does the tank mount like that or is your picture the side of the tank, not the to.
Thanks Russ
  • 0
F250 extended cab, Cougar from ATC. You guys rock thank you!

#23 Vic Harder

Vic Harder

    Doctor Electric

  • Site Team
  • 4,962 posts
  • LocationCalgary, Alberta

Posted 06 October 2016 - 05:19 AM

In my pic that Wuck commented on, the tank is just sitting on the floor of my garage, on end.  So yes, it looks funny as is.  


  • 0

#24 Vic Harder

Vic Harder

    Doctor Electric

  • Site Team
  • 4,962 posts
  • LocationCalgary, Alberta

Posted 12 November 2016 - 03:26 AM

More water tank questions - I know that the water inlet of the tank is usually plumbed up fairly high on the side of the camper for filling from the outside, and I'm guessing that the drain has two lines going to it on my new tank (see pics above) because one is for the drain coming from the hot water heater and the other goes to the back/outside of the camper with a petcock for draining.  


Where does the vent go to?


  • 0

#25 wuck

wuck

    Senior Member

  • Members
  • 329 posts
  • LocationPollock Pines, Sebastopol CA

Posted 12 November 2016 - 05:50 PM

Long ago promised pics from my build - sorry about delay, I've actually been out camping in my camper rather than working on my camper! Yea!


Here are the connections coming up from the tank:

P1050494r.JPG


From left to right

1) Sensor wiring

2) Pump Suction

3) Vent

4) Fill


And the Fill/Vent hatch, from the inside:

P1050495r.JPG


1) Blue PEX is city water connection

2) Clear vinyl tube Vent

3) Large diameter fill tube


My fill hatch appears to be a Valterra A01-2004VP


  • 0

Pat

'04 FWC Hawk

'15 F250 SD SuperCab / Short Bed

SuperDuty Mileage (Fuelly)

Trip Photos on Flickr 


#26 wuck

wuck

    Senior Member

  • Members
  • 329 posts
  • LocationPollock Pines, Sebastopol CA

Posted 12 November 2016 - 10:04 PM

Vic, you might find this install a bit more interesting. It's a '99 Hawk that is undergoing a major remodel including addition of a water heater and furnace. I'm just gathering the last few pieces before installing the water plumbing - gas lines are complete.

P1050744r.JPG


This is the left front corner, from top to bottom are the fill/vent (No city connection in this one), water heater, and the water tank. The fill/vent assembly appears to be a JR products JFE-12A, water heater is a late model Atwood, the tank was recently purchased from fwc (Didn't come with hoses like yours!)


  • 0

Pat

'04 FWC Hawk

'15 F250 SD SuperCab / Short Bed

SuperDuty Mileage (Fuelly)

Trip Photos on Flickr 


#27 Vic Harder

Vic Harder

    Doctor Electric

  • Site Team
  • 4,962 posts
  • LocationCalgary, Alberta

Posted 13 November 2016 - 02:32 AM

Thanks Wuck!  This is great info!


Vic


  • 0

#28 Vic Harder

Vic Harder

    Doctor Electric

  • Site Team
  • 4,962 posts
  • LocationCalgary, Alberta

Posted 21 November 2016 - 01:04 AM

I posted this elsewhere on this forum, but thought I would keep all my mods and questions in this thread too.  I test fit the batteries next to the water tank.... as Wuck pointed out in the other thread, the tank can expand up to 3/4", so the super tight fitment option is out!


NICE big batteries!

sml_gallery_6362_1070_151953.jpg


Check it out... the batteries fit this way!

sml_gallery_6362_1070_63839.jpg


And this way!

sml_gallery_6362_1070_906790.jpg
 
That gap is 6"
sml_gallery_6362_1070_241251.jpg
 
But it is super tight on the other end.  Is that enough room for the various hoses to attach?
sml_gallery_6362_1070_627735.jpg


  • 0

#29 Vic Harder

Vic Harder

    Doctor Electric

  • Site Team
  • 4,962 posts
  • LocationCalgary, Alberta

Posted 21 November 2016 - 01:05 AM

I asked this over on my More Power Scotty thread too:


in taking the exiting camper wiring out, I found this wire coming into the camper, right next to where the truck to camper wiring enters.  This wire goes into the front wall of the camper.  Is this the factory pre-wiring for solar?  Looks to be about 10g.  This is looking up under my 2005 vintage Hawk.


sml_gallery_6362_1070_248608.jpg

Edited by Vic Harder, 21 November 2016 - 01:06 AM.

  • 0

#30 Vic Harder

Vic Harder

    Doctor Electric

  • Site Team
  • 4,962 posts
  • LocationCalgary, Alberta

Posted 25 November 2016 - 09:47 PM

So my new TF130 arrived today, and so I took the rest of the driver's side and rear of the camper paneling off to see what was in there for framing.  Good news!  It looks like my "shell" was pre-framed for the propane tank and for a fridge.  No welding to do!  


Couple of questions though:


1) If you look at this pic of the rear wall where the propane box is going to go, you will see that there is a double section of framing back there at the bottom.  The box fits above that.  Is it normal for the box to be sitting up above the floor by that amount?  It would leave room for the water tank drain line to go underneath.


1a) That picture is upside down.  How do I flip that around?


2) There was a purple wire taped up high on the rear wall.  Flood light?


3) The green wire goes as far as the sheet metal siding, but not through.  That could be flood light too.


rear wall
 
4) This pic is of where the fridge is going to go.  Looks like it has a spot where the fan is supposed to mount.  That won't work for my TF130.  I'm just going to cut a 4" or so hole at the top right, where the hunk of white plywood sits.  I will have to cut one of the aluminum supports there.  Thoughts on that?
 
spot where the fridge will go
 
5) These pics are of the "wiring channel" near the front, driver's side of the camper.  The orange wire went to a 12v power socket, the red and black with the yellow connectors on them were just sitting here.  Looks like they MIGHT be the end of the solar panel wiring.  Ideas on that?
 
close up of wiring in corner
drivers side wall wiring channel


Edited by Vic Harder, 25 November 2016 - 09:50 PM.

  • 0


Also tagged with one or more of these keywords: hawk, 2500HD, 8.1L

0 user(s) are reading this topic

0 members, 0 guests, 0 anonymous users