

I had to remove my burner tube again to readjust the electrode while adding a relighter so I'm adding some tips and photos for getting out the burner when there doesn't appear to be enough room.
1. Turn off the gas.
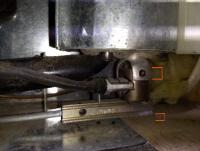
2. Remove the screw that's on the flange above the burner (see arrow in next photo) to allow you to push the assembly up into the flange a bit to make it easier to get box wrenches under the assembly.
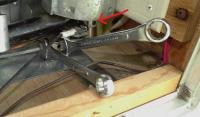
3. Using a wrench on the burner and a wrench on the nut, loosen the nut connecting the metal gas line tube to the burner tube several turns to allow you to rotate the burner without twisting the rigid gas line. There is almost no room to rotate the wrenches so a "turn" moves the nut maybe 22-degrees. If you have even less room than I, you may want to consider grinding off the backs of the wrenches to reduce their width. (I could not budge the connection at the other end of the gas line.)
4. Rotate the burner as much as possible within the flange. There still may not be enough clearance.
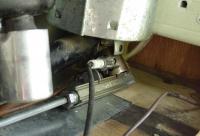
5. Use a prybar to GENTLY lift the chimney assembly. I put a scrap piece of metal inside the lip of the door to protect the lip and then leveraged off the wood to lift underneath the big pipe that carries the ammonia. I had also tried to leverage more directly under the chimney but there wasn't much room to work. Some people have apparently had to bend the flange "wings" out a bit.

6. Use your wrenches to completely disconnect the burner. Be VERY careful not to lose the tiny orifice "cap" when disconnecting. It is held in only by pressure. Note its orientation; the orifice/hole should be innermost to the burner. The wider "brim" of the "cap" fits over the end of the gas line. Be careful when reassembling to ensure it's in the right position as you tighten the nut.
7. Complete your maintenance.
8. Reassemble but before putting the burner back under the flange, fully tighten the gas delivery nut, turn on the gas and test for leaks. Then ensure it lights and burns well.
9. Turn off the gas again and then loosen the gas line nut yet again so you can rotate the assembly back under the flange with the help of your prybar.
10. Tighten the nut and recheck for gas leaks.
11. Secure the assembly to the flange with the screw you removed in Step 2.
12. Test again. Good luck on this. For me, a successful test out of the chimney area did not necessarily translate to success once everything was reassembled, i.e. it would light first time, every time outside the chimney, but when I stuck it back under the chimney, it ceased to light or did so only sporadically. I don't know why. Something about the air-to-gas ratio inside and outside of the flange? I had to repeat, adjust the electrode, cross my fingers, and try again. It took me about four tries. What a pain! But if you're not changing out the electrode, I would guess you won't have the same issue as me.


