
I started following this a few days back, pretty sweet. I also noticed that FWC posted a similar build on their Instagram a couple days ago. Excited to see how your build turns out.

'81 Grandby on '91 Jeep YJ - New build
Started by
Boonie
, Dec 02 2016 10:06 PM
FWC Grandby Jeep Project New build
66 replies to this topic
#52

Boonie
-
- Members
- 193 posts
Senior Member
- LocationBrighton, Colorado
Posted 28 March 2020 - 12:43 AM
It seems like I'm out in the garage working, but what I get done doesn't show. A lot of thinking, measuring and head scratching. In post #60 I said I was planning to locate the propane tank in the left side tool box. Well, after not really liking that decision, I measured the left side fender well (just below the toolbox) and found it would fit. Keeping in mind my commitment to keeping the weight low and centered on the wheelbase. I will now have two six volt house batteries, 10 gallon water tank and the 11 lb propane tank located in a line ahead of the rear wheels, behind the seats, and at or just above the level of the frame and outside of the living envelope.
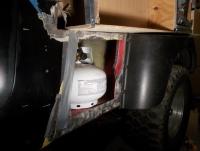

I feel better with this solution.
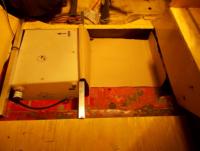 I also have a 20x18x4 space under the floor that can house the water pump or I could fit a second 10 gal water tank that I have, but it is 7 1/2" deep, so to fit I would have to raise the floor 3 1/2". Not sure I want to do that. I think carrying the 6 gal Jerry can fits my needs better.
Now on to cutting the aluminum to frame the rear overhang, so I can get that welded.
Edited by Boonie, 28 March 2020 - 08:42 PM.
#53
Boonie
-
- Members
- 193 posts
Senior Member
- LocationBrighton, Colorado
Posted 02 April 2020 - 02:28 AM
Welding the extension day 1.
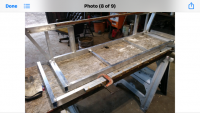
Should be able to square up and finish welding tomorrow
#54
Boonie
-
- Members
- 193 posts
Senior Member
- LocationBrighton, Colorado
Posted 05 April 2020 - 02:33 AM
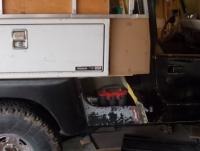
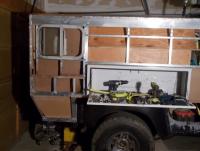
Welding complete, now final fitting before welding to the original shell. You can also see from the picture how handy the side opening toolbox is.
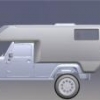
For those who are new to my (slow) build. I started with a '91 Jeep YJ which I extended the wheelbase 24".Then taken a '81 Grandby, removed the wood floor pack, narrowed it 11", removed the front wall (so it is a walk-thru to the cab) pushed the camper forward so the bed was extended to the windshield. (Camper inside is now 7'.) This resulted in a 22 1/2 " rear overhang which needed to be supported thus the extension, welded out of aluminum keeping with the original design.
Edited by Boonie, 06 April 2020 - 12:58 AM.
#55
Zoomad
-
- Members
- 289 posts
Senior Member
- LocationColorado
Posted 06 April 2020 - 01:23 AM
Looks great!
#56
longhorn1
-

- Members
- 2,826 posts
Ouch, that stings!
- LocationCarmel, Indiana
Posted 07 April 2020 - 07:55 PM
Nice job
#57
Boonie
-
- Members
- 193 posts
Senior Member
- LocationBrighton, Colorado
Posted 08 April 2020 - 11:59 PM
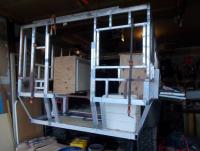
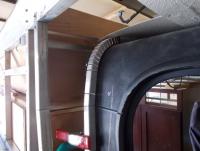
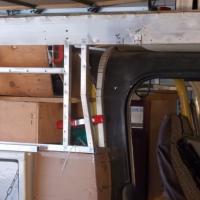
No big deal, but it is sometimes the details that are the most satisfying. I have had a basic idea of how I was going to join the square camper to a rounded roof of the Jeep. As you can see I used the technique that FWC used to make to rounded front bed.
#58
Zoomad
-
- Members
- 289 posts
Senior Member
- LocationColorado
Posted 09 April 2020 - 02:27 AM
Great work. Looks like a good fit.
#59
PokyBro
-

- Members
- 467 posts
Senior Member
- LocationLas Vegas, Nevada
Posted 09 April 2020 - 01:32 PM
Very creative way to do the radius around the cab. Will you be welding anything on the top of the curve over the cuts, to stiffen the metal in place?
Also, did you end up purchasing a tig welder and learning to weld aluminum, or has that been a skill you acquired long ago? Either way, very impressive, not many of us are qualified to weld this thin speck aluminum tubing, great job Boonie!
1999 F250 crew cab SRW, 7.3 Powerstroke TD
1981 Grandby shortened to a Hawk
Build thread / https://www.wanderth...by-into-a-hawk/
#60
Boonie
-
- Members
- 193 posts
Senior Member
- LocationBrighton, Colorado
Posted 09 April 2020 - 06:07 PM
Alas Poky, the cost of a TIG welder and equipment, not time to learn, dictated that I had the welding done. Fortunately my son-in-law was a long time friend of a welder, therefore, Woody Glover has done (and will do) the welding for me at the cost of a new bottle of argon gas, $66.38. THANKS Woody!
I will be adding a member at the top that runs from the outer frame to the segmented member (which will attach to the bottom of the bed), then facing the resulting panel. My hope is that this panel tied to the segmented member will add the rigidity necessary without having to specifically weld it. At the end of the segmented piece, the distance between the bottom of the bed and the top of the Jeep is one inch and decreases to zero in the middle of the roof thus creating a thin wedge shaped gap, so I am contemplating how to complete the seal between bed and roof. Both the bed and the top are anchored at the mid point to the Jeep roll bar and to each other at the roll bar, thus, no movement between the two.
Ideas anyone?
Boonie
P.S. I am also thinking of a way to fill the entire space between the roof and the bed with foam insulation. This could be part of the solution.
Edited by Boonie, 09 April 2020 - 06:20 PM.


Also tagged with one or more of these keywords: FWC, Grandby, Jeep, Project, New build
Trucks, Campers, Gear Forums →
Gear Exchange →
2011 FWC Kestrel $16,800 Akron, OHStarted by Smorgash , 15 Apr 2024 |
|

|
||
Trucks, Campers, Gear Forums →
Gear Exchange →
2009 Eagle Four Wheel Camper Madison WisconsinStarted by WiscoK , 10 Apr 2024 |
|

|
||
Trucks, Campers, Gear Forums →
Gear Exchange →
FS: 2023 FWC Project M for 5.5' Full Size Beds - $14,000 - Colchester, VTStarted by danruss , 06 Apr 2024 |
|

|
||
Trucks, Campers, Gear Forums →
Gear Exchange →
For Sale: upgraded 2001 FWC EagleStarted by Wildcat , 26 Feb 2024 |
|

|
||
Trucks, Campers, Gear Forums →
Gear Exchange →
2001 Toyota Tundra W/ 2006 Four Wheel Camper HAWKStarted by carlajuliett , 21 Feb 2024 |
|

|
0 user(s) are reading this topic
0 members, 0 guests, 0 anonymous users

