Jump to content


Photo
- - - - -

FWC Flatbed Discussion

FWC Flatbed Flat Bed

  • Please log in to reply
45 replies to this topic

#31 CamperCamper

CamperCamper

    Senior Member

  • Members
  • 122 posts

Posted 02 December 2017 - 07:53 PM

A question for you flatbed owners. 


How exactly is your flatbed integrated to the mounting of the FWC? I am in the process of having a custom flatbed made. The flatbed fabricator is working off of drawings provided by FWC. I am assuming that I want the bed drilled and tapped to accept a bolt down from the FWC. From talking to my FWC dealer he seems to think that a bolt and separate nut under the flatbed is needed. To me that seems ridiculous as you will need two people to tighten each bolt and nut. It seems so much simpler to just put threads in the flatbed. The mounting points are being specifically reinforced for the application, so there will be plenty of aluminum there.


How are your flatbeds designed? Would you do it the same way given the opportunity to do it over again?

Thanks in advance for your input.


My two cents for what it is worth:  I would not want to remove the camper from the flat bed several times a year.  It seems to me a difficult endeavor if you just have a camper and not the extra stuff I have installed.  Lining up 4 holes while supporting a camper on 4 jack stands will not be easy.  Hell, I struggled placing my former slide in camper exactly where I wanted it in the pickup bed before I built the flat bed.  There were no holes to line up there just get it centered in the bed!  In my current flat bed situation it would not be practical at all since I have also (in addition to four bolts) drilled through the floor of the camper for a grey water drain, second fresh water tank plumbing line and diesel heater fuel line, combustion air and exhaust lines.  All of those would have to be removed in addition to the camper.


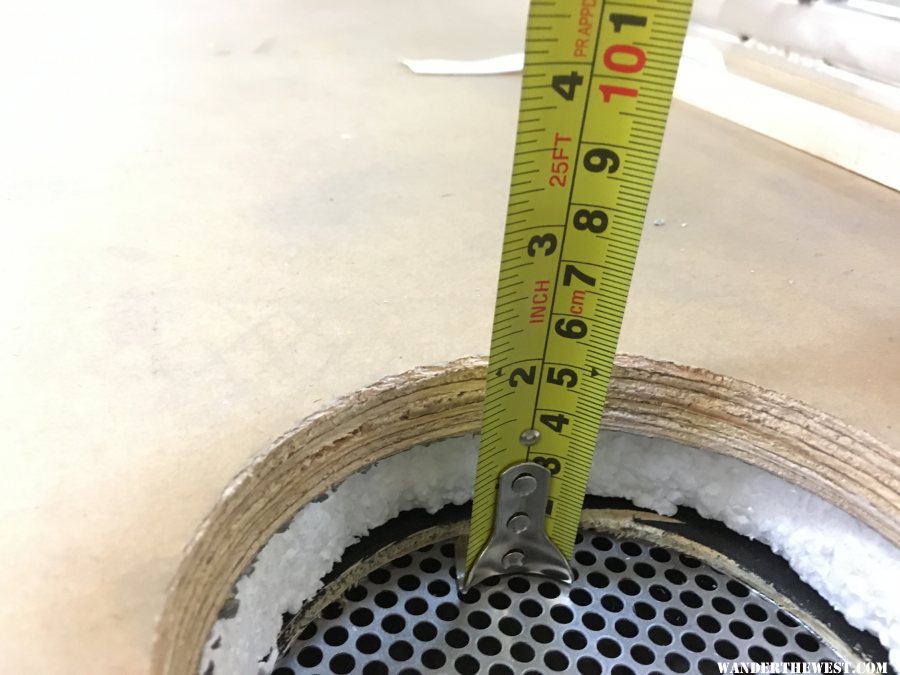
As for your question about threaded flat bed for the bolts, that is going to present several challenges too.  I do like Rando's suggestion of rivet nuts that are placed inside the camper during the install if you must but I suspect they may not hold properly due to the nature of the material on the floor of the camper.  I am attaching a bunch of photos below that may help you with your decision.  The photo (from the production floor) of the propane box exhaust vent is telling as to floor composition.


I chose to install 1" aluminum plate welded inside the frame as the drawings suggest.  The install guys were not happy about that because they were restricted as to the location of the plumbing cabinet bolt and even had to move the fresh water fill line in order to get the bolt in there.  They cussed more than once about "engineers" leaking drawings and restricting them during the install.


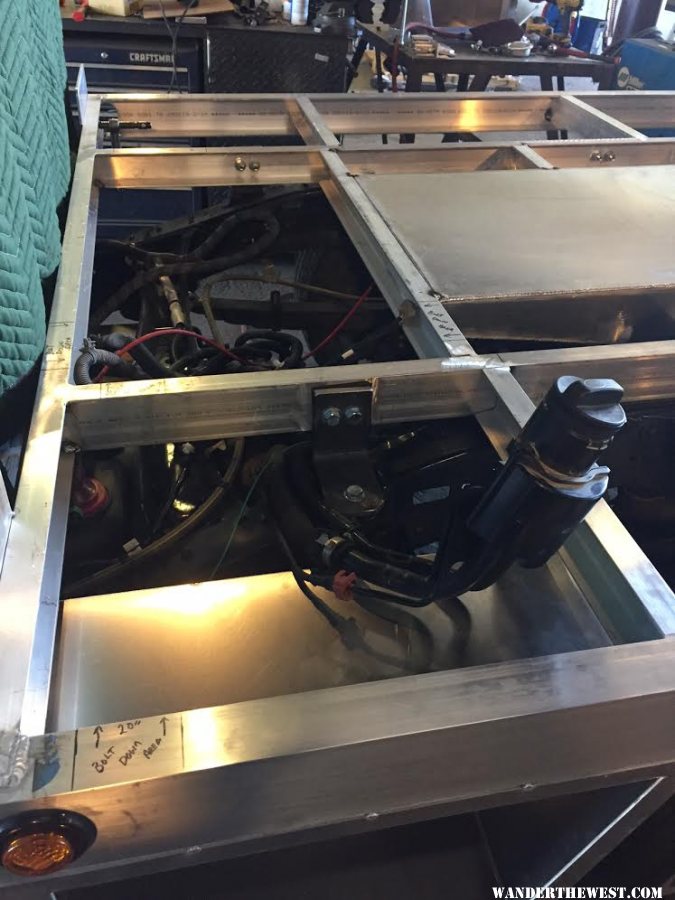
This first photo is from FWC and it shows the suggested reinforcement plate locations in the frame of your flat bed.  This diagram was still valid in May but things may have changed since then so best to confirm with folks at FWC.  The most challenging bolt location will be the left front of the camper as this bolt is located inside of the plumbing cabinet.  There is not a lot of room inside of that cabinet and I am attaching several photos for you to see.  If you end up placing bolt pilot holes inside the bed and they change the location of a pipe or electrical line then you will be left with going to "Plan B".  In addition, there are no jigs used on the production floor so things don't always end up in the exact same location when they do the build.  Of course, options such as hot water, outdoor or indoor shower, toilet all add to the crowded plumbing cabinet.  I guess it is easier to say that the install guys need some flexibility!  That's why they engineers drew up the plans with such a large reinforcement plate!


gallery_6092_1134_2283651.jpg


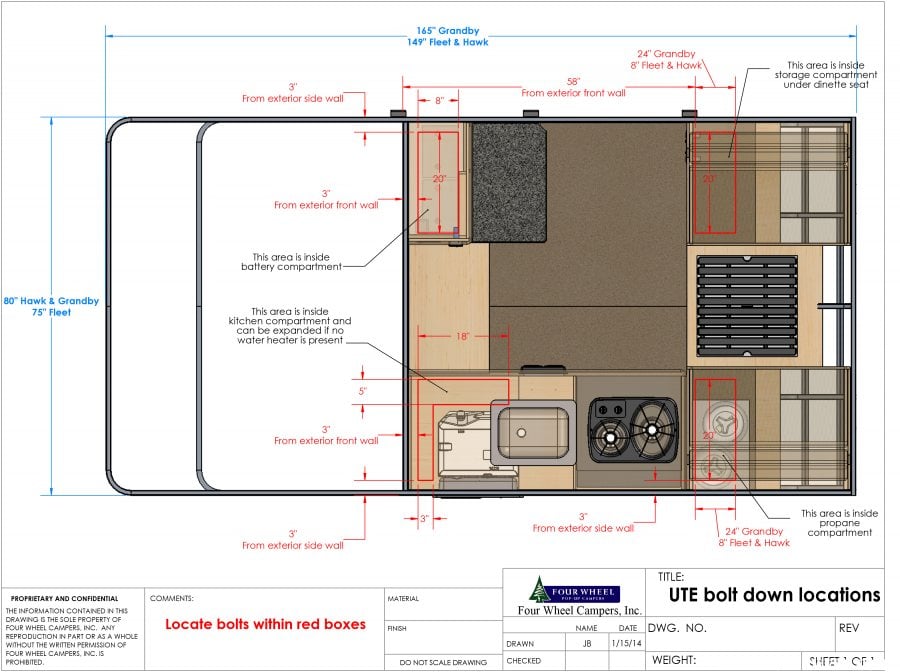
Because of my build and components in the bed, we ended up only placing one of the reinforcements (of two called for in plumbing cabinet) inside the frame.  It is critical to make sure the builder knows where the bolt down locations are so that you don't end up drilling into a frame member.


gallery_6092_1134_45608.jpg


gallery_6092_1134_717962.jpg


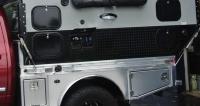
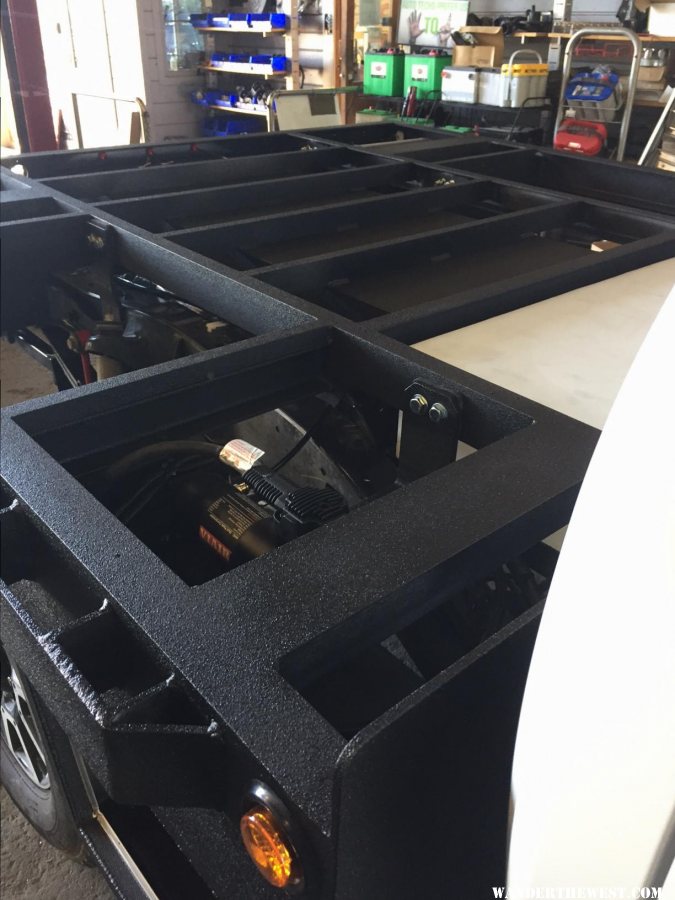
Right Front (under propane tank) mounting plate after bed has been sprayed and before deck attached.  BTW, we screwed the bed down to the frame so that I could have access to any component that would require replacement and may not be accessible from below.  Because of the thick 1" reinforcement plates, we were able to use 1/4 aluminum for the deck which saved a significant amount on weight!


gallery_6092_1134_37552.jpg


I'm not convinced this material would support a riv nut and hold the camper down!


gallery_6092_1134_197020.jpg


The following photos show the plumbing cabinet.  They start with a shot from the production floor and then others to illustrate how truly small this cabinet space really is.  I eliminated the reinforcement plate in front of the hot water heater because of the extra fresh water tank (seen in photo above before deck attached).  I restricted the bolt location to just the front side of the water heater and further complicated it by limiting that space with my drain line and water line coming from under the bed.  The FWC guys rose to the occasion however and "got-er-done".


gallery_6092_1134_778414.jpg


gallery_6092_1134_376798.jpg


gallery_6092_1134_968856.jpg


gallery_6092_1134_1378917.jpg


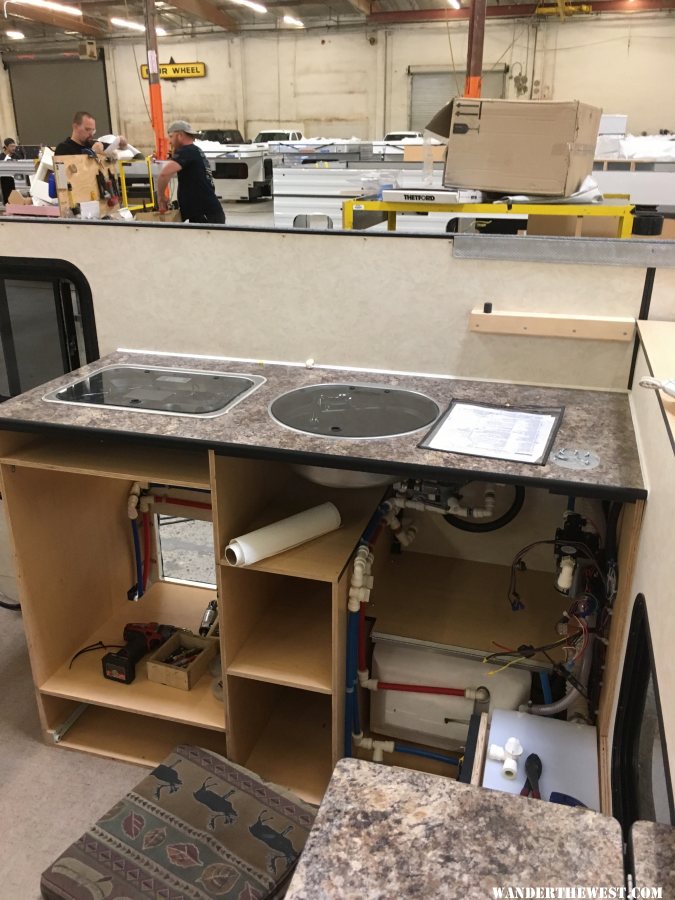
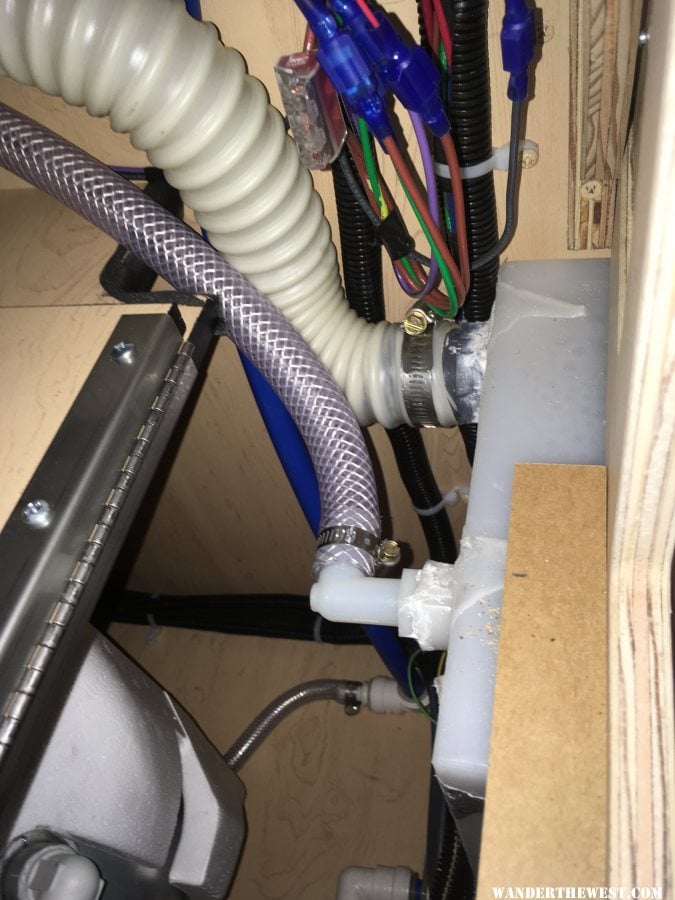
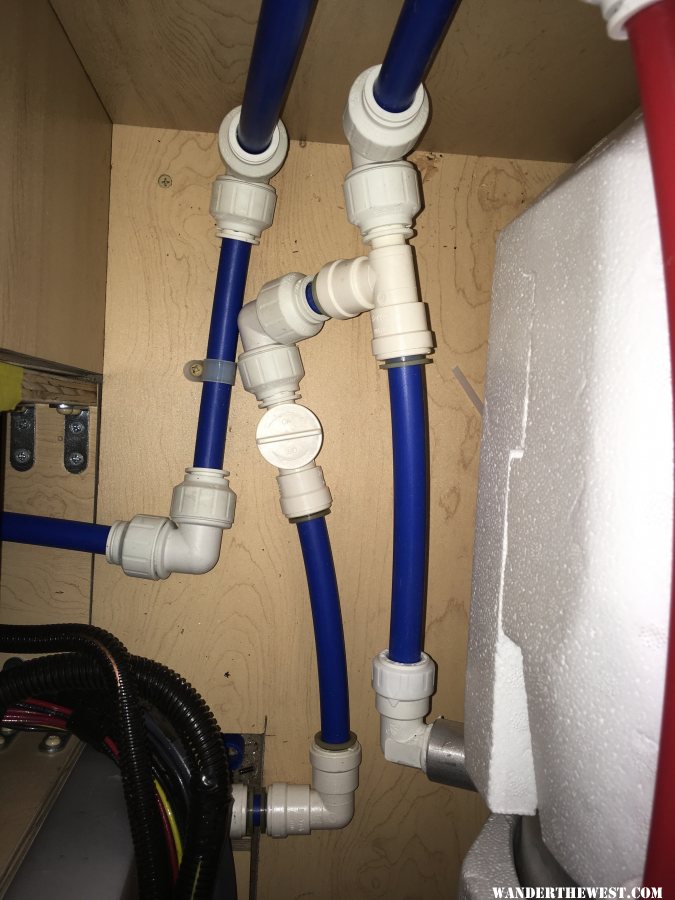
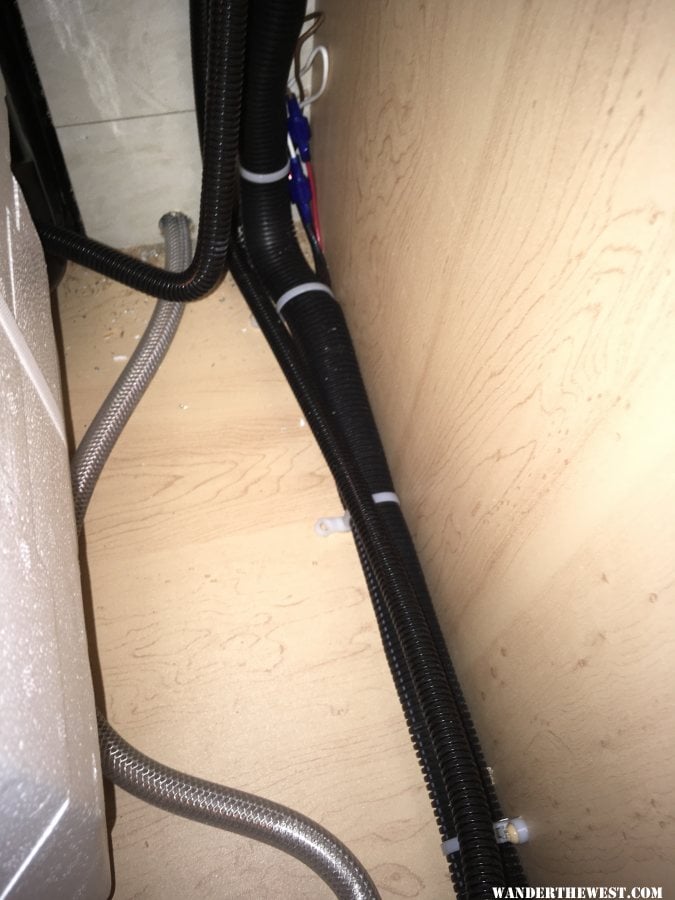
Not a lot of room in here!


gallery_6092_1134_908129.jpg


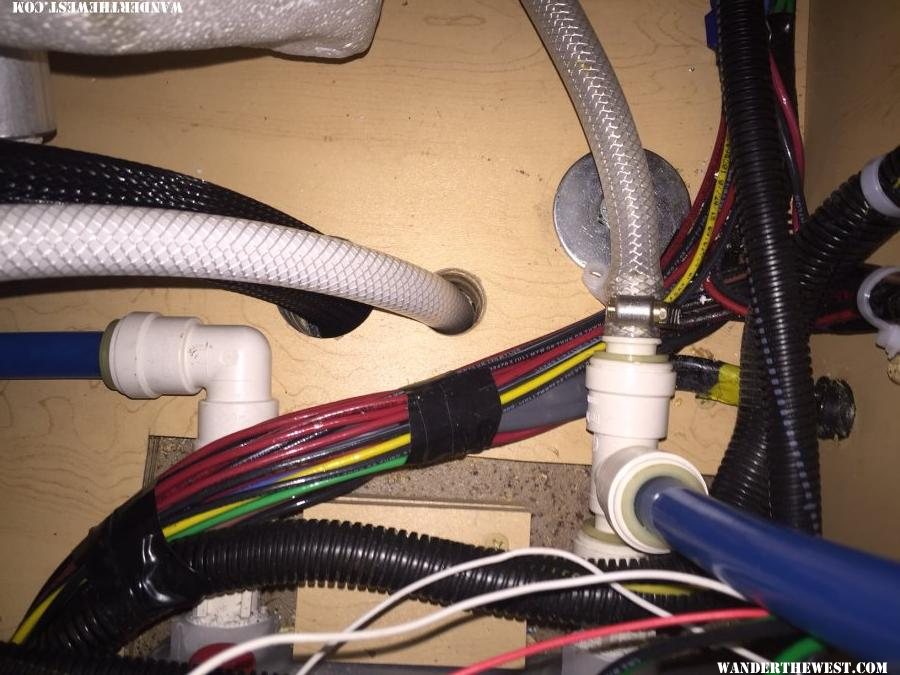
Here's a shot of the finished job with additional plumbing lines drilled through camper and bolt in place.


gallery_6092_1134_191659.jpg


This is truly an exciting time for you!  I hope my experience helps you somewhat in your decision process.


Edited by CamperCamper, 02 December 2017 - 08:00 PM.

  • 0

#32 rando

rando

    Senior Member

  • Members
  • 1,638 posts
  • LocationColorado

Posted 02 December 2017 - 09:28 PM

Just to be clear - I was not suggesting a rivnut in the camper floor, I am suggesting a rivnut in the deck of the flatbed once you have everything lined up and match drilled.  


But in general I would agree with CamperCamper that lining up 4 holes to 4 holes to reinstall the camper is going to be really, really difficult to do.  You are either going to have to climb into the camper or crawl under the truck with the camper on jacks to see the relative alignment.   I still thinking putting studs on either the bed or camper would be easier so you can just guide the studs into the holes - but I still think it will be a challenging task.   I would like to make some minor adjustments to my setup, but the thought of removing and reinstalling the camper has given me pause. 


  • 0

2016 Fleet Flatbed

2016 Toyota Tacoma


#33 Durango1

Durango1

    Senior Member

  • Members
  • 532 posts

Posted 03 December 2017 - 03:05 AM

Taking off and reinstalling my flatbed Hawk would be a nightmare with six holes with bolts and plated to all line up.


I love the FWC flatbed models (just ordered a new Grandby!) but I would encourage anyone that installs a flatbed model to stop thinking of their vehicle as a 'truck" and more of a "go-anywhere RV"! Because that is what it has become!


Edited by Durango1, 03 December 2017 - 03:05 AM.

  • 0

#34 MrCrash

MrCrash

    Member

  • Members
  • PipPip
  • 10 posts

Posted 03 December 2017 - 03:47 PM

CamperCamper, thanks a ton for the photos and the spec drawing. Your build thread has been most helpful to me too. Cheers


  • 0

#35 nico

nico

    Advanced Member

  • Members
  • PipPipPip
  • 30 posts
  • LocationSan Luis Obispo , ca

Posted 12 December 2021 - 03:50 PM

Yes it is. The only good thing is after a year I got down underneath our Hawk Flatbed with a cordless impact wrench and the wife up above with a box end wrench and not one of the nuts moved one mm. So not too bad!


I did run the reinforced floor and welded nut by Denny and he suggested we install the new Grandby Flatbed I ordered YESTERDAY with his usual grade 8 bolts with 4" x 6" 1/4" thick plates top and bottom first and then have my flatbed fabricator weld the bottom plate and nut to the bed. 


I'll check with my flat bed guy but I like the idea.

How is this system working? 


  • 0

#36 nico

nico

    Advanced Member

  • Members
  • PipPipPip
  • 30 posts
  • LocationSan Luis Obispo , ca

Posted 12 December 2021 - 03:55 PM

HI everyone,

I wanted to re visit this topic. I have a brand new grandby flatbed on a ute flatbed or 'tray'. I am hoping i can make my truck function as a work and play truck by removing the camper quite frequently. i looked at the bolts and FWC used 6 bolts with small plates. The bolts appear pretty small, maybe 3/8'' (which iwas surprised about). So I am looking into upgrading the sized of the bolts and the plates, but also having the plates welded with either the nut welded to the plate or a large plate thats tapped. THis way i will decrease the difficulty of removing the camper as I will have to just unthread the bolts from inside the camper. I need to determine the best option there and whether the diameter of the bolts that FWC used is the right way to go or not. 


  • 0

#37 pvstoy

pvstoy

    Senior Member

  • Members
  • 2,770 posts
  • LocationCarson City, NV

Posted 12 December 2021 - 05:42 PM

We bought Durango1's flatbed Hawk.  I have removed the camper once to do some wiring.  For me this is my third FWC that I have bolted through the floor.  So for me it seems simple to remove and reinstall as I have worked out a system to do it.  The toughest was on the second combo, painted the bottom of camper and truck bed had spray in liner. Harder to slide the camper around due to the friction interface between materials.


On the four corners I have marks on camper and bed where to line it up.  Back the truck under and get it close to those marks.   Make the gap very small between the truck bed and camper bottom. There is good amount of play in the jacks that you can fine tune your placement. You can drop in the holes some of the bolts.  Push the camper in the direction to line up the outside guide marks and bolt will drop into the bed hole. If you are off a lot you can push the camper over and release the jack to drop the camper down.  The jack leg is now moved and can jack it up for a slight gap. Doing this you can walk the camper over to match your guide marks.


I should mention I do this all by myself, having a helper would speed this up quite a bit.  It is more time consuming to go from under the truck to into the camper to set things up for the next bolt.


When you allow all the bolts to drop into their holes I go inside and put a box end wrench on the bolt head.  Put the other end of the wrench against a solid object to push against and put something heavy on the wrench head to keep it in place while I work under the truck.  Crawl under the truck and slide on the backing plate, washer and grade 8 nylock nut. If nut has been on and off a couple times, use a new nut.  Since inside the camper is set up for preventing the bolt head to just spin, I tighten the nut on making sure I don't push up and only go in the direction for tightening.  Repeat for all the other bolt locations and done.


If you decide to have the backing plate and nut welded to the bottom of the truck bed there could be some things to consider.

  • After the nut is welded you'll need to re-tap the nut as the welding will reshape the nut.
  • You'll want to put a split washer inside under the bolt head to keep the assemble from loosing up.
  • When removing the camper you'll want to put a bolt through the bed into the welded nut to keep the threads clean.
  • If the welded nut gets buggered up then you'll need to cut it off and re-weld a new one.  Or drill it out and use a longer bolt with a nylock nut under the drilled out nut.
  • Depending on how many times you take the camper off, the threads on the bolt and nut gets screeched for torque every time.  Over many cycles they just wear out and need to be replaced.  The threads just give up and strip (fail).
  • Having a plate and nut welded to the truck bed you'll have to be dead center with all the nuts and bolts or you'll strip out the nuts. Having a loose bolt and assembling the plate and nut from under the truck, you can be off from center and still get it bolted down.

For your truck there could be bolt locations where you just can't get a welder in to do the work.  Like on mine there is one right above the gas tank.


Think it out from start to finish.  Make good reference marks to help line up camper to truck. I'm sure you'll get a procedure that works for you.


  • 2

Patrick

2015 FWC Hawk Flatbed


#38 kmacafee

kmacafee

    Senior Member

  • Members
  • 296 posts
  • LocationSt. Paul, MN

Posted 12 December 2021 - 05:46 PM

FWIW, I remove my camper several times a year.  Reasons you might want to include:

1. you need to haul something other than the camper (lumber, etc);

2. you need the truck serviced but the garage you use either doesn't have a door high enough or a lift strong enough to lift the combined weight (this happens more often than you think;

3. you need the camper left someplace to have it serviced.


Now I have helped several people load and unload their flatbed campers that were bolted directly through the floor.  I have no doubt its strong but lining up 4-6 bolts when the camper is suspended in the air is like eating soup in the rain -- sure, it can be done but why?


When I had my Bundutec Odyssey built and loaded on my Alumline flatbed, I wanted an external option.  My flat bed has rub rails and we drilled holes in those rails in the front and in the flatbed frame in the rear and use Fastguns attached to the jack plates to secure the camper on.  I also added an aluminum side plate so the camper would not shift sideways.


In 80,000 plus miles and lots of it off road and off camber, the camper has never moved and the holes have not enlarged at all.  And its very easy to remove.


I've attached a picture for reference -- just another way to consider.  


Hope this helps.

Attached Thumbnails

  • FB_IMG_1539004872064.jpg

Edited by kmacafee, 12 December 2021 - 05:49 PM.

  • 2

#39 pvstoy

pvstoy

    Senior Member

  • Members
  • 2,770 posts
  • LocationCarson City, NV

Posted 12 December 2021 - 06:10 PM


When I had my Bundutec Odyssey built and loaded on my Alumline flatbed, I wanted an external option.  My flat bed has rub rails and we drilled holes in those rails in the front and in the flatbed frame in the rear and use Fastguns attached to the jack plates to secure the camper on.  I also added an aluminum side plate so the camper would not shift sideways.


Thanks kmacafee for sharing another way of doing things. Forgot about your mounting method. If I was always in need of taking the camper on and off those Fastguns are a good solution. 


Having that gutter rail down the sides will keep the camper from sliding sideways and would speed up the placement of the camper if using bolts through the floor.  Having a tight gutter on the sides and front of the flatbed would make it simple for bolt holes alignment to always be there.


  • 1

Patrick

2015 FWC Hawk Flatbed


#40 nico

nico

    Advanced Member

  • Members
  • PipPipPip
  • 30 posts
  • LocationSan Luis Obispo , ca

Posted 13 December 2021 - 02:54 AM

FWIW, I remove my camper several times a year.  Reasons you might want to include:

1. you need to haul something other than the camper (lumber, etc);

2. you need the truck serviced but the garage you use either doesn't have a door high enough or a lift strong enough to lift the combined weight (this happens more often than you think;

3. you need the camper left someplace to have it serviced.


Now I have helped several people load and unload their flatbed campers that were bolted directly through the floor.  I have no doubt its strong but lining up 4-6 bolts when the camper is suspended in the air is like eating soup in the rain -- sure, it can be done but why?


When I had my Bundutec Odyssey built and loaded on my Alumline flatbed, I wanted an external option.  My flat bed has rub rails and we drilled holes in those rails in the front and in the flatbed frame in the rear and use Fastguns attached to the jack plates to secure the camper on.  I also added an aluminum side plate so the camper would not shift sideways.


In 80,000 plus miles and lots of it off road and off camber, the camper has never moved and the holes have not enlarged at all.  And its very easy to remove.


I've attached a picture for reference -- just another way to consider.  


Hope this helps.

thanks to everyone who replied. I am trying to avoid spending another 30-40k on another truck but that may eventually be inevitable but id like to make it work for a few years. Seems like welding the plates/nuts might save time in some respects but then that is lost in othet respects. I think the fastguns might be the ticket. maybe use the fastguns for short trips and on long excursions use the bolts to bolt it down.


  • 0


Also tagged with one or more of these keywords: FWC Flatbed, Flat Bed

0 user(s) are reading this topic

0 members, 0 guests, 0 anonymous users