Jump to content


Photo
- - - - -

2011 Cougar Build Thread


  • Please log in to reply
38 replies to this topic

#31 Rafter C

Rafter C

    Advanced Member

  • Members
  • PipPipPip
  • 76 posts
  • LocationGrass Valley, CA

Posted 24 January 2018 - 02:11 AM

The CO2 tank mount is still in progress, but in my case, no the door won't hit it. But that's only because I moved the door wind catch inward. Meaning toward the door, so that the door doesn't open as far as it used to. To me, thats fine. The storage potential is more important, as well as an improved effectiveness of the spot lights, and clearance for some supports for a planned rear awning I will do. It will also allow me to mount the shovel next the tank.

The table post seemed like a no brainer to me since the floor space is pretty valuable.

I should mention that moving the wind catch does affect its effectiveness fairly significantly. Just a several inch move inward of mine greatly reduced its ability actually "catch" the door. The change in leverage is dramatic. Mine is now mostly a door "stop" now. For me, its fine. I'm planning to make a strap that will keep the the door open, and if the winds is that bad, it'd be closed anyway.


  • 0

'08 Dodge 3500, '11 ATC Cougar


Build Thread: http://www.wanderthe...r-build-thread/

Blog: https://raftercexplo...s.wordpress.com


#32 Rafter C

Rafter C

    Advanced Member

  • Members
  • PipPipPip
  • 76 posts
  • LocationGrass Valley, CA

Posted 04 February 2018 - 05:32 PM

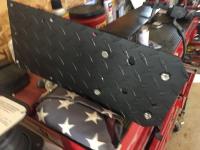
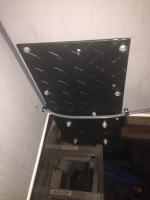
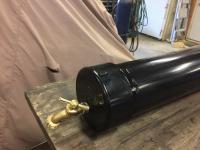
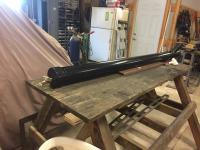
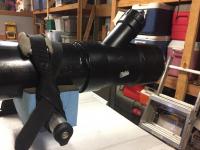
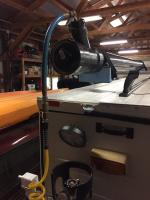
    Got my mount for my CO2 tank bracket done today. Pretty simple deal really. Took a piece of aluminum diamond plate (3/16” nominal thickness, but effectively 1/4” with the “diamonds”) I had in the shop, cut it on the band saw to the width of the bracket x 18" long. This particular piece had been used for something in the past, so it already had a few conveniently placed holes in it to help mount it, and I drilled a few more where needed.

   Before mounting it, I painted it with some Dupli-color truck bed lining paint because I think the black looks better...and because it was an old piece of diamond plate that needed some flaws hidden.

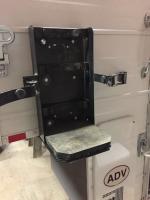
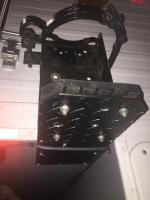
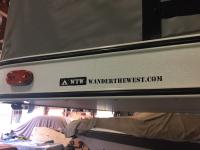
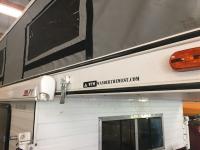
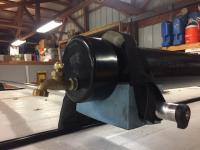
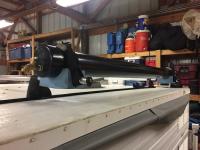
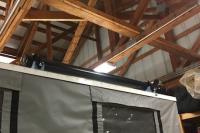
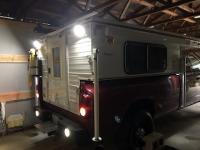
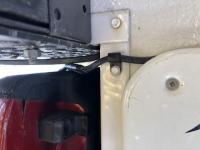
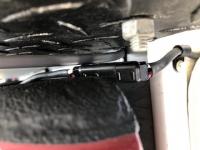
    I bolted the bracket to the diamond plate, then held it up (actually, my wife held it) next to the camper  so that the back of the bracket was flush with the camper wall, and the diamond plate slid under horizontal plywood under the fridge. I fastened the plate to the plywood with some #14 x 3/4" wood screws, and then triangulated the bracket by drilling through the back wall (and one of the vertical aluminum frame members), then bolted it through into the space behind the fridge with 2" backing plate I made from some aluminum bar stock. Finally, I cut a leftover piece of horse stall matting (heavy duty 3/4” thick rubber) to minimize noise, and abrasion to the bottom of the tank from the bolts attaching the bracket to the diamond plate.

    The resulting mounting system is quite solid, has virtually no movement or apparent vibration concerns, and should work quite well.

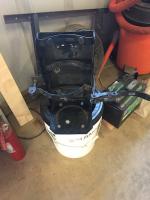
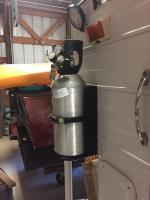
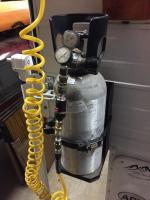
     Now.... I'm sure there's plenty of folks out there asking: What the hell is the CO2 for? Good question. Answer: It's a "replacement" for compressed air. CO2's characteristics  relative to "air" (~79% Nitrogen & ~21% ) are very similar, and as such can be used as a "replacement" for many common uses. My primary use will be as a means to air tires back up after some off road situations. But obviously, it could also be used to for airing up inflatables, blowing out filters, and even running air tools during repair situations or tire changing. 

     A 10 lb cylinder of CO2 has the capability of airing a 33" tire from 15 to 30 psi ~40 times before running empty. And because of that volume capability, can run air powered tools better than most on-board air compressors, even in combination with storage tanks. CO2 when compressed is stored in a liquid form, and converts to its gaseous state when released. This allows much greater volume than a same sized tank of compressed air (i.e., a scuba tank), BUT the downside is weight. Being stored in a liquid state means it has mass, unlike stored air.

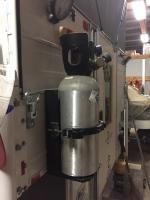
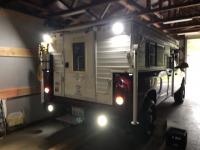
    The total weight of the liquid CO2, the tank (aluminum) and the bracket (stamped steel) is about 30 lbs. Roughly the same as about 3 gallons of water plus the bracketry to hold. So its not outrageous compared to what some folks have mounted on the rear of the camper, but it does give cause for monitoring the mounting system for any signs of stress. The liquid CO2 doesn’t have the same “sloshing” factor as gasoline or water, so it think the stresses relative to that will be minimized. Additionally, I don't anticipate taking the tank on all trips, so it wont be a constant weight on the bracketry.

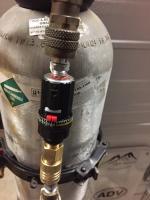
     I’ve carried an identical bracket on my rock crawler Jeep for almost 20 years, and have had it in much more adverse conditions than I ever expect to have my truck and camper, so I’m quite confident in the brackets ability to retain the tank, though will be adding some rubber weatherstripping to the tank to make it slightly more snug, and will have to put a small cable lock through the latch to keep it secure.

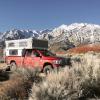
     Overall, I think this’ll be a nice addition for the occasional need use, and adds to the self contained nature of my truck and camper.


Attached Thumbnails

  • IMG_5830.JPG
  • IMG_5833.JPG
  • IMG_5837.JPG
  • IMG_5842.JPG
  • IMG_5843.JPG
  • IMG_5834.JPG
  • IMG_5835.JPG

  • 0

'08 Dodge 3500, '11 ATC Cougar


Build Thread: http://www.wanderthe...r-build-thread/

Blog: https://raftercexplo...s.wordpress.com


#33 Rafter C

Rafter C

    Advanced Member

  • Members
  • PipPipPip
  • 76 posts
  • LocationGrass Valley, CA

Posted 05 February 2018 - 01:29 AM

     Oh, and I ordered a couple site decals from Vinyl Disorder, so now I'm flying the colors....

Attached Thumbnails

  • IMG_5825.JPG
  • IMG_5827.JPG

  • 0

'08 Dodge 3500, '11 ATC Cougar


Build Thread: http://www.wanderthe...r-build-thread/

Blog: https://raftercexplo...s.wordpress.com


#34 jimjxsn

jimjxsn

    Senior Member

  • Members
  • 599 posts
  • LocationRoxborough Park or Buena Vista CO

Posted 07 February 2018 - 01:21 AM

Great job on the tank mount. It's looking good.
  • 0

~Jim
2000 Tundra AC- 2000 FWC Ranger

2017 Tundra DC - 2017 ATC Panther


#35 Rafter C

Rafter C

    Advanced Member

  • Members
  • PipPipPip
  • 76 posts
  • LocationGrass Valley, CA

Posted 07 February 2018 - 02:07 AM

Great job on the tank mount. It's looking good.

Thanks. I know I initially showed that I was going to put it behind the door, but decided to go for the other side because I identified that the vertical support member was right where I need to bolt through. The behind the door side didn't seem like it was as stout, and without Marty or Jeff there to tell me where the frame was, I went with what I could confirm. It seems to have worked out well, though truth be told, I'd forgotten the total weight of the tank until after the bracket was in place, so as I said, I will exercise some caution and monitor the mount the first few times I travel with it.


  • 0

'08 Dodge 3500, '11 ATC Cougar


Build Thread: http://www.wanderthe...r-build-thread/

Blog: https://raftercexplo...s.wordpress.com


#36 Rafter C

Rafter C

    Advanced Member

  • Members
  • PipPipPip
  • 76 posts
  • LocationGrass Valley, CA

Posted 05 March 2018 - 02:38 PM

Latest add on is a quickie solar shower. 6' of 4" ABS pipe, a slip cap glued on one end with a hose bib tapped into it, a 4"x 2" 45* tee glued on the other end with threaded cap adapters fitted to it. And an automotive tire Schrader valve mounted through the small cap. Easy peasy...


Fill the "tank" with water (through the small threaded cap), drive or sit around in the sun for a few hours, apply about 30 psi of air pressure (in my case, CO2) to the Schrader valve, hook up the hose, take a warm shower. No propane used, no electric power used.


I haven't mounted it yet, but I saw a neat set up using carved canoe blocks on a Yakima rack that I probably will try. When full, the whole thing should weigh around 40 lbs (~5 gallons), so not outrageous relative to solar panels, but with my kayaks also on top, may require some helping lifting from my Crossfitting wife (truth be told, she is our roof lifter anyway!).


This obviously not some great new idea. There are lots of iterations of these out there on the inter web (YouTube). Mine is a copy of one of those. You can also spend about $500 on the aluminum Road Shower version, but since I've only got $17 into mine (with $75 off because of a new Home Depot credit card), I'm feeling pretty good.


I will post again when I mount it, and will probably paint it with the same spray on bed coating I've used in the past, or maybe just flat black paint to help with heat absorption (or maybe its to reduce heat reflection?). Anyway, follow up coming....


Attached Thumbnails

  • IMG_5916.JPG
  • IMG_5918.JPG
  • IMG_5919.JPG

  • 0

'08 Dodge 3500, '11 ATC Cougar


Build Thread: http://www.wanderthe...r-build-thread/

Blog: https://raftercexplo...s.wordpress.com


#37 Rafter C

Rafter C

    Advanced Member

  • Members
  • PipPipPip
  • 76 posts
  • LocationGrass Valley, CA

Posted 14 March 2018 - 05:53 PM

Mounted the solar shower up on the camper yesterday, which was the result of an additional project; mounting the Yakima racks up on the roof.


A while back, I had the guys at ATC mount Yakima rails over the full length of the roof of my Cougar, but hadn't gotten around to buying the actual rack parts yet. A recent trolling of CL in Sacramento, yielded an ad for some used Control Towers at a good price. The ad implied just a set of 4, and I was looking for 6, but replied anyway. Turns out the seller was part of a "kayak club" (his words), and had multiple (as in MANY) sets available, so I made a deal for 6 towers with all the necessary rail mounting hardware for $200 (a hell of a lot cheaper than new, and they are in perfect condition).


For bars, I wanted them to be full width of the camper, which in my case is 84", and Yakima's 86" bars are hellaciously expensive (and heavy), so I stole an idea from the TARDIS build over on ExPo, that Hadley stole from our own Ski3pin, and ordered 20' of 6061 aluminum tubing from my local steel supplier for $90. Its outside diameter is 1.125 (1 1/8"), with a wall thickness of 1/8". This mimics exactly the steel tube used by Yakima, and so allows use of their locking bar ends that minimize any chance of strapping slipping off the end. I cut the tubing into thirds (80" pieces), which I'll take as close enough to full width, and it gave me the pieces I wanted for my triple rack system.


So back to the shower mount...


As I mentioned in my last reply, I'd seen an idea to mount this using foam blocks normally used for canoes, and I just happened to have a couple I hadn't used in years. So my wife scribed a 4" radius on them, and cut them with her pocket knife, and voila, bar mounts. I strapped the the tube down using Yakima's boat straps (again, already had them, wasn't using them), and it is quite secure. 


I then mocked up how it would be used in the field relative to how the the CO2 would pressurize the water. The full output pressure of the C02 is over 120 psi, so I'm using an adjustable pressure relief valve from Home Depot to bring it down to ~40 psi (common household water pressure).


And of course, here's the pics to easily show what I so verbosely just explained... :)

Attached Thumbnails

  • IMG_5963.JPG
  • IMG_5964.JPG
  • IMG_5965.JPG
  • IMG_5966.JPG
  • IMG_5967.JPG
  • IMG_5968.JPG
  • IMG_5969.JPG

Edited by Rafter C, 14 March 2018 - 06:08 PM.

  • 0

'08 Dodge 3500, '11 ATC Cougar


Build Thread: http://www.wanderthe...r-build-thread/

Blog: https://raftercexplo...s.wordpress.com


#38 Rafter C

Rafter C

    Advanced Member

  • Members
  • PipPipPip
  • 76 posts
  • LocationGrass Valley, CA

Posted 25 December 2018 - 07:55 PM

After not quite a year, I'm back to camper mods.... The latest is just a quick and dirty one, but kind of handy I think.

Recently, I upgraded the backup lights in my truck bumper to LED from incandescent, as well as putting some brighter LED bulbs in the factory reverse light location on the truck (taillight housing). They make a hell of a difference in general, but then it occurred to me that the rear facing flood lights on the camper would be a great addition as well, and especially because the camper blocks so much view when its on. So I figured why not wired those to the vehicle system lights, and really make it so I can see when I'm trying to fit the truck/camper into some tight spot in the dark. 

The rub was that I also wanted to be able to use the camper spot lights as they were intended; still on the switch near the back door. BUT, I didn't want to back feed the truck system. Answer?: In line diode...

Ordered one up off Amazon from Dorman; kind of spendy ($20), and it came ready to wire, with shrink tubing already in place, and male/female bullet connectors on each end.

I accessed the power wire to the lights (purple) through the furnace cover, tapped into it with a splice connector, ran a wire with the diode spliced into it from that to a two wire waterproof connector, and connected the other wire to a ground. The lead comes out of the top of the furnace cover, and runs over to the edge of the lower vertical corner of the camper, right near the top of the truck bed, where the tailgate corner would be.

Then, from the truck side, I removed the left side taillight housing where i could access the wires going to my truck's auxiliary reverse lights, and just tapped into that with a matching two wire connector to the camper (again, grounding the other wire), ran those leads up through the stake pocket, where they can easily be reached when putting the camper on the truck, and plugged into its counterpart from the camper.

Worked great, very bright, no back feed to the truck when switching the spots on from the camper, AND, I got the added bonus of having g the LED's I put on under the flat side of the camper come on when the truck is put in reverse, so I can see my rear tires, and the ground around them when backing too. 

It came out pretty slick and it didn't cost much.

Attached Thumbnails

  • IMG_7953.jpeg
  • IMG_7954.jpeg
  • IMG_7961.jpeg
  • IMG_7962.jpeg

  • 0

'08 Dodge 3500, '11 ATC Cougar


Build Thread: http://www.wanderthe...r-build-thread/

Blog: https://raftercexplo...s.wordpress.com


#39 billharr

billharr

    Senior Member

  • Members
  • 2,824 posts
  • LocationStockton CA

Posted 25 December 2018 - 09:44 PM

..................    . So I figured why not wired those to the vehicle system lights, and really make it so I can see when I'm trying to fit the truck/camper into some tight spot in the dark. 

The rub was that I also wanted to be able to use the camper spot lights as they were intended; still on the switch near the back door. BUT, I didn't want to back feed the truck system. Answer?: In line diode...

Ordered one up off Amazon from Dorman; kind of spendy ($20), and it came ready to wire, with shrink tubing already in place, and male/female bullet connectors on each end.

I accessed the power wire to the lights (purple) through the furnace cover, tapped into it with a splice connector, ran a wire with the diode spliced into it from that to a two wire waterproof connector, and connected the other wire to a ground. The lead comes out of the top of the furnace cover, and runs over to the edge of the lower vertical corner of the camper, right near the top of the truck bed, where the tailgate corner would be.

Then, from the truck side, I removed the left side taillight housing where i could access the wires going to my truck's auxiliary reverse lights, and just tapped into that with a matching two wire connector to the camper (again, grounding the other wire), ran those leads up through the stake pocket, where they can easily be reached when putting the camper on the truck, and plugged into its counterpart from the camper.

Worked great, very bright, no back feed to the truck when switching the spots on from the camper, AND, I got the added bonus of having g the LED's I put on under the flat side of the camper come on when the truck is put in reverse, so I can see my rear tires, and the ground around them when backing too. 

It came out pretty slick and it didn't cost much.


You can do without a diode. I used a relay and triggered the relay with voltage from the backup lights. You are right does make a great back up light.


P1110850.jpg


  • 1


0 user(s) are reading this topic

0 members, 0 guests, 0 anonymous users