Jump to content


Photo
* * * * * 2 votes

Vic's new 2012 Puma build


  • Please log in to reply
209 replies to this topic

#121 Vic Harder

Vic Harder

    Doctor Electric

  • Site Team
  • 4,947 posts
  • LocationCalgary, Alberta

Posted 02 April 2020 - 06:06 PM

Vic,


if you need any fine tuning, I’m thinking you could try a bar clamp on both sides of the bend, with your board spaced in between, might be worth a try. That would give you the clamping distance you need and is fully adjustable, and should provide needed force to bend aluminum square tubing, ever so slightly, without overdoing.


Poky

Thanks Poky.  I think where it needs tweeking a bit is in the actual sheet metal.  The tubing is now straight.  The very slight kink is in that area right at the frame where the round horizontal tube joins the side.   If you have seen the roof apart, you might know of what bits I speak.    It is much better now than it was, for sure.


I did manage to get a piece of 1/2" plywood in between the rooftop and that round tube, which straightened it a lot.  Is it in concours condition?   :lol:   No.  But the side liner is now much less slack than it was.


Regarding the side liner.... I notice that new FWC have almost rigid looking side liners when the roof is up.  Very different than the older models.  How are they doing this?  Can the side liner and/or lifting panels be adjusted to lift higher, thus eliminating slack?


Edited by Vic Harder, 02 April 2020 - 06:15 PM.

  • 0

#122 PokyBro

PokyBro

    Senior Member

  • Members
  • 467 posts
  • LocationLas Vegas, Nevada

Posted 02 April 2020 - 10:17 PM

I think the new material they use for sideliners is just different, and possibly stiffer , and or different thickness or weight. I haven’t seen it in person, but I too have noticed it doesn’t sag as much. I don’t think there is a way to adjust slack, other than when you first install. I know on mine there is slack in the middle of each side, and that is because of the bend in the roof itself with the weight and pull of the fabric along the sides causing flexing of the metal frame.


Also it might be possible the side liner material may shrink slightly over time, certainly did on the old original 80’s FWCs.


Anyhow, just my thoughts.


Edited by PokyBro, 02 April 2020 - 10:38 PM.

  • 0

1999 F250 crew cab SRW, 7.3 Powerstroke TD

1981 Grandby shortened to a Hawk

Build thread / https://www.wanderth...by-into-a-hawk/


#123 rando

rando

    Senior Member

  • Members
  • 1,638 posts
  • LocationColorado

Posted 02 April 2020 - 11:11 PM

The newer FWC sideliner is a heavy reinforced vinyl (like the material rafts are made out of).  I am not sure how they get it so tight at install, but there is no user adjustment.    


  • 0

2016 Fleet Flatbed

2016 Toyota Tacoma


#124 Vic Harder

Vic Harder

    Doctor Electric

  • Site Team
  • 4,947 posts
  • LocationCalgary, Alberta

Posted 03 April 2020 - 12:44 AM

OK, more progress.  Turnbuckle doors.  I wanted a better, more elegant solution than the thin sliders my campers have come with, and not use hinges like the current FWC style since those need "room" to open.  Neither solution would work with my front turnbuckle doors, as they are obstructed by my over-large 30 gal water tank.


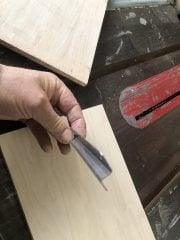
So, I discovered that a 1/2" Z-bar can be put to use for this purpose.  I used extra Z-bars from my Propex install, and bought a few more from a vendor.  Here is what I am talking about:

Z-bar


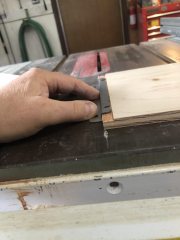
I used my table saw (router would make a cleaner cut for sure!) to shave off a midge to get a good snug fit:

Cut to depth with table saw
 
This is how if snugs up:
Fit
 
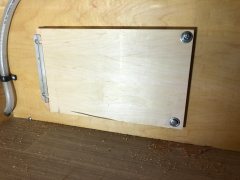
Installed, they look like this from the inside.  I used T-nuts again to provide good clamping force, and allow for multiple removals without stripping out the wood like a wood screw would do
drivers rear from inside


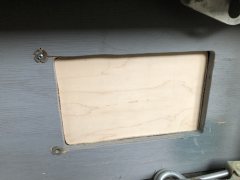
And here is a view from the outside.  I've already cut 1/2" think rigid fiberglass to fill the gap, for added insulation as well as ease in reintalling.
outside


  • 0

#125 Bill D

Bill D

    Senior Member

  • Members
  • 981 posts
  • LocationEdmonton, Alberta, Canada

Posted 03 April 2020 - 04:34 AM

Way better than the ultra thin sliders that you had before!  They were very cheap.

Why would there have been an issue the doors taking room when open, if you had used a traditional hinge?  


The reason I ask is I open my doors frequently for ventilation.  I added a mesh screen (like many others) to keep the bugs out.  My unit has an overhang from the kitchen cabinets, so they are never really "in the way" when open.


Curious...


  • 0

#126 Vic Harder

Vic Harder

    Doctor Electric

  • Site Team
  • 4,947 posts
  • LocationCalgary, Alberta

Posted 03 April 2020 - 05:06 AM


Way better than the ultra thin sliders that you had before!  They were very cheap.

Why would there have been an issue the doors taking room when open, if you had used a traditional hinge?  


The reason I ask is I open my doors frequently for ventilation.  I added a mesh screen (like many others) to keep the bugs out.  My unit has an overhang from the kitchen cabinets, so they are never really "in the way" when open.


Curious...

Bill, check out this pic... 

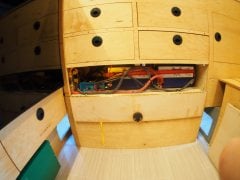
battery shelf


The 5" wide, 13" long spaces on either side of the water tank are the places I have to get my hands into to fasten the turnbuckles.  With the FasGun Derringers, that's doable.  Not sure I could do it with regular turnbuckles.  Having a door in the way would make it worse.


Plus, these are screwed down tight.  No air leakage at all.  I will make one turnbuckle door with screen on it so I can swap that out when I want/need to ventilate.


Edited by Vic Harder, 03 April 2020 - 05:11 AM.

  • 0

#127 Bill D

Bill D

    Senior Member

  • Members
  • 981 posts
  • LocationEdmonton, Alberta, Canada

Posted 03 April 2020 - 05:19 AM

I see.  You'd have to Anderson Cooper arms otherwise.  :)


  • 0

#128 Vic Harder

Vic Harder

    Doctor Electric

  • Site Team
  • 4,947 posts
  • LocationCalgary, Alberta

Posted 09 April 2020 - 10:49 PM

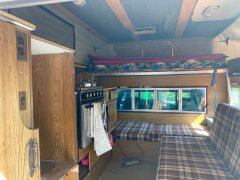
Question for those who have built/re-built their ceiling/roof.  I notice that the very outside long edges of the camper ceiling do NOT have a wooden strip on them like all the others do.  And that the resting area that this edge would be on when the top is down is foam/fleece lined.  This is obviously to protect the sideliner material.  


Would there be any reason to not put a strip on that outside edge?  Gap, abrasion, fit?  


  • 0

#129 PokyBro

PokyBro

    Senior Member

  • Members
  • 467 posts
  • LocationLas Vegas, Nevada

Posted 09 April 2020 - 11:22 PM

Vic,


I cant see a reason putting a strip on the outside edge would be a problem, other than needing to adjust your roof clamps slightly.


I think the challenge would be in holding the ceiling material in place before adding the strip due to gravity.


when I did my ceiling, my roof was off and upside down, so I was able to pull the perforated vinyl over the edge and tuck it up under the roof metal skin. I can visualize you’re trying to do this without removing the roof, so this isn’t an option for your approach.


you certainly might be able to get one side up and put the strip in, but tightening and getting it to the other side might be the challenge. Have you considered contact cement under the fabric before the strip? I’m just wondering how you’re going to hold the ceiling material in place before adding the strip.  If you were using perforate vinyl, you could possibly use a staple gun to tack down the fabric before adding the strip, but I think your using more of a cloth type fabric if I’m seeing it right. Not sure as I’ve never seen an ATC up close to see what they use for the ceiling material.


Anyhow, just thinking out loud with the above ideas. Hope that might be helpful.


Poky


Edited by PokyBro, 09 April 2020 - 11:25 PM.

  • 0

1999 F250 crew cab SRW, 7.3 Powerstroke TD

1981 Grandby shortened to a Hawk

Build thread / https://www.wanderth...by-into-a-hawk/


#130 m.r.h.

m.r.h.

    Senior Member

  • Members
  • 121 posts

Posted 10 April 2020 - 12:42 AM

When I got my Keystone the previous owner had put carpet on the roof. From some old photos he had shared with me it looked like one corner had some water damage so he cut that corner out and put carpet up. It wasn't the best job and I have been wanting to take it down for a long time.


As you can see in the photo he put up wood strips up on the outer most edge of the ceiling. My only concern with it was the sharp corner that could have just been rounded off. It caused no damage. Will add likely add them in my repair.


Looking in before


This winter I noticed a very small leak in that same corner and decided to tear it out and start thinking about how to replace / repair. Taking the roof off to repair is my absolute last resort  I haven't removed all of the carpet (unsure what the original material looks like but fingers crossed it is ok) yet but that might be a think weekend project. Here are a couple repair thoughts / ideas


1. Find matching material and glue in a patch. Put the top down with some sort of plywood contraption to keep pressure on the area while it dried

2. Remove old material and insulation and replace with rigid insulation. Glue the new material to the insulation before installing and hopefully hold everything in place by screwing new wooden strips in.

3. As you already know Reefy had fiberglass panels? I am really interested in learning more about that.

4. Do more research into repairing car headliners. 


  • 0


0 user(s) are reading this topic

0 members, 0 guests, 0 anonymous users