
Nice work Vic. That would be a nice improvement even with the standard length bed.

 2 votes
Vic's new 2012 Puma build
Started by
Vic Harder
, May 14 2019 01:48 AM
209 replies to this topic
#171

jimjxsn
-
- Members
- 599 posts
Senior Member
- LocationRoxborough Park or Buena Vista CO
Posted 28 April 2020 - 02:36 AM
~Jim2000 Tundra AC- 2000 FWC Ranger
2017 Tundra DC - 2017 ATC Panther
#172
Vic Harder
-
- Site Team
- 4,959 posts
Doctor Electric
- LocationCalgary, Alberta
Posted 10 May 2020 - 04:41 AM
Nice work Vic. That would be a nice improvement even with the standard length bed.
I shortened that push bar today. I found that with the top down, getting at the fridge was hard with the bar that long. It is now long enough to push on to lift the top and when down, it clears the fridge door. Much nicer for raiding the fridge on short rest stops!
2015 Silverado 3500 crew cab 8' bed Diesel
2012 ATC Puma Shell build - https://www.wanderth...012-puma-build/
Power considerations thread - https://www.wanderth...e-power-scotty/
Building out an electrical system - So, you want to setup a good electrical system in your camper? - Electrical, Charging, Solar, Batteries and Generators - Wander the West
#173
Vic Harder
-
- Site Team
- 4,959 posts
Doctor Electric
- LocationCalgary, Alberta
Posted 10 May 2020 - 05:10 AM
A bit more progress last week. Got the roof prepped for the canoe we are having built for us. First step was to remove the solar panel and traction mats from where they were. Solar panel was at the front of the roof, and went all the way across too. 78" long on a 78" wide Puma. Sorry, no pics of that.
I bought some more T-slot tracks from Lee Valley, and some 1" aluminum bars from Home Depot. Here is a bad shot of the roof during this construction phase:

This T-slot has a maximum length of 4', so when I built this camper out (the prototype build) last fall I had one one each side of the front of the camper for the solar panel, and two at the rear for the traction mats. These were held on to the roof by drilling holes in the T-slots to line up with the existing holes in the roof, and then I put white butyl tape under the T-slots and screwed them in with 3/4" #8 machine screws. I inspected these before installing more, and boy... that butyl tape is sticky. I think that the solar panel would have stayed put even if the screws had fallen out!
I added more T-slot bars, basically making 2 rails on each side of the camper. The new rails were attached with 3m 5200 under them instead of butyl tape. It makes for a bit cleaner look, and is likely even stronger than the butyl tape was. Again using all of the existing screw holes. I did NOT put a rail in the middle of the roof, since the roof is bowed by design, and I wanted that to stay to help with rain run off. I also did not go closer to the front and rear than 6", because there is a lot of slope to the roof in that last 6".
Notice the dirty roof! 4 months of being in the garage while I built the inside out created a lot of dust! I cleaned under the rails with brake cleaner before attaching the rails.

Driver's side with the traction mats mounted:

This side is for the canoe!

Driver's side with the solar panel mounted. I really wanted to mount this heavy stuff on the passenger side, as nearly all the heavy bits in this build are on the driver's side. But the roof vent location made that impossible. Definitely need to clean that solar panel before it will produce good power!

Question was asked about wiring up the solar panels. Mine did not come pre-wired. The red/black wires in this picture come up right at the end of the bed area, and head down towards the floor. The yellow wire is the factory installed ceiling power for both the lights and fan. Both my Hawk and this Puma used the same wiring scheme for the ceiling wiring. I ran the red/black from my DC fuse panel to this point, then behind that 1/8" paneling strip towards the front of the camper. It then tucks around the corner and comes up by the lifter panels.

It is taped to the back of the panels, and then I made two holes in the headliner (hot soldering iron melts it nicely) and drilled up through the roof. The wires terminate in a solar cable entry box. The box is sealed with 3m 4200 and screws (3 of the 4 screws go into the roof framing. One doesn't because the roof was not pre-wired. Plenty strong and weather tight. I believe factory pre-wired roofs have some additional framing for the roof penetration area, at least my Hawk did.

2015 Silverado 3500 crew cab 8' bed Diesel
2012 ATC Puma Shell build - https://www.wanderth...012-puma-build/
Power considerations thread - https://www.wanderth...e-power-scotty/
Building out an electrical system - So, you want to setup a good electrical system in your camper? - Electrical, Charging, Solar, Batteries and Generators - Wander the West
2012 ATC Puma Shell build - https://www.wanderth...012-puma-build/
Power considerations thread - https://www.wanderth...e-power-scotty/
Building out an electrical system - So, you want to setup a good electrical system in your camper? - Electrical, Charging, Solar, Batteries and Generators - Wander the West
#174
Wandering Sagebrush
-

- Site Team
- 10,584 posts
Free Range Human
- LocationNortheast Oregon
Posted 10 May 2020 - 05:15 AM
“Got the roof prepped for the canoe we are having built for us“
I think I’ve missed some boat news, could you share the details?
I am haunted by waters
#175
Vic Harder
-
- Site Team
- 4,959 posts
Doctor Electric
- LocationCalgary, Alberta
Posted 10 May 2020 - 09:09 PM
“Got the roof prepped for the canoe we are having built for us“
I think I’ve missed some boat news, could you share the details?
Sure. We briefly had a great cedar strip canoe that a friend of mine built in the late 1970's. Outrageous boat. 16' long, 50 pounds, 30" wide, no tumblehome or rocker, nor keel. Completely round hull shape, so unbelievably tippy. But super fast with great secondary stability. Two strong guys could practically turn it into a hydrofoil, it shot out of the water so hard. But, the tippy bit had us selling it 2 years after we inherited it a few summers ago. Just not practical, as you could count on ending up in the water at least once every time you went out.
So, I did a bunch of R&D, and ended up looking hard at Souris River and Swift canoes. I really liked the idea of a 34# carbon/kevlar canoe, especially when thinking about getting it on top of the camper. Both of those firms are out east, and so I hesitated long enough to discover Hellman Canoes in Nelson BC. Bob Hellman used to work with Souris River, and has tweaked their designs to make his own. We are getting him to make a 16' Quetico for us in clear Kevlar. 39 pounds when done, and for considerably less $$ than either of the eastern firms.
Like most things these days, his company has been closed due to covid-19, but we are told we'll have our canoe in June.
2015 Silverado 3500 crew cab 8' bed Diesel
2012 ATC Puma Shell build - https://www.wanderth...012-puma-build/
Power considerations thread - https://www.wanderth...e-power-scotty/
Building out an electrical system - So, you want to setup a good electrical system in your camper? - Electrical, Charging, Solar, Batteries and Generators - Wander the West
2012 ATC Puma Shell build - https://www.wanderth...012-puma-build/
Power considerations thread - https://www.wanderth...e-power-scotty/
Building out an electrical system - So, you want to setup a good electrical system in your camper? - Electrical, Charging, Solar, Batteries and Generators - Wander the West
#176
Taku
-

- Members
- 757 posts
Buffalo Rockface
Posted 10 May 2020 - 10:13 PM
oh, that will be nice. After 29 years our old Mad River Explorer died of cracks so we bit the bullet and bought a kevlar canoe. 43# outfitted weight and it paddles very lightly. Don't want to be banging rocks like we could, but getting it on top of the camper is way easier. As soon as I retire, we are heading to rivers in Canada with it.
2005 Tundra 2013 Ocelot "Ridiculously comfortable"
2021 Tundra 2022 Cougar Shell Built Out "Even more ridiculously comfortable"
#177
Wandering Sagebrush
-
- Site Team
- 10,584 posts
Free Range Human
- LocationNortheast Oregon
Posted 10 May 2020 - 11:15 PM
Vic, that’s a sweet boat! Pix Please when you take delivery!
I still have one of my Lincoln canoes, plus the lapstrake I built. The Lincoln is 17+ and 65 pounds. I should think about something lighter.
I am haunted by waters
#178
Vic Harder
-
- Site Team
- 4,959 posts
Doctor Electric
- LocationCalgary, Alberta
Posted 11 May 2020 - 02:40 AM
oh, that will be nice. After 29 years our old Mad River Explorer died of cracks so we bit the bullet and bought a kevlar canoe. 43# outfitted weight and it paddles very lightly. Don't want to be banging rocks like we could, but getting it on top of the camper is way easier. As soon as I retire, we are heading to rivers in Canada with it.
yeah, the "banging rocks" bit was one of the factors for NOT getting a Swift Carbon canoe at 34#. Carbon is nice for race boats, not so much for recreational paddling where you very likely will be hitting something sooner or later.
The Souris River canoes and by association, my Hellman canoe, are used by a lot of outfitters up here, and get serious abuse. Mind you, those are their heavier layups. We have an east coast trip planned that will take us through Northern Ontario (Quetico, Algonquin, etc) and are looking forward to some nice fall colours from the water.
2015 Silverado 3500 crew cab 8' bed Diesel
2012 ATC Puma Shell build - https://www.wanderth...012-puma-build/
Power considerations thread - https://www.wanderth...e-power-scotty/
Building out an electrical system - So, you want to setup a good electrical system in your camper? - Electrical, Charging, Solar, Batteries and Generators - Wander the West
2012 ATC Puma Shell build - https://www.wanderth...012-puma-build/
Power considerations thread - https://www.wanderth...e-power-scotty/
Building out an electrical system - So, you want to setup a good electrical system in your camper? - Electrical, Charging, Solar, Batteries and Generators - Wander the West
#179
Fishyhead
-

- Members
-

- 68 posts
Advanced Member
- LocationAnaheim, CA
Posted 11 May 2020 - 02:44 PM
I bought some more T-slot tracks from Lee Valley
Thanks for the T-Slot link. I have Yakima's stuff for my cars but after pricing what it would cost to install a pair of their tracks and enough towers and bars to do what I want, it cost way too much. I like your system of multiple T-Slot tracks since it should allow for easy upgrades in the future.
1997 Toyota T100 4x4 manual - 1993 FWC Ranger 8'
#180
Vic Harder
-
- Site Team
- 4,959 posts
Doctor Electric
- LocationCalgary, Alberta
Posted 22 May 2020 - 05:54 AM
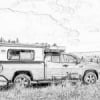
earlier this week we test fit the camper onto the truck. If you may recall, I had some doubts about my chosen location for the Propex 2800. I had measured multiple times, but.... I have made mistakes before! So, we backed the truck up to the camper and it looked like it would fit!

Sure enough, it fit and the camper has been on the truck for a few days now. I was pleased to see the solar panel working really well, and not so pleased once it started to rain. The roof is tight, no problems there. But ALL the windows leak... or rather, the seams leak:

They drip pretty steady in a 1" per day of rainfall type of steady rain, which is hardly a downpour. I'm thinking I need some seam sealer?
2015 Silverado 3500 crew cab 8' bed Diesel
2012 ATC Puma Shell build - https://www.wanderth...012-puma-build/
Power considerations thread - https://www.wanderth...e-power-scotty/
Building out an electrical system - So, you want to setup a good electrical system in your camper? - Electrical, Charging, Solar, Batteries and Generators - Wander the West
2012 ATC Puma Shell build - https://www.wanderth...012-puma-build/
Power considerations thread - https://www.wanderth...e-power-scotty/
Building out an electrical system - So, you want to setup a good electrical system in your camper? - Electrical, Charging, Solar, Batteries and Generators - Wander the West


0 user(s) are reading this topic
0 members, 0 guests, 0 anonymous users

