Jump to content


Photo
* * * * * 2 votes

Vic's new 2012 Puma build


  • Please log in to reply
209 replies to this topic

#51 Vic Harder

Vic Harder

    Doctor Electric

  • Site Team
  • 4,962 posts
  • LocationCalgary, Alberta

Posted 12 March 2020 - 05:52 PM

Great job Vic!  Talk about storage space!  I love how you have the queen bed set up full time now.


You are definitely going to have to go to one of the FWC/ATC camping parties and show off your craftsmanship and ingenuity some day.


You've given so much to this forum, we all owe you a root beer.

aaawww shucks Bill!  I'd love a root beer!  Couldn't have done it without this forum. Love WtW!


  • 0

#52 Vic Harder

Vic Harder

    Doctor Electric

  • Site Team
  • 4,962 posts
  • LocationCalgary, Alberta

Posted 26 March 2020 - 03:26 AM

OK, long overdue for an update.  The interior build is finished (for now.  This is my third build, 2nd version of this particular camper), and it turned out pretty OK.  I still need to do the ceiling over, as it saw some abuse of some kind and the cloth is shredding slowly.  I already have new roof liner, so that may still happen before Covid-19 is over and we can go camping again.


A note about my build:  I see other folks (with better cabinet making skills than me) build really nice cabinets and then carry the completed unit into the camper and screw it in.  Or worse, the cabinets I found in my previous two shell tear downs were glued, screwed/stapled and otherwise permanently attached to the camper, meaning that a tear down pretty much ruined the inside in the process of removing the stuff I didn't want.  So, I built my cabinets so that they all come apart.  No glue unless the bits being glued did not need to come apart for easy disassembly.  


Almost all the wood is 1/2" Canadian maple 5 layer plywood.  Nice stuff.  Not as strong as the 9 layer Baltic plywood I used in my Hawk build, but that Baltic stuff only comes in 5' x 5' sheets, and I wanted to have access to 8' sheets for this Puma/Grandby build.  Interior siding is 1/8" Maple.  


The floor has 1/2" hard styrofoam board with 1/4" subflooring screwed and glued to the bare wood floor.  On top of that is a nice thick luxury vinyl sheet that my wife helped me cut... it fits super snug, with room to move on 2 of the for sides.  I taped it down with double sided tape on the sides I wanted to anchor.  Tub/Tile caulking keeps dust from getting under the vinyl.


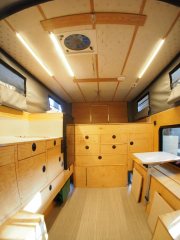
The cabinets have really nice LED lights that are turned on with a switch in the 6-gang Blue Sea Below-Deck panel right at the entrance.  The overhead lights were replaced with these 40" long LED bars that are similar to the new FWC lights.  Mine are wave activated and touchless dim as well.  Super bright when needed, subtle when wanted.  


Now to the pictures:


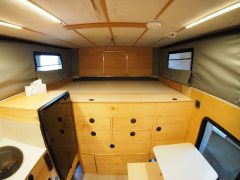
This is the view when you are standing in the door (pics taken with an Olympus OM-D E-M1 Mk1 and lenscap 9mm fisheye lens, handheld).  Yes, I removed the front window and replaced the front siding with new stuff from ATC.  This front wall likely has as much storage as we had our entire camper before.  

looking in at the front cabinet wall
 
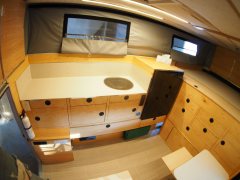
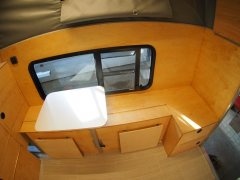
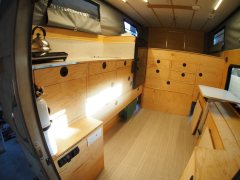
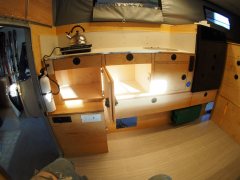
I'm standing in the very rear passenger side of the camper for this picture, it gives you an idea of how the fridge and counter top area integrate with the front wall cabinets.  We used to have our fridge in the back, where I am standing.  On our trip to Utah in the fall of 2019 we did a lot of backroad driving, and had the fridge empty itself and/or rearrange its insides completely.  I figured the fridge would get a much gentler ride being in between the wheels of the truck than it did at the "back of the bus".  So, we moved it forward and across.  Not totally happy about all the weight being on that side of the camper though.
view from pax rear
 
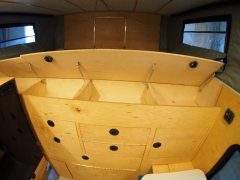
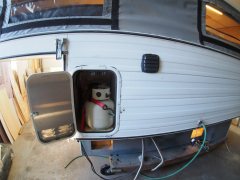
Here I have opened the top of the front cabinets.  Lots of storage here.  We intend to put clothes in most of this area.  The area at the far left is over the new propane cabinet and a bit shallower.  Because of how the counter/fridge intersects the front wall, this would normally be a dead space.  In home kitchens, access is granted via some kind of lazy susan or it is just left void.  I opened up the outside wall and installed a new propane cabinet there.  Voila, no wasted space.  All latches are the 2" round slam latched FWC uses these days.  In camper build #2 we experimented with many different latches.  These are the easiest to open, and latch very securely.  The shocks on the lid push up very strongly, enough so that the mattress won't stay down.  So there are two latches in the lid to keep it closed.
front cab top open
 
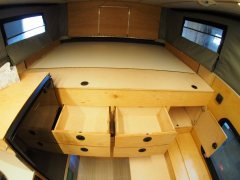
This is a picture of the front cabinets with the drawers open and the right hand side cabinet open.  The drawers all use full suspension slides.  These at the front are 12" deep, and the cabinets are 13" deep making the bed area 60" wide, just like a real queen bed, and we never have to remove our bedding when we drop the top.  
 
front wall drawers open

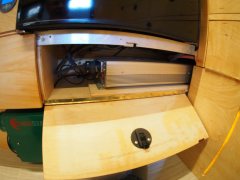
This is the battery cabinet.  Two 100AH BattleBorn LiFePo4 100AH batteries.  Why two?  My previous Hawk build had awesome Rolls/Surette 275AH 6V batteries, so surely just one BBorn would replace that?  Yup, but the 1800W Induction cooktop we wanted to try out draws 1800w/12.5V = 144Amps.  Each BBorn can only output 100A.  So I needed two in parallel to give me the juice to run the cooktop.

 
Also in that space are the shunt for the Victron BMV 712, a 250A fuse for the inverter feed, and the Renogy 40A DC-DC charger that feed the batteries when we are driving.  Not in there is the Victron 100/30 MPPT.  It lives a different cabinet, shown later.  The 1 AWG cables feeding the inverter are only 36" long, so voltage drop will be very minimal.  The batteries are also linked via the same 1G wire.  The camper to truck wires are 4 AWG, plenty beefy for 40A.  I may still do the "rando" solution to also incorporating my Blue Sea 7622 ACR with some 80A relays I already have on hand.  
 
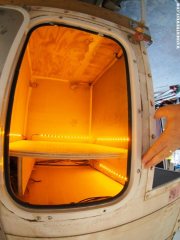
Under the batteries is a custom made 30 gallon water tank, with a router cut 1/2"  "sight gauge" that is lit up with thin strip lighting so it is easy to see the water level.  Covers for the turnbuckles doors are still to come.  I've got a novel solution in mind for those!
 
Green box on the left is the Propex 2800 heater.  


Edited by Vic Harder, 26 March 2020 - 04:42 AM.

  • 1

#53 lmwilco1

lmwilco1

    Advanced Member

  • Members
  • PipPipPip
  • 93 posts
  • LocationTempe Arizona

Posted 26 March 2020 - 03:33 AM

Really nice job!


  • 0

#54 rando

rando

    Senior Member

  • Members
  • 1,638 posts
  • LocationColorado

Posted 26 March 2020 - 03:41 AM

Spectacular work!


  • 0

2016 Fleet Flatbed

2016 Toyota Tacoma


#55 Vic Harder

Vic Harder

    Doctor Electric

  • Site Team
  • 4,962 posts
  • LocationCalgary, Alberta

Posted 26 March 2020 - 04:40 AM

Really nice job!

Thanks... I'm still editing this post... takes time!


  • 0

#56 Vic Harder

Vic Harder

    Doctor Electric

  • Site Team
  • 4,962 posts
  • LocationCalgary, Alberta

Posted 26 March 2020 - 04:41 AM

Spectacular work!

Thanks rando!  


  • 0

#57 Vic Harder

Vic Harder

    Doctor Electric

  • Site Team
  • 4,962 posts
  • LocationCalgary, Alberta

Posted 26 March 2020 - 05:49 AM

Inverter shelf

This is the inverter cabinet, tucked under the 130L Truckfridge.  The aluminum bar supports the fridge.  The AIMS 3000w pure sine wave inverter is huge.  3-4 x the size of my previous 1000w Renogy unit.  It has two GFCI outlets on the back, that are wired using outdoor rated 3/10 gauge cable to one plug inside by the countertop, and one outside by the water inlet so I can cook outside too.  Half of the inverter (it is 24" long) is tucked under the propane cabinet.  I made the wires for all these electrical bits long enough so that I can pull them out without disconnecting them if I need to do maintenance.
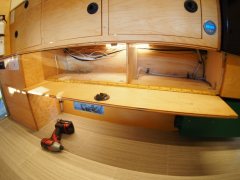
 

long under counter cabinet

At the same level as the inverter is this long space under the counter/kitchen cabinets.  You can see the water line that comes from the 30gal tank (fed by a Shurlfo pump with the addition on of a Shurflo accumulator.  I really like the way this accumulator improves the water flow.  I found that without it, when the faucet is opened just a crack, the pump would oscillate slowly and the water would "judder" out of the faucet, splashing everywhere.  With the accumulator, you can get a nice steady trickle, and the pump cycles on/off way less often.


You can also see that the water line T's off ... up to the flush mount sink, and back towards the back of the camper.  There I have a nice brass ball valve that is now pressurized!  Meaning water is easy to get when we are outside, which is where we prefer to cook.  Note that this replaces the stock drain system.  The nice things is that with the pump turned off, the "drain" valve doesn't flow any water because it is now going through the pump.  Instant water security.


And what the H*ll is with the wires in the next cabinet?  Sorry about that... they are NOW zip tied and secured ... much nicer looking!


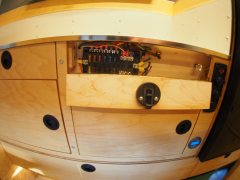
fuses

OK, so these are the fuses.  This just tucks in front of the sink.  I used the standard FWC kill switch (far right) and currently have 9 of the 12 circuits in this Blue Sea panel populated.  ALL circuits have properly run grounds, except for the lights/fan that were wired from the factory.  Both FWC and ATC are in the habit of using the aluminum frame as the ground return.  This can cause issues with corrosion, so I really don't like that method of wiring.  Home runs for +ve and -ve for this panel are 8 AWG.  Excuse the one white wire dangling across.  That is tucked away now.  That's for the in cabinet lighting I just added.  


The space between the fuse block and the switch is for a fuse/circuit list - still to come.


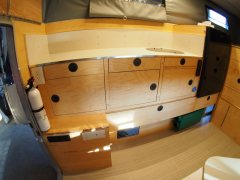
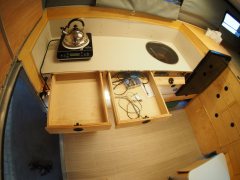
stove top drawer

This drawer (19" deep, full suspension sliders) houses our new 1800W Induction cooktop.  You can just see the outlet to the left.  We place it on the counter top for cooking.  The white thingy on top is a non-slip silicon surface to keep stuff from moving around on the super slick surface of the cooktop.


The counter top is 1/2" Maple with arborite laminated to it.  My first time doing this.  Same for the backsplash.  Edges are finished with 1/2" wide 1/8" thick satin finish aluminum bar.  The screws for the backsplash are in odd places because of where there is aluminum framing behind the maple paneling.  Again, screws are used (no glue) so everything comes apart if needed.  


Oh, and a rare earth magnet stuck to one of the screws by the fridge... for leaving love notes!


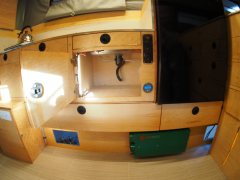
Under the open drawer you can see the white Propane detector (has its own fuse, but is also disabled by the master kill switch.  Is that best practice, or should it be impossible to disable the detector?)


Also visible under the open drawer is the 6-gang switch panel:

1) Amber LED porch lights

2) Rear LED flood lights 

3) In cabinet LED and floor lighting

4) Blank

5) Cell Booster

6) Water Pump


P3250021
This is what the kitchen/counter area looks like when everything is tucked away.  I'm still pondering some 90* elbows for the Propex heater... at least one, so that the heat output blows right at our feet when we are seated at the dinette.  On the other hand, at present the heat blows along the length of the water line that goes outside... that could be useful to prevent freeze up when winter camping.
 
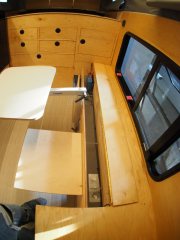
dinette deployed

Moving to the other side, is the dinette.  In this pic, the long top opening cabinet is open showing the Victron MPPT at the far end.  It has 12g wire feeding it from the 330W Canadian Solar panel on the roof.  It is a huge panel, but has been working great for us.  From the inverter, there is 8g wire going back to the batteries.


Also visible are the new style hold/down anchors.  This era of ATC/FWC used the very small anchors.  We never had an issue with them, but I saw pictures of others that had torn out.  Ours didn't do that, even when we hit enough "turbulence" to empty everything into the camper, but I feel better with these installed.  


And finally, you can see the 1/4" threaded rods that go through this cabinet and anchor into the outside wall with... whatchamacallits?  This is how the seat hinges are mounted and become strong enough to hold my 200 pounds without flexing.


Oops, I forgot to mention the little black do-hicky by the MPPT controller.  That is the inside antenna for my WeBoost Drive Reach.  The camper functions as my remote office (I am an executive/leadership coach by trade) and the cell booster enables communications in the most wonderful camping sites!


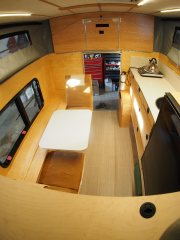
Speaking of seats, in this picture, one is deployed, and the front one stored.  The lagun table leg is a wonderful addition.  I finished the table top surface with the same arborite as the counter top.  Haven't finished the edges yet.  Open to ideas on how to do that.  We might change the size of the table top in the future, so no hurry on that.


dinette tucked away

Dinette tucked away.  LOTS of room to move around.  


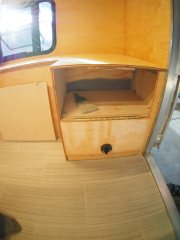
You may also note that we have room for more cabinets.  That big space at the passenger rear, as well as over the window.  That may still happen. 


The black thingy (top left) is within easy reach of the bed... the new Propex Digital Thermostat!  We are stoked about being able to set the exact temperature we want vs the old thermostat which had a fixed number of pre-set temps.  


pax rear top cabinet
This is the cabinet at the passenger rear corner.  We are thinking shoes and such.
 
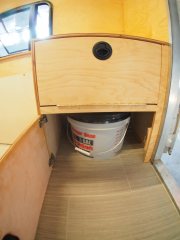
pax rear porta potti cabinet

This is directly under the cabinet pictured above.  That 3 gal pail is my porta-potti!  Lots of room in there yet for TP, hand trowel, etc.  It may get a divider yet to prevent movement.  As is, it is sized so the pail can NOT tip.  The pail also has a gamma seal lid.  No spills, no leaks, no smell!


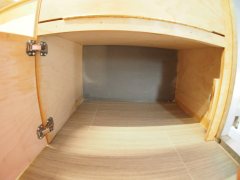
pax rear porta potti cab empty
Same cabinet, but empty.  The caulking is still visible here as white. It will cure transparent.
 
looking it, with lights on

Another view inside from the door, but angled up so you can see the lights (and the horrible condition of my roof liner!)  The strip lights are hand wave activated.  


I left one stock light by the head end of the bed.  We will have amber LED lights in there for nighttime excursions to the porta potti.


counter top cab closed

Another peak in.  Lower left, you can see the light for the in cabinet lighting is on.  And also that the water tank sight gauge is lit up.  Excuse the bright lighting on the cabinets... darn spring sunshine!


counter drawers open

The two kitchen drawers and fuse panel open.  


looking under sink
Looking into the cabinet under the sink.  You can just see some of the wiring on the fuse panel.  The LED lit gauge is the Victron BMV 712, and the vertically mounted black thingy is a Blue Sea DC panel with power switch, "cigarette lighter" and two x 2 USB ports.  One of the USB ports has been upgraded to the 4.8A amp version for fast charging on the devices that can handle that.
 
counter other cabinets
These are the other two under the counter top cabinets.  All three cabinets are the same size.
 
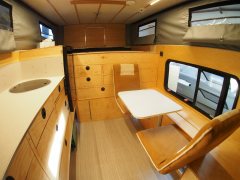
looking down from bed
Here is a view from the bed.  We chose to build out a PUMA/Grandby shell because even with the bed fully stretched out to queen size, we had the same usable floor space as a Hawk with its bed fully retracted.  
 
Also, the dinette Bonvivo II chairs have been placed in this picture.  These are super comfy, fold flat for storage and have 5 different positions for seating.  Practically speaking, they have two positions we are likely to use most often, 90* and 100*.
 
dinette w chairs

Another view of the camper with the dinette fully deployed.  Yes, I can get at the beer in the fridge from my seat!


former propane cab
former propane cab - lights

Two pics of what used to be the propane cabinet I built for version 1 of this camper.  You can see the nice ball valve at the bottom left, and the in cabinet lighting.  I went with amber here, so we can open this at night and not lose our night vision.  This will like house our Little Red Propane fire pit and our mini camp side tables in the bottom section, and our water fill/filter/drain hoses on top.  


The wood divider on the top right of the cabinet protects the wiring for the switch panel and propane detector.


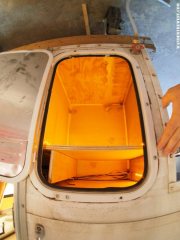
New Propane cab
The new propane cabinet at the front of the camper.  Two 10# tanks.
 
The black vent to the upper right is the 4" fridge vent, placed right where the fan is on the 130L Truckfridge.  There are two more fans servicing the fridge.  One inside to keep the air moving, and one placed on the other side of the compressor and blowing air into the camper.  Nice strong air flow over the condensor coils.


  • 1

#58 PaulT

PaulT

    Need gumbo

  • Members
  • 2,612 posts
  • LocationHillsboro, Oregon

Posted 26 March 2020 - 06:04 AM

Wow, Vic. Sure can tell you’ve done this enough times to know what you want. There are many good ideas there. It will be interesting to see how well it works for you.


Paul


  • 0
I thought getting old would take longer.

#59 Vic Harder

Vic Harder

    Doctor Electric

  • Site Team
  • 4,962 posts
  • LocationCalgary, Alberta

Posted 26 March 2020 - 06:48 AM

Wow, Vic. Sure can tell you’ve done this enough times to know what you want. There are many good ideas there. It will be interesting to see how well it works for you.


Paul

Thanks Paul.  We were planning on leaving for Utah in 2 weeks.  Looks like that idea on hold for a good long while now.


  • 0

#60 Happyjax

Happyjax

    Senior Member

  • Members
  • 1,444 posts
  • LocationMaryland

Posted 26 March 2020 - 12:20 PM

Wowza Vic! Such a neat job and great use of space. Perty too! Have fun with that fine camper, when you are allowed to....


  • 0

2018 Ford F-250. Customized Bundutec Sable :)


0 user(s) are reading this topic

0 members, 0 guests, 0 anonymous users