Jump to content


Photo

Bison Overland Flatbed Shell Build on 2010 Ram 2500 CTD


  • Please log in to reply
18 replies to this topic

#1 Totemo_Hayai

Totemo_Hayai

    Member

  • Members
  • PipPip
  • 14 posts

Posted 16 December 2020 - 05:37 AM

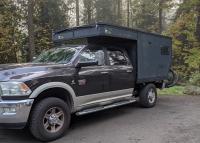
Sharing details of my Bison Overland build. We had been considering a camper purchase for about a year then COVID hit and a camper looked like the only way to carry out some previously made plans. The original idea was to purchase an FWC Hawk Shell. Build times for FWC at this point would not have allowed me to complete my trip and then Bison arrived in my Google feed. My ideal camper was always a flatbed because of the extra storage, rear dinette, side door, and increased space while keeping the length of the truck at bumper level short. I would have never bit the bullet on a $33k or so camper so the Bison was quite enticing at $20k to start. That turned out to be poor reasoning as I've way over spent my anticipated budget for the camper and the truck which is also new to me. In addition to the anticipated lower cost, what Bison could provide that FWC couldn't was a build time that allowed me to go on the trip I planned and a camper body that is less than 80" wide. It is very important to be under 80" wide so the rig can be parked on the street in front of my house which allows us to avoid storage fees and makes the rig more accessible. I also prefer to have a much larger dinette than what FWC offers in their flatbed.

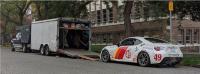
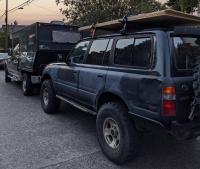
Our main uses for this truck and camper setup are skiing day lodge, racecar/go-kart hauling, and family vacations. These uses really pushed us to a truck camper because we needed 4wd and something that can tow well. It is also nice to have for soccer practice and its used for mountain biking, but we don't really hang out in it when mountain biking. The goal is to have a setup that can provide ample seating space for at least 6 adults while also having provisions for cooking and excretion.


The build includes two 100ah LiFePo batteries, 340 watts of solar, and propane for a buddy heater and a cook top. At this point I regret bothering with propane and wish I had invested in more battery instead. There is currently plenty of battery for cooking or heating the camper for 4 hours or so.
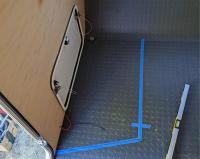
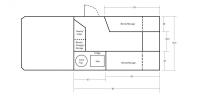
 

Floor Plan:

Floor Plan.jpg

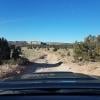
Out Mountain Biking:

Duthie Resized.jpg
Loading Up:
camper trailer racecar.jpg


  • 1

#2 Totemo_Hayai

Totemo_Hayai

    Member

  • Members
  • PipPip
  • 14 posts

Posted 16 December 2020 - 06:09 AM

Build Day 1 - Right Side Bench

Material Acquisition:

Materials.jpg

3x 1/2" Plywood and 1x 3/4" Plywood, though 2x of each would have probably been a better mix. 1/2" is used for the vertical pieces and 3/4" is used for horizontal pieces to allow for storage access cut outs. I also routed out 1/4"x1/2" of the bench tops at the edges to help the pieces keep their position.

Layout:

Right Side Bench Layout.jpg


  • 0

#3 Totemo_Hayai

Totemo_Hayai

    Member

  • Members
  • PipPip
  • 14 posts

Posted 16 December 2020 - 06:29 AM

Day 1 - Continued

Attachment:

Right Side Bench Lower Bracket.jpg

Benches are attached to the floor with 3/16"x1.5" aluminum angle. 1/8"x1.5" would probably have been sufficient and easier to work with. Benches attach to the wall with 3/16"x2" aluminum angle, this seems to be the appropriate size.

Assembly:

Right Side Bench Test Fit.jpg


  • 1

#4 Kolockum

Kolockum

    Still Wandering

  • Members
  • 622 posts
  • LocationWashington

Posted 16 December 2020 - 02:01 PM

Looks good. Subscribed!


  • 0

------------------------------------------------------------------------------------

2017 Toyota Tacoma with 2000 FWC Eagle


"The nut behind the wheel is the most important one. Don't forget to snug yourself up every once in a while." John D & ri-f


#5 longhorn1

longhorn1

    Ouch, that stings!

  • Members
  • 2,826 posts
  • LocationCarmel, Indiana

Posted 18 December 2020 - 12:35 AM

Looking Good
  • 0

http://texaslonghorns01.blogspot.com/


Ford F-250 Long bed, 2014 Grandby


#6 Totemo_Hayai

Totemo_Hayai

    Member

  • Members
  • PipPip
  • 14 posts

Posted 02 January 2021 - 07:57 AM


Looks good. Subscribed!


Looking Good


Thanks! Looking at other build threads on here there are some impressive wood working skills. My work is passable, especially considering the tools, space, and time I have. I'm working out of a 10x20 garage that is typically occupied by the racecar, making all my cuts with a 10" Harbor Freight table saw and a 6" cordless Milwaukee circular saw. The table saw is too small to fence for most cuts so it often turns into a saw horse while I cut with the circular saw. For interior cuts and other detail work I borrowed a nice Bosch router. I briefly attempted to use a jigsaw for interior cuts, but it doesn't work as well. For anyone beginning a build, I highly recommend purchasing a new finish blade for your saw before you pickup your camper. I forgot about the importance of a quality blade and have been struggling with a framing blade on the circular saw of unknown age. Also, use router bits with a 1/2" shank if you can.


Build Day 2 - Left Side Bench and Galley Area

Copying the angle from the right side bench

Dinosaur Panel Layout.jpg


Routing out a hole for the fridge, storage access, grooves for cabinet walls.

Dinosaur Panel Routing.jpg


  • 0

#7 Totemo_Hayai

Totemo_Hayai

    Member

  • Members
  • PipPip
  • 14 posts

Posted 02 January 2021 - 08:23 AM

Day 2 - Continued

Test fit of the vertical left side bench/galley panel:

Dinosaur Panel Test Fit.jpg


I call this the dinosaur panel because it slightly resembles a large animal. At this point it has a hole for a yet to arrive Dometic CRX-65 fridge, a notch on the bottom to integrate with the forward bench, an under sink storage cutout and a larger storage cutout under what will be the stove top area. This panel is quite a challenge to fit because it spans the length of the camper, includes the angle in the back and has to fit tightly on both ends. I'm very lucky to have not messed up the forward end when shaving small portions of it off with the circular saw. It is also very flimsy when uninstalled so I was quite worried the front of it would break off as I drug it in and out of the camper.


Left side bench:

Left Bench.jpg


  • 0

#8 Vic Harder

Vic Harder

    Doctor Electric

  • Site Team
  • 4,962 posts
  • LocationCalgary, Alberta

Posted 02 January 2021 - 10:00 PM

Thanks! Looking at other build threads on here there are some impressive wood working skills. My work is passable, especially considering the tools, space, and time I have. I'm working out of a 10x20 garage that is typically occupied by the racecar, making all my cuts with a 10" Harbor Freight table saw and a 6" cordless Milwaukee circular saw. The table saw is too small to fence for most cuts so it often turns into a saw horse while I cut with the circular saw. For interior cuts and other detail work I borrowed a nice Bosch router. I briefly attempted to use a jigsaw for interior cuts, but it doesn't work as well. For anyone beginning a build, I highly recommend purchasing a new finish blade for your saw before you pickup your camper. I forgot about the importance of a quality blade and have been struggling with a framing blade on the circular saw of unknown age. Also, use router bits with a 1/2" shank if you can.


Build Day 2 - Left Side Bench and Galley Area

Copying the angle from the right side bench

attachicon.gifDinosaur Panel Layout.jpg


Routing out a hole for the fridge, storage access, grooves for cabinet walls.

attachicon.gifDinosaur Panel Routing.jpg

Doh, never thought of using my router to make those holes!  That would be way cleaner than using my jigsaw.  That said, I would still have to clean up the corners to make them square.  How are you doing that?


  • 0

#9 Totemo_Hayai

Totemo_Hayai

    Member

  • Members
  • PipPip
  • 14 posts

Posted 03 January 2021 - 06:40 AM

Doh, never thought of using my router to make those holes!  That would be way cleaner than using my jigsaw.  That said, I would still have to clean up the corners to make them square.  How are you doing that?

Funny, it was the woodwork in your build I was admiring last night. Nice work! I ran across your build thread while contemplating heaters. The short answer is that I'm not cleaning up the corners to make them square. I noticed that the new Scout campers have cabinets with open shelves instead of cabinets with doors and drawers. They use radiused corners, so I figured I would give it a try as an initial go. Later on I may add doors to the two storage areas. It will be a challenge to match the radius of the holes, but I think it can be achieved using the router and a template. I do like the radiused look and if anything I'd try to cut a larger radius at the corners. I think I used a 5/8" bit, but a 3/16" bit would probably leave a sharp enough corner to visually appear square enough to match a sanded edge on a drawer or cabinet door.


  • 0

#10 Vic Harder

Vic Harder

    Doctor Electric

  • Site Team
  • 4,962 posts
  • LocationCalgary, Alberta

Posted 03 January 2021 - 10:04 PM

You mentioned heaters. FYI, I am in the process of changing my heater setup to draw the re-circulated "cold air" from outside of the camper instead of inside, so as to made for drier camping.  Something to keep in mind as a "possible" to do with Propex or Diesel heaters.


  • 0


0 user(s) are reading this topic

0 members, 0 guests, 0 anonymous users