Jump to content


Photo

Discovering my first camper


  • Please log in to reply
5 replies to this topic

#1 Dr.Science

Dr.Science

    Advanced Member

  • Members
  • PipPipPip
  • 44 posts

Posted 29 April 2021 - 03:19 AM

I recently acquired not only my first Alaskan, but my first truck camper, and it's been quite an education, sort of a case of drinking from a fire hose. I thought I should catalog the experience for the benefit of other newbies and to give the greybeards a chance to correct my misteaks.


BC (Before camper)


I've been sleeping out in the bush for over 60 years, so there's not much I don't know about camping. However, as the years wear on the body wears out, so in 2015 I bought a Chevy Astro and outfitted it with a bed for the wife and I, and for 5 years we camped quite happily in the Chevy, logging travels for maybe 2 months of the year. In 2020 my wife Bonnie started to express displeasure with the level of comfort the Astro provides, and we decided that we needed a home where we could stand up, sit at a table, cook indoors, be warm on icy winter mornings, and generally enjoy a few well-deserved comforts. However we also wanted to retain our ability to travel rough and rocky roads to empty lands in places like Utah and Yukon, Nayarit and Nevada, and hang out there for as long as we care. So that left us with a 4WD vehicle, high clearance, probably a truck camper, and a low C of G so we could keep the rubber on the bottom. That meant a pop-up camper, and a little further review led me to Alaskan, partly because it's a very well designed and built machine, but also because I love old stuff and good woodworking and things that hold their value for good reasons. But first I needed a truck. COVID had hit a few months earlier and trucks, as well as Alaskans, were suddenly both scarce and expensive. So it took quite a bit of searching, but in March 2021 I acquired a 2013 Silverado 2500 with only 62K miles and in great shape, so then I detailed the Astro and sold it for a great price. When I got home from the Astro sale with $8K burning in my pocket, I opened up Craigslist and hallelujah, there was an 8-ft cabover Alaskan (May 1991 build), for sale 5 miles from my house, just posted. Even more oddly it was being sold by a guy I didn't know, but who's planning a clearcut behind my house. Coincidences! I was there in under an hour and after confirming that the wood was sound and the hydraulics worked reasonably well, and otherwise it was a pretty good buy, closed on it. Picked it up that evening.


At this point in the process I had learned these new things:

  • Who makes pop-up campers and their relative merits, issues and costs. For instance, did you know that though Alaskans are "heavy" compared to softside pop-ups, the weight penalty is only a little over 10% for campers of equivalent cabin volume? Even less when compared to wood-framed (instead of aluminum-framed) pop-ups. Also, Alaskans hold their value better than other pop-ups, and a well cared for Alaskan will often sell for more than its original list price (if you don't correct for inflation). I think I paid about 65% of list for my 1991.
  • Basic history and construction of Alaskans, what to watch out for, what's not too much of a worry to deal with, and the concept that for Alaskans (unlike pretty much any other camper) a 30-year-old camper is not, in fact, especially old, particularly if it's been well cared for.
  • GVWR, fore-aft weight allocation to axles, center of gravity, weights of empty campers, weights of campers loaded with water, food, gear, people, dogs etc., what this means for suspensions, what this means for the kind of truck you need to haul this gear in safety, power and comfort. A 1500 lb dry weight camper can easily exceed 3000 lb payload weight after all personnel and gear are accounted for, and unless the vehicle is designed to readily handle such loads, substantial suspension modifications can be needed, esp. for serious high-clearance 4WD performance.
  • Diesel vs. gas trucks: despite the substantially better MPGs, diesel saves no money after initial costs and maintenance costs are considered. Diesels are very heavy and this can substantially eat into your payload allowance. Diesels are best for long-haul service, with continuous use and fairly constant loads, such as pulling a heavy trailer down the Interstate; stop-and-go driving, highly variable power loads, and frequent stops that involve engine off, all favor gasoline engines. When traveling, I stop all over the place, often covering 100 miles or less before finding a place to stop for the day, so my use scenario is gasoline.
  • Basics of what services the camper provides and how it does so: electrical, propane and water systems and how they interact to service appliances in various settings, i.e. boondocks, shore power and water, trailer on or off truck, solar power available or not.
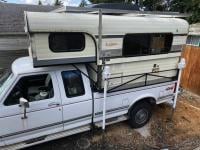
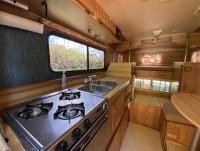
  • Photos show the Alaskan as it came to me

Alaskan photo.jpg

AK1.jpeg


That'll do for now.


  • 0

#2 popRoid

popRoid

    Advanced Member

  • Members
  • PipPipPip
  • 64 posts
  • LocationSouth Carolina

Posted 29 April 2021 - 02:07 PM

Dr. Science:


Very nice synopsis.  I enjoyed every word.


Long live the Alaskan.


Lloyd Anderson


  • 0

2018 10' Alaskan Cabover/2017 Ford  F350 Dually Diesel


#3 Beach

Beach

    Senior Member

  • Members
  • 866 posts

Posted 29 April 2021 - 02:18 PM

Camper looks to be in nice condition, enjoy the new found room and comforts. Happy wife, happy life.


  • 0

#4 Dr.Science

Dr.Science

    Advanced Member

  • Members
  • PipPipPip
  • 44 posts

Posted 30 April 2021 - 12:11 AM

Looking Over The Camper


Once I had the new camper home, I took a good long look at it, combined that with what I'd figured out from reading about campers in general, and put together a "to do" list:


  • Install tie-downs. The PO had bought a Happijac tie-down kit but never got past doing the rear tie-downs, and his kit was for a 1990's Ford, so I'll have to figure out what I need to adapt the remains of his kit and then source the parts. Actually I wasn't certain that tie-downs were really necessary, so I drove a little fast over a parking lot speed bump. Sure enough, the camper hopped in the air a couple of inches and slammed back down. OK, so I want some serious tie-downs, because when that camper is full of gear water and food it will be plenty heavy.
  • Remove the jacks and minimize the bric-a-brac. The camper came with nice jacks but HEAVY and they stick way out to the sides and, besides some giant mounting plates (a PO was a welder), has heavy wrought-iron panels connecting the jack plates. There are also some big pieces of loose aluminum tubing that can supposedly be used, along with a blue tarp, to fabricate a canopy. I'll let that idea go. Getting rid of this junk will save about 300 pounds and reduce the rig's width by about 6 inches. Inspection shows that removing or replacing the jacks only requires 12 easy-access bolts, so it's a 15 minute job.
  • Fix the jack wiring harness, or toss it and get a new one, and use camper power to run the jacks. The old harness is VERY old, looks like it spent a couple of decades in the rain and sun, and was patched many times with electrical tape.
  • The plumbing leaks. Leaks badly in one or two places, seems tight elsewhere. So I learn about the joys of working with 3/8" PEX pipe. More about that later.
  • The water heater seems to have been installed by someone who knows little about tools and less about fire hazards. Have to remove and reinstall properly.
  • Need to get a 7-pin cable extension cable and install the jack in the side wall near the front of the truck bed.
  • Need to get a battery box and fasten it securely in place (currently the battery is unboxed and poorly anchored)
  • Nood to sort out the wiring - what is everything and how is it connected? How do I charge the onboard battery? How do I use the suitcase solar panel kit that came with the camper? How are running lights wired, versus camper power? Where are things fused? How are things controlled? Just lots of questions. Would like to create a camper wiring diagram, then test everything for continuity and function.
  • Rear porch light doesn't work. What gives?
  • Does all the propane stuff work? Are the propane tank and lines in good shape? Tank looks questionable. I have a couple of 5-gal tanks in much better condition.
  • How does the refrigerator work? For that matter, does it work?
  • Ditto stove and oven
  • PO fabricated some angle iron braces to keep the cabover from sagging, but they seem overbuilt and interfere with the rear doors on the truck. Need to modify so that doors are usable. Also PO removed travel lock so there is none. This must be corrected.
  • Apply a nonskid floor material to the tailgate, which is now a sort of back porch.
  • Scrub and touchup-paint camper shell
  • It came with a rocket box that is ugly, beat, catches the wind, and is unnecessary. Remove it and sell it.
  • Doors have no keys. Get some.
  • Hydraulic system: rear jacks work great, front ones raise/lower slowly and right side one doesn't hold much pressure at all. Need to troubleshoot and correct.
  • Window coverings look more like something from the 50's than the 90's. They are roller shades that fall off on bumpy roads. I have a notion for a 4-pin insulated/reflective system, more about that later.
  • Pirelli / weatherstripping renewal on shell, is mostly pretty good. But on the rear it seems old and worn. And, the cabover doors are loose and drafty. Somebody put on some velcro straps to address that, which is lame ugly and ineffective.
  • Interior woodworking: The 1991 is not up to the quality of the current-generation Alaskans. There are lots of things that would benefit from some work, but it's not a pressing problem.

With this info in hand, I started doing a lot of reading, and found some great websites. More about that later.


My first concern, though, was that the camper doesn't touch the truck bed. The clearance is 2.25 inches. This is sort of a good thing because I wanted an insulated floor anyway. I head down to the local hardware store and pick up 3 Doug fir 2-by-4's, a sheet of 2" expanded polystyrene (XPS) insulation, some satin black exterior paint, and a box of 3" deck screws. With these I fabricate a wooden frame that runs around the footprint of the camper. I paint the frame, two coats. I then cut the XPS with a circular saw, which is messy but works great, and pin it into the frame with finishing nails and construction adhesive. When that dries, I screw the whole thing to the floor of the camper and put on another coat of paint, also painting the wooden sides of the camper because they need it. In the process I also find a little dry rot in one part of the camper floor, but very local and limited so I'm not going to try to fix it now. I then reinstall the camper in the truck bed, finding it a very snug fit, no play whatever either vertical, port-starboard or fore-aft. Then I remove the jacks.


  • 0

#5 Dr.Science

Dr.Science

    Advanced Member

  • Members
  • PipPipPip
  • 44 posts

Posted 02 May 2021 - 02:50 PM

First trip, a shakedown cruise. Small highways to the Yacolt Forest, camp at Sunset Falls, logging roads over the pass to the Columbia River gorge, then up some very marginal 4WD roads to a nice campsite at the eastern edge of Mt Hood NF, try to cross the forest on snowy roads, back off, and freeway home. No new issues appeared, everything worked as needed except as noted on the "to do" list. Photo of home at Sunset Falls.

https://scontent-sea...922&oe=60B4A319


Edited by Dr.Science, 02 May 2021 - 02:50 PM.

  • 0

#6 Dr.Science

Dr.Science

    Advanced Member

  • Members
  • PipPipPip
  • 44 posts

Posted 02 May 2021 - 03:35 PM

Tie-downs and 7-pin plug


Shakedown trip established that tie-downs are important, and that it would be necessary to tie in to the truck's electrical system in order to light my running lights and charge my battery.


When I bought the camper it came with the tie-down kit for a Ford truck. After studying the Happijac website, it was pretty clear that all I needed to fit it to the Silverado was a different set of front tie-down plates, a long stabilizer bar, and a different rear bracket set. I contacted Happijac about this and was informed that I had the wrong kit and they would sell me the right kit for $450. Seeing that I was not going to get any customer support from Happijac, unless I wanted to buy a pair of tie-down plates for $450, I spent yesterday sorting things out.


Mostly this involved a lot of careful measurements too see where things had to be bolted and to ensure there was something beefy to bolt them to. The Silverado has a number of small drain holes at the front of the bed and these turned out to be the best reference points to transfer measurements between the inside and outside of the bed. The front tie-down plates were not as long as I would have liked and needed a more emphatic bend in them, but I cushioned the places where they touch the truck's bed with sections of an old motorcycle inner tube. I'll check that after a couple more weekend trips and if the inner tubes start to wear out, I could also extract the plates, bend them a bit more with the help of an oxyacetylene torch, retemper, repaint and then they'll be the right shape. Or maybe I'll get lucky and find a pair of suitable plates on eBay. Apart from that, the install was quite easy. A few 3/8" holes in the front bed connect the Happijack frame and stabilizer bar in the bed to the tie-down plates on the front of the bed, and then two holes down through a stiffening member in the truck bed connect the assembly to a structurally sound part of the bed. Turnbuckles then connect the tie-down plates to the jack plates on the camper. Happijac is not, contrary to what they advertise, a frame-mounted tie-down; it's mounted to the bed, and is tied to it almost as securely as the bed is tied to the truck's frame. The photos do not show the rear tie-downs because I haven't yet received the kit to install them, but it seems to be pretty simple compared to the front install, and can be done with the camper in the bed.


Photos:

The Happijac kit: https://scontent-sea...083&oe=60B4A155

The kit installed: https://scontent-sea...90e&oe=60B2DEF0

Kit detail, also 7-pin jack: https://scontent-sea...16c&oe=60B5860F

Turnbuckle installed: https://scontent-sea...1c2&oe=60B2F68F


The other thing I did was install a 7-pin extension. This is a fancy ($100) extension cord that plugs into the back of your existing 7-pin trailer jack and allows you to add a second jack in the truck bed. I put it near the front of the bed where I can reach it from inside the camper, through an access hatch in the electrical bay, which in my case is at the left front corner. This was a very easy job that requires unplugging the existing jack, plugging in the extension, and then routing the extension cord forward (for the most part parallel to the existing main electrical harness). A 2.125" diameter hole has to be drilled in the bed, and the jack is then secured with 4 self-tapping screws. There are several types of 7-pin jacks and naturally the one in my camper is incompatible with the new outlet, so I also picked up a new jack plug and will use the switched power, taillight (running light), and ground leads from the truck, leaving the other leads unused.


7-pin extension cord: https://scontent-sea...77d&oe=60B50C01


  • 0


0 user(s) are reading this topic

0 members, 0 guests, 0 anonymous users