Jump to content


Photo
- - - - -

Prepping a F250 and Hawk Camper for a Year on the Road


  • Please log in to reply
31 replies to this topic

#1 Jkron

Jkron

    Advanced Member

  • Members
  • PipPipPip
  • 30 posts
  • LocationCO/NH/NY

Posted 07 December 2021 - 07:07 PM

Hello All, 


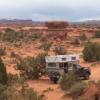
My name is John, and my wife and I have made the decision to take some time and wandering around the US for a year or so. We will be moving into our 2020 F250 and 2021 Hawk Woolrich UTE for a year, once our lease is up. So in the meantime, we will be making some modifications to the truck and camper to hopefully make life on the road a little easier and more comfortable. 


This thread will document our upgrades, and other modifications to both the truck and the camper. 


This is 3rd FWC, and second flatbed. I previously had a 2018 Hawk FD on a Tundra, then upgraded to the F250 with a 2020 Hawk UTE, then this past summer moved into a Hawk Woolrich Flatbed. 


After purchasing a Stewart & Stevenson M1079 with the plan of building it out for long term travel, we had some discussions about the overall practicality of using such a large vehicle, and the cost to build it. Being concerned with the limitations of accessibility due to its sheer size, we decided to back burner that project, and use our FWC.


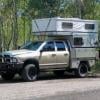
Here is how the truck sits now:

http://20210904-160117.jpg


The specs on the truck are as follows:

2020 F250 STX

6.2l V8, 4.30 Axle Gears, Skid Plates, Locking Rear Diff

285/75/18 Yokohama XAT Tires (35x11x18)

Tremor Front Bumper

Baja Designs LP6s


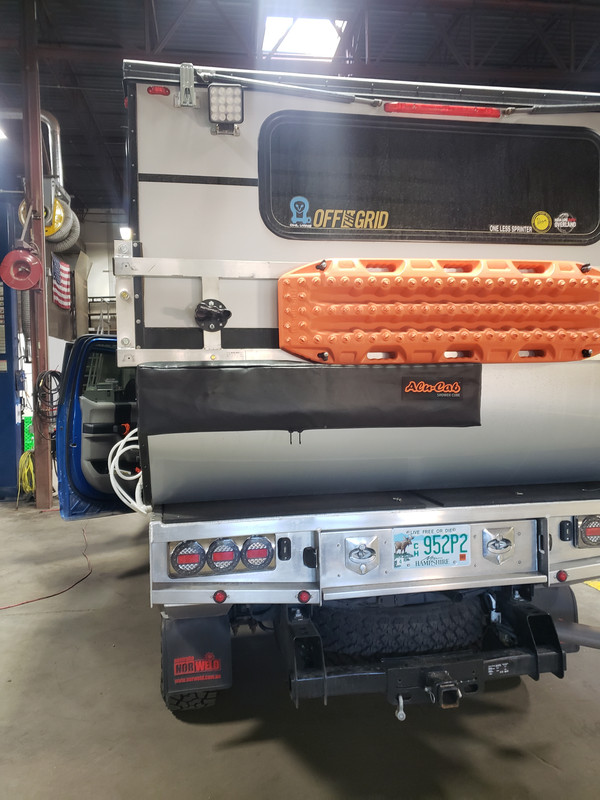
2021 Woolrich Hawk UTE

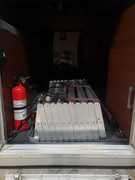
Battleborn Lithium Batteries, Redarc Manager 30, Inside Shower, 160w Overland Solar Roof Mounted Panel, 130w Overland Solar Portable panel, and all Woolrich options.


Looking forward to hitting the road, and gathering the wealth of info that is on this forum.


  • 1

#2 Jkron

Jkron

    Advanced Member

  • Members
  • PipPipPip
  • 30 posts
  • LocationCO/NH/NY

Posted 08 December 2021 - 12:53 AM

After getting tired of dealing with those collapsible outdoor shower enclosures, I decided to upgrade to an AluCab Shower Cube. I did not want to mount to the side, as I wanted to keep the profile as slim as possible so I do not get it snagged on tree branches and other obstacles. And with the shower port on the flatbed models being close to the rear corner, it made sense to mount it to the rear of the camper. 


I made some simple brackets from some 1/4" aluminum, and bolted it to the rear aluminum rack. I moved the rotopax mounts to clear the shower cube. 


I do want the shower cube to be a little higher, so I am having a bracket made to move the maxtrax lower and at an angle, and moving the shower cube up a bit. 


20211204-151234.jpg


  • 0

#3 FAW3

FAW3

    Advanced Member

  • Members
  • PipPipPip
  • 42 posts
  • LocationNorthern Virginia

Posted 10 December 2021 - 09:42 PM

Great rig…enjoy your adventure!


  • 0

Frank W.


Ram3500 & FWC Hawk


#4 Dirtroadsavant

Dirtroadsavant

    Advanced Member

  • Members
  • PipPipPip
  • 48 posts
  • LocationSoutheast Ohio

Posted 11 December 2021 - 11:33 PM

Good times ahead. I have a nearly identical rig.  If you are carrying scissors stairs, I built a frame to hold them in front of the spare when we’re driving.  The frame  also serves as a step to do the back latches.  we also have clips modified so the stair latches into the rail on the tray. If interested, let me know and I’ll share some pictures

John


Edited by Dirtroadsavant, 11 December 2021 - 11:36 PM.

  • 0
Flatbed Hawk on a Norweld Tray on an F350 Supercab Gas. All 2017.

#5 Jkron

Jkron

    Advanced Member

  • Members
  • PipPipPip
  • 30 posts
  • LocationCO/NH/NY

Posted 12 December 2021 - 12:03 AM

Today's project was to add a second fridge to increase capacity, add some redundancy, and just make accessing adult beverages easier at camp. I had this Dometic CFX 35 for several years, and has been through the ringer in several vehicles over the years, and keeps ticking. Its the perfect size to fit in the 40% side of the rear seat.  


In order to make room for the fridge, I had to relocate by scissor steps, since i stored them in the backseat area. I moved them into the camper, and so they don't play pinball with the cabinets, I installed some single L Track mounts in the camper, and secured them using rachet straps. They have held up on some rough terrain without coming loose, so they will live there until i can find a better solution.


20211211-163532.jpg


I had planned on removing the rear seat completely, and I was a little annoyed to find that there are occupancy sensors in the rear seats, so when it was removed it triggered an airbag light on the dash. So I re-installed the seat, cleared the code, and came up with a new plan. I made a simple platform out of some 3/4" ply, and some 2x4s. It is bolted in the rear to the seat frame, since there were holes already in it. I added some L-Track to secure the fridge. The passenger seat can slide almost all the way back, so still plenty of legroom in the front seat.


20211211-150718.jpg


Next came how to power it. I contemplated running the power from the trucks battery, but was concerned with draining it down and causing a no start condition. So I decided to wire to the camper, since the solar will keep the camper batteries topped off. 


I drilled down into the propane compartment from the battery compartment, ran the wiring down the side of the propane compartment, and then drilled a hole through the bottom of the propane compartment, the camper, and the flatbed. Luckily there was already in a grommet in the floor of the cab, right where I needed to come up. I secured all the wiring, and sealed all the penetrations with Sikaflex 221, and mounted the Dometic hardwire kit under the platform. The platform is tall enough so i can kit one of my Zarges cases under there if I decide to, or store my Cook Partner stove under there. 


20211211-120806.jpg


20211211-120755.jpg

20211211-150709.jpg


I will be adding a third 100ah Battle Born battery in the camper since there is room for one, which will help give some extra capacity for the additional fridge. 


  • 0

#6 Jkron

Jkron

    Advanced Member

  • Members
  • PipPipPip
  • 30 posts
  • LocationCO/NH/NY

Posted 12 December 2021 - 12:06 AM

Good times ahead. I have a nearly identical rig.  If you are carrying scissors stairs, I built a frame to hold them in front of the spare when we’re driving.  The frame  also serves as a step to do the back latches.  we also have clips modified so the stair latches into the rail on the tray. If interested, let me know and I’ll share some pictures

John


I would be interested in seeing the frame you built. I have the Brophy steps, so I have the track for them mounted to the side of the flatbed already. I love having the stairs, but they are beyond awkward to store. I keep moving them trying to find a better spot to store them. 


  • 0

#7 Dirtroadsavant

Dirtroadsavant

    Advanced Member

  • Members
  • PipPipPip
  • 48 posts
  • LocationSoutheast Ohio

Posted 13 December 2021 - 02:13 PM

Rear view stairs caddy on Ford Flatbed

here’s the basic idea.  As I master posting pictures, I’ll do a more detailed report.
the hooks below the boards may be the greatest campsite innovation yet.

Edited by Dirtroadsavant, 13 December 2021 - 02:16 PM.

  • 0
Flatbed Hawk on a Norweld Tray on an F350 Supercab Gas. All 2017.

#8 Jkron

Jkron

    Advanced Member

  • Members
  • PipPipPip
  • 30 posts
  • LocationCO/NH/NY

Posted 13 December 2021 - 04:10 PM

Thanks for the pics, that looks like a good solution for the steps!  I like the idea of the hooks as well, would be especially handy for hanging items to dry. 


The next item I want to tackle, is a gray water storage solution. Currently I just use a small Aquatainer, that I installed a hose thread connector on. This works pretty decent, but requires setting up the hose and container each time, and some places seem to get cagey about not having something hard mounted for gray water. Not to mention when the container is full, I need to transport a container filled with gray water either in the camper or in the truck, and always makes me nervous that 


So my idea, is to mount some unistrut front to back under the flatbed attached to the flatbed rails that run front to back. Then mount 3 - 4"x48" long PVC pipes with caps left to right as "tanks".  This should be approx. 7 gallons of gray water capacity. They will be mounted and connected together, with each one slightly lower than the other to promote draining. I will also need to figure out a way to have a vent, so the air that is displaced can escape. I will then make the driver side 1/4"-1/2" lower, and have a valve with a hose connection on it, so I can then drain to an appropriate facility when required.  


I am thinking of putting a tee in the line under the sink, so it will not require me to connect the hose on the exterior, and drilling through the bottom of the camper and flatbed to connect to the tanks underneath. But I am on the fence about drilling another set of somewhat large holes in the camper. 


Anybody have any other ideas before I give this a shot?  


  • 0

#9 Wandering Sagebrush

Wandering Sagebrush

    Free Range Human

  • Site Team
  • 10,584 posts
  • LocationNortheast Oregon

Posted 13 December 2021 - 04:29 PM

<snip>


Anybody have any other ideas before I give this a shot?  

I am always hesitant to bore through holes in my campers, and I’ve never camped anywhere an external gray water tank is prohibited.   If it were me, I’d keep using the Aquatainer.


  • 1

I am haunted by waters


#10 Jkron

Jkron

    Advanced Member

  • Members
  • PipPipPip
  • 30 posts
  • LocationCO/NH/NY

Posted 13 December 2021 - 10:42 PM

I am always hesitant to bore through holes in my campers, and I’ve never camped anywhere an external gray water tank is prohibited.   If it were me, I’d keep using the Aquatainer.


Yea, not exactly thrilled with drilling more holes than needed. Unfortunately some places do require a gray water tank, that is mounted. I may just mount a tank underneath, and have it still drain via the exterior hose and just connect the hose to the tank each time. I've found sometimes I just want to use the sink quick to either brush my teeth, or rinse something, and not have the hassle of setting up the hose and container. But its typically only when I'm in a place for a short night, or somewhere more urban. 


  • 1


0 user(s) are reading this topic

0 members, 0 guests, 0 anonymous users