Jump to content


Photo
- - - - -

solar panel mount on yakima racks


  • Please log in to reply
17 replies to this topic

#11 camelracer

camelracer

    Senior Member

  • Members
  • 960 posts
  • LocationGoleta, Ca

Posted 02 July 2013 - 05:58 AM

Thought I would post an update, since I picked up two 100W panels from Grape Solar through Costco. Also installed a trimetric 2025 battery meter with Steelhead's help, but that's another topic.


I went with Zoie's idea and secured the panel directly to the factory installed Yakima tracks. To do this I bolted  two 1.5" x 1.5" x 1/8" x 60" angle pieces of aluminum to a panel (Can't be angle iron if it's aluminum, can it?).  Then I drilled through each end of the angle aluminum pieces  and secured to the Yakima tracks using the steel plate that fits in the track channel and the matching set screw with plastic lock ring. FWC puts some of the plates in the channel in their install. The screws and plates are intended to secure Yakima rack towers using their "Landing Pad 1", several of which I happened to have on hand. Pretty sure you can buy just the screws and plates from Yakima.  I had to shim the screws a bit with washers so they wouldn't bottom out in the track.  


It seems very secure, but I will definitely be checking the screws and bolts often on the next trip. The bolt heads securing the aluminum angle to the panel are only about 1/2 inch above the camper roof, so may need to cover them with something soft in case there is flex when driving on wash board roads, etc. Wouldn't want the bolt heads to hammer the camper roof.  The set up seems rigid enough, but definitely can't be sure at this point.


I'm going to mount the other panel under the camper cab-over. Lucky for me, there are some good threads on that topic. This is such a great forum..


Here are some photos of my install..


Williak

Williak,


Like you I mounted my panel to the Yakima rails. I had read that panel heat was a problem and air circulation under the panel was needed. I ended up putting 1 inch aluminum spacers between the angle and the rails to lift the panel off the roof. 


  • 1
2002 Fiat 2500 CTD 4x4, FWC Grandby 1951 Willys CJ3A

#12 williak

williak

    Advanced Member

  • Members
  • PipPipPip
  • 35 posts
  • LocationUtah, Inc.

Posted 03 July 2013 - 01:46 PM

Nice idea with the spacers on the YAK tracks below the aluminum bracket Camelracer.  What did you use for the spacers? -cut the aluminum down from another piece, or did you find something stock?


I've got a flat 1/8" x 1 1/2" piece that I could cut into 1" sections or so and stack. Think I'll only go up 1/2"-3/4" up from the tracks as I want to  use the little plastic 1/4" lock washer that came with The Yakima screws, at least they came with the YAK Landing Pads. That should be enough to provide clearance between bolt heads and the aluminum angle bracket. I may attach a strip of 3/8" weather strip along the brackets, covering the bolt heads, just to be safe.


Williak


  • 0

#13 ckent323

ckent323

    Senior Member

  • Members
  • 1,227 posts
  • LocationSolvang, CA

Posted 03 July 2013 - 03:41 PM

Williak,
 
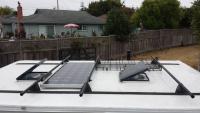
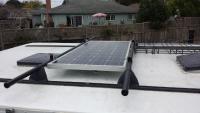
Thanks for posting the info on mounting your Solar panel. I also bought two of the Grape Solar units from Costco. We have 10' tracks on the Keystone and what you have done is very close to what I was planning to do.
 
I got latched up trying to devise a pivoting mount (described earlier in the post) and have mostly decided to just hard mount flat due to reliability concerns about a pivoting mount. I like your use of the Aluminum "L" material to keep the top of the panel below the bottom of the Yakima towers so we can still carry our Kayaks (or other items).
 
I also planned to mount the second solar panel in a slide out tray on the bottom of the cabover bed compartment. I look forward to seeing those details since I have not yet come up with a mount design there. Also I am still trying to decide on an MPT controller.
 
I do not know what diameter fasteners you used but you want to be sure they are large enough to handle the dynamic loads (particularly in high winds and during any off pavement travel). You also want to be sure the thickness of the Aluminum "L" allows for adequate thread engagement.
 
The following is based on assumption that nuts are not used and that the fasteners are threaded in to the Aluminum "L" material to minimize chance of nuts backng off the fasteners as well as fastener end (and nut) impacting the roof on bumpy roads.
 
Comment on fasteners I found on the web:
 
"As a general rule, a bolt should engage a distance greater than or equal to its outer diameter. The number of threads engaged can then be calculated from the number of threads per inch on the bolt. So if you are using a 1/4-20 bolt, meaning it has 1/4" diameter and 20 threads per inch, you should engage the bolt 1/4" into the hole, or 5 threads. (20 threads/inch x 1/4 inches). Alternatively a #10 fastener has 24 threads per inch and you would need about 3/16" thread engagement.

Why: The shear stress on the threads will be equal to the tensile stress in the shank of the bolt. This means that once you thread the bolt in a distance greater than its diameter, the shank itself will fail before the threads shear off the bolt under tensile load.

Sources: Design of Machinery class at Purdue University, page 10 of the following MIT article: http://web.mit.edu/2.75/resources/FUNdaMENTALs%20Book%20pdf/FUNdaMENTALs%20Topic%206.PDF"
 
I work in Aerospace (Optical Systems Engineer for Spaceborne Weather Sensors) and I checked with a Mechanical Engineer colleague. He confirmed the rule of thumb of engaging the fastener into material at least as thick as the fastener outer diameter. He said that 1/4-20 fasteners are far stronger than needed but since the operational environment will have unknown dynamic loads he advised sticking with #10 or 1/4" fasteners.
 
The bottom line is that if the fasteners are threaded into the Aluminum "L" material the thickness of the Aluminum "L" probably should be at least 3/16" thick. Another consideration for making the "L" material thicker is that you want the mounting to be stiff and not flex or allow twisting. Flexing and/or twisting can result in damage to the Solar Panel as well as the camper roof (from impacts). I have not yet looked into the minimum "L" thickness relative to twisting and flexing over the span between the Yakima tracks.
 
In any event (nuts or not) all fasteners probably should be #10 or larger.  (if you are not already using lock washers or equivalent I strongly recommend adding them).
 
BTW:  A technique we use on our instruments for Space is to "stake bond" fasteners. We apply a thin line of epoxy across the head of the fasteners to keep them from backing out during the dynamic loads from launch (we almost always use internal threads and don't use nuts unless they are captured).
 
Regards,

Craig

Edited by ckent323, 03 July 2013 - 04:43 PM.

  • 0

1993 Dodge Cummins W-250 Club Cab long bed, 2007 FWC Keystone


#14 williak

williak

    Advanced Member

  • Members
  • PipPipPip
  • 35 posts
  • LocationUtah, Inc.

Posted 03 July 2013 - 11:19 PM

Well, maybe it is rocket science after all.


Really excellent information Craig, thanks for posting. I guess I always knew there were sound mechanical guidelines behind bolt size, thread count, etc. but never felt compelled to check it out. But yeah, the possibility of a 20lb object flying off the top of my camper at highway speed is pretty compelling.


To secure the panel I'm using 4 1"x 1/4" steel hex bolts, soon to be stainless, if and when I can find them. I'm coming up through the aluminum L bracket into the panel bracket and fastening with nylon lock nuts.  I'm willing to give my Ace Hardware fastening method a shot, and have a perfect stretch of road in mind to test things out -  exquisite washboard. You know, the kind where you either have to go 50 mph or 5. Between stops to check the fasteners, and turnbuckles BTW, I can look for the drain hose that bounced out of my rig last time I was down there.


I think I will go with 1/4" aluminum L brackets though. That's an easy replacement: $15.94/ 5' length on onlinemetals.com

Much flex at all with the brackets could do some serious tattoo work on the camper roof, padding or not. Had not considered the possibility of damage to the panel.


williak


  • 0

#15 camelracer

camelracer

    Senior Member

  • Members
  • 960 posts
  • LocationGoleta, Ca

Posted 04 July 2013 - 06:00 AM

Nice idea with the spacers on the YAK tracks below the aluminum bracket Camelracer.  What did you use for the spacers? -cut the aluminum down from another piece, or did you find something stock?


I've got a flat 1/8" x 1 1/2" piece that I could cut into 1" sections or so and stack. Think I'll only go up 1/2"-3/4" up from the tracks as I want to  use the little plastic 1/4" lock washer that came with The Yakima screws, at least they came with the YAK Landing Pads. That should be enough to provide clearance between bolt heads and the aluminum angle bracket. I may attach a strip of 3/8" weather strip along the brackets, covering the bolt heads, just to be safe.


Williak

Williak,


You could just use square aluminum tubing from your local hardware store.


  • 0
2002 Fiat 2500 CTD 4x4, FWC Grandby 1951 Willys CJ3A

#16 Kispiox

Kispiox

    Senior Member

  • Members
  • 204 posts
  • LocationPacific North West

Posted 16 July 2013 - 01:29 PM

This is some great information! I just ordered a Hawk with one factory panel, but not delivered yet. I also ordered the Yakima 10 foot tracks thinking that could use them for a second panel. I know solar panels are way more efficient (greater output) if they ventilate from underneath to stay as cool as possible. Thanks again!
  • 0

#17 NorCalHawk

NorCalHawk

    Senior Member

  • Members
  • 316 posts
  • LocationHumboldt County, California

Posted 17 September 2014 - 11:13 PM

Hello,

I just finished installing my solar onto my Yakima racks, thanks for your impute Leadsled9. I read that even the slightest shadow on a panel can compromise the charging capabilities of the panel. Attachment 1, shows how the bars could cast a shadow along the edge of the panel under the right conditions. So I am trying this, Attachment 2, the panel is almost flush with the bars, but the panel is mounted high, 3" above roof, cables exposed somewhat and what about wind resistance.  Don't want to drill any holes into the roof.

I would appreciate your impute.  


Attached Thumbnails

  • 177 (640x360).jpg
  • 244 (640x360).jpg

  • 0

#18 photohc

photohc

    Senior Member

  • Members
  • 267 posts
  • LocationSo. Calif.

Posted 18 September 2014 - 12:31 AM

I have my panel mounted using a system sold by AM Solar out of Oregon. I've had it mounted for over a year now and it hasn't flown off yet. The 3M VHB tape is pretty much permanent. It can be removed by using some 100% alcohol and I've done it before to change from a 100 w panel to a 150 w panel. These mounts will fit the Grape solar panels as I have. This mount also eliminates having to drill into my roof. It does require you to have a smooth roof top surface. They also sell a bracket to allow tilting the panels once stationary. Here some images.


AM Solar mount 2
AM Solar mount
Grape Solar panel


Once stuck on the roof, I then used the Dicor sealant to keep the water out. No affiliation with AM Solar but they sell all that you need to do this mount. 


Edited by photohc, 18 September 2014 - 12:34 AM.

  • 0

Ford 2018 F250 FX4,Lariat, Gasser. FWC 2013 Hawk W6QN (formerly KH6FBU)


0 user(s) are reading this topic

0 members, 0 guests, 0 anonymous users