
Apology for the two articles as I just figured out how to add this post to the first one. Maybe two is better so all that text doesn't put us all to sleep.
First "How to:" submitted June 3rd, 2012 - "2012 Eagle Shell Amateur Buildout" on page 5-6.
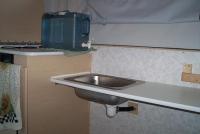
As you review the earlier one I said I was using a portable sink. Well after camping for 5 days that idea was not too practical. I researched bar sinks and most are pricey at Lowe's and Home Depot. Cheapest I found was around $80.00 without clips to install it. I'm not proficient enough with tools to have "made it work". I called Terry at Four Wheel Camper and bought the sink and misc parts from them for $ 83.00 plus freight and handling.
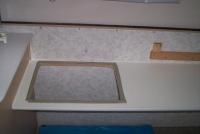
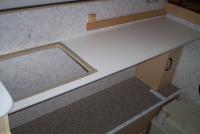
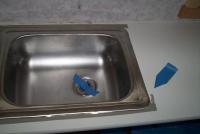
The installation is pretty easy. A pattern is included. Locate the pattern on your counter, scribe a line around the pattern, cut the hole with a portable jig saw. Included in the kit is a roll of plumbers putty. Lay the putty around the hole (pics 2290,2291). Set the sink down into the hole and tighten down the clips. Trim off the excess putty with a sharp knife (pic 2293). Sink is installed.
Drain and connection to outside:
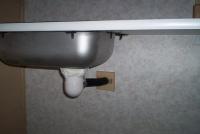
FWC includes the outside pipe and a length of 3/4" heater hose. Drill a 1-1/8" hole from inside to outside. and make a 3-4" square backing plate to bolt the plastic pipe flange to the inside of the camper as a "sandwich".
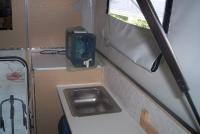
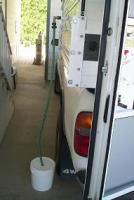
Pic 2296 shows the plastic housing and plumbers putty that is installed on the sink and the drain hose going through the wall of the camper.
WORD of CAUTION..... The drain tube is Offset about a half inch with the tube coming from the sink because I forgot to measure it before tightening the sink down.
The primary issue with drilling through the side of the shell is the location of the vertical studs. FWC uses two frames - one setup for shells and one setup for campers with the full kitchen. I was unable to obtain a diagram of stud placement and a normal stud finder didn't work....I said a prayer and guessed.... and was almost lucky just clipping the edge of the stud (If I had drilled the hole directly inline with the pipe coming out of the sink drain I would have squarely hit the stud). I expanded my hole over the the right about a half an inch then drilled through the aluminum plate and easily installed the flange increasing the size of the backing plate to 3 x 3 inches to cover the hole. Shortened the heater hose added a hose clamp and was done.
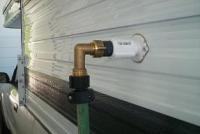
Camper World sell a 90* pipe that screws into the flange coming out of drain and to a heater hose - Cost about $4. I used a 60" piece of hose from home. For a grey water container I'm starting out with a 2 gallon paint bucket with lid (Home Depot) again about $4. Two gallon because water weighs about 8 pounds a gallon and I am limited to 25 pounds with my herniated disk. Pics 2306, 07, 09.
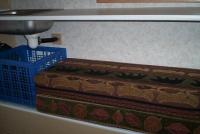
Pictures 2304 shows that I haven't lost any storage under the sink. Pict 2305 shows the sink nestled in my $15 melomine board. You will see I can still use the sink with the bed fully deployed. I tried it out and it works great.
Lastly I have been thinking about suggesting to Tom that FWC offer a shell classic version for those of us that don't want or need a built in kitchen, electric water pump, hotwater tank, and 20 gallon tanks - just cabinets, counter, and a simple couch - maybe a sink. I don't want all the extra weight and I leave mine bolted on the truck so I don't have to pay for storage. Any interest out there in a simple shell with basic creature comforts?