Jump to content


Photo
* * * * * 1 votes

Full build - Reconstructing a 1981 Grandby into a custom Hawk!


  • Please log in to reply
306 replies to this topic

#141 Living The Dream

Living The Dream

    Senior Member

  • Members
  • 464 posts
  • LocationFront Range, Colorado

Posted 31 October 2016 - 01:45 AM

Hey Poky!


I had a great weekend of TC work myself.  Look for an update soon.  But also I got the roof off so I can do the solar instal, wiring, insulation, and headliner.  I looked back at your post 89 and followed the breadcrumbs.


Is this the material you purchased for the headliner? How much excess material did you buy to accommodate cutting and tucking it all in?


http://www.upholster...HDL%2d1004.html


Thanks for such an extensive write up on the roof!  I am going to go with rigid insulation up top, ill take the extra weight for the extra r-value.


Many thanks. Tim


  • 0

My youtube channel about my Four Wheel Camper - https://www.youtube.com/c/timmorrissey

All about my camper - https://www.tgmorrissey.com/camper

Item I used in my build- http://bit.ly/TGMorrisseyParts


#142 PokyBro

PokyBro

    Senior Member

  • Members
  • 467 posts
  • LocationLas Vegas, Nevada

Posted 31 October 2016 - 02:25 AM

Takesiteasy, sorry to not respond sooner. I know you were one of the first who commented on my build, when I was into it early on, and encouraging me to keep it up. Thank you for going back and re-visiting the whole process, that's nice to let me know!


Sent from my iPad using Wander The West
  • 0

1999 F250 crew cab SRW, 7.3 Powerstroke TD

1981 Grandby shortened to a Hawk

Build thread / https://www.wanderth...by-into-a-hawk/


#143 PokyBro

PokyBro

    Senior Member

  • Members
  • 467 posts
  • LocationLas Vegas, Nevada

Posted 31 October 2016 - 02:39 AM

Hey Poky!

I had a great weekend of TC work myself. Look for an update soon. But also I got the roof off so I can do the solar instal, wiring, insulation, and headliner. I looked back at your post 89 and followed the breadcrumbs.

Is this the material you purchased for the headliner? How much excess material did you buy to accommodate cutting and tucking it all in?

http://www.upholster...HDL%2d1004.html

Thanks for such an extensive write up on the roof! I am going to go with rigid insulation up top, ill take the extra weight for the extra r-value.

Many thanks. Tim


Tim, that looks like the right stuff; marine grade, perforated vinyl. Marine grade means it has been treated to help withstand mildew. It's got a little weight to it when you pick up a roll, you'll be surprised. Nothing excessive, but it is quality material.

I just bought enough material to make sure I had enough lengthwise X 2, with a little extra to boot. You only need about 1 1/2" extra to go over the side, and to tuck inside under the aluminum sheeting on top, but it's also a good idea to have enough to be able to pull and stretch to get the wrinkles out. I had quite a bit extra material left over, I think they just threw in what was left on the roll, but only charged me for what I ordered.

You should be fine on the weight factor with rigid foam insulation for your roof. In my case, I had added quite a bit of weight with the added aluminum struts, but you have the 1 1/2" rectangular lengthwise struts, giving you a stronger roof than mine was, at least in my estimation. I don't think you'll feel that much difference. I kind of wish I had still gone with rigid foam myself, but when I was hefting my roof around in the garage, it kept feeling heavier, and heavier with each additional item. Once they're on the camper, it's not so bad, especially if with lift assist struts. Good luck, you'll really enjoy seeing that nice new ceiling when it's done.


Sent from my iPad using Wander The West
  • 0

1999 F250 crew cab SRW, 7.3 Powerstroke TD

1981 Grandby shortened to a Hawk

Build thread / https://www.wanderth...by-into-a-hawk/


#144 WyoIDI

WyoIDI

    Senior Member

  • Members
  • 101 posts
  • LocationCody, WY

Posted 02 November 2016 - 08:08 PM

WyoIDI, you're very generous with your compliments, I've just done what I could to put this together, and it's turning out pretty good. By the way, I'm up in Cody for work once a month or so, maybe we could meet up?


Sent from my iPad using Wander The West

You bet, shoot me a PM when you're up here and we could grab a beer or something


  • 0

92' Grandby, 93' f350 7.3L CCLB


#145 PokyBro

PokyBro

    Senior Member

  • Members
  • 467 posts
  • LocationLas Vegas, Nevada

Posted 03 November 2016 - 02:21 PM

I finally have a chance to catch up on the final build process that went right up to the shakedown trip, so I'll add the additional photos and comments now.

If you haven't checked out the "maiden voyage" shakedown yet on trip reports, here it is:

http://www.wanderthe...yage-shakedown/


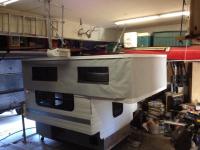
Well as you might imagine that last week or so was fast and fierce to finish up to a point of being confident the camper wouldn't leak, wouldn't fall apart, and wouldn't fall off the truck. Back on entry #125, I had tried the liner on for fit, so let's back up to there.

ImageUploadedByWander The West1478180074.324787.jpg ImageUploadedByWander The West1478180180.117869.jpg

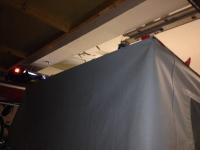
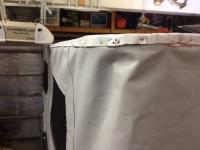
If you look at the back of the camper, the liner is very loose fitting, too loose in fact, so it had to be taken back off, and back to the sewing machine. I pulled the material as tightly as possible to the back of the camper, and folded what I could over top of itself, and determined it would be safe to remove two inches, or so, of material. To accomplish this, I undid the seam on the rear of both side panels, removing 1 inch of material from both sides, and then resewing the seams as described earlier.

With hindsight, I would say the most accurate measurement for the liner is taken from the circumference of the camper body, not the lid. There's probably a good bit of allowance here, because, 40 feet of vinyl will allow some stretching if needed. So try for a reasonably snug fit on the bottom on the first try. Mine was still a little looser than desired when I tried it back on, but I had to go with that, because to take more material out pretty much meant another two inches minimum, based on redoing seams, and not having needle holes shewing. From pictures I have seen, it looks like the fit on the lid is pretty snug, requiring some stretching, when installed, looking at the photos of Ski's ATC build thread.

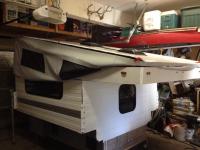
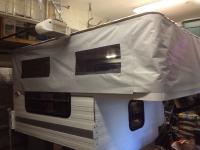
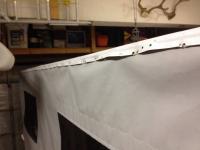
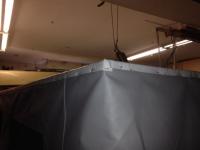
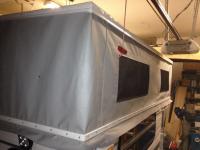
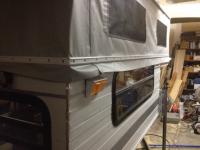
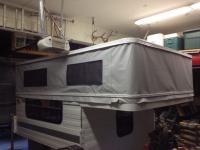
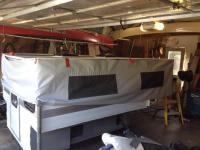
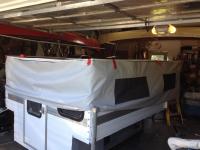
Here's the difference when I brought the liner back out to the garage and tried it on. The fit fit was close enough to live with, and over time will likely shrink a bit little by little as the fabric ages. So, game on!


ImageUploadedByWander The West1478181545.282877.jpg

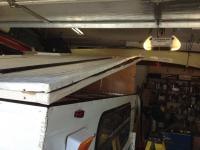
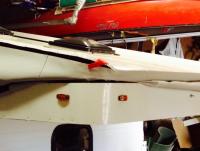
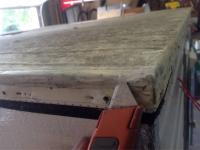
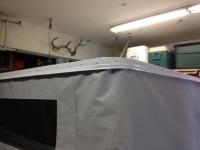
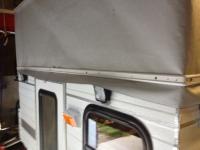
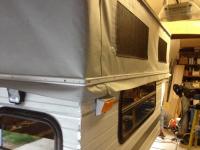
First I removed all the staples and screws holding the rooftop sheet metal down, and went around and snugged the headliner material one more time, added more contact cement where needed, and folded it up over, and underneath the sheetmetal, trying not to cut myself in the process.

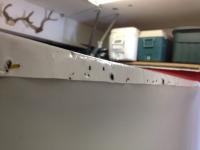
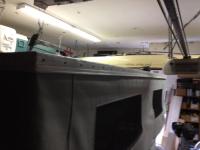
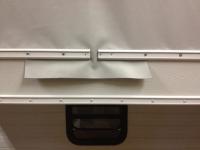
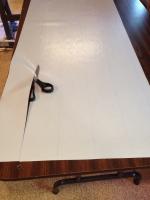
Next, I cut, I think 4 1/2" strips of left over vinyl material, enough to go the length of each side, for the Arctic Pack to be added later, sewed on the Velcro, and attached these with staples, before putting the completed side liner back on. I used 2" loop Velcro material here. I would leave a 1/4" space of vinyl above the edge of the Velcro when installed, as the trim ring will use that up when it is installed later. Here's those shots.

ImageUploadedByWander The West1478181593.819907.jpg ImageUploadedByWander The West1478181616.925880.jpg


Sent from my iPad using Wander The West

Edited by PokyBro, 06 November 2016 - 03:56 AM.

  • 0

1999 F250 crew cab SRW, 7.3 Powerstroke TD

1981 Grandby shortened to a Hawk

Build thread / https://www.wanderth...by-into-a-hawk/


#146 PokyBro

PokyBro

    Senior Member

  • Members
  • 467 posts
  • LocationLas Vegas, Nevada

Posted 03 November 2016 - 02:42 PM

ImageUploadedByWander The West1478182922.452134.jpg ImageUploadedByWander The West1478182957.625724.jpg ImageUploadedByWander The West1478182991.879557.jpg ImageUploadedByWander The West1478183022.562000.jpg ImageUploadedByWander The West1478183050.283326.jpg

I went around and marked one inch from the top of the liner all the way around, as this one inch mark would need to be at the top of the aluminum tubing that would be covered up by the sheet metal rooftop later, and I folded that one inch of material in under the sheet metal, and then after positioning the liner, and making sure it was center at front and back, began stapling the material to the roof frame. I then went around and tried to make sure it was not bunching up anywhere, and was hanging as uniformly as possible all the way around. You can make adjustments here if needed, by removing staples and repositioning if needed. My garage doesn't have the best lighting, and a bit tight on space, so it was difficult to stand back and inspect well on both sides.

ImageUploadedByWander The West1478183674.880557.jpg

This is how things were layered on the original build. The headliner was installed, and the sheet metal was stapled down over top of that. The liner was later stapled on top of those two, and then the trim ring was installed. Sealant was applied over the space between the trim ring, and the roof top, which was fine until the sealant weathered and dried, and then they were prone to start leaking. I think that's why so many of these early campers had lift panel rotting, and other damage from water leaks. I was shocked to see this when I dismantled mine. It didn't make sense to me. When I looked at Ski's ATC build thread, they folded the liner underneath the rooftop sheeting as it should be. Here's how I did mine.


Sent from my iPad using Wander The West
  • 1

1999 F250 crew cab SRW, 7.3 Powerstroke TD

1981 Grandby shortened to a Hawk

Build thread / https://www.wanderth...by-into-a-hawk/


#147 PokyBro

PokyBro

    Senior Member

  • Members
  • 467 posts
  • LocationLas Vegas, Nevada

Posted 03 November 2016 - 02:58 PM

ImageUploadedByWander The West1478184158.808467.jpg ImageUploadedByWander The West1478184195.092756.jpg ImageUploadedByWander The West1478184238.112476.jpg ImageUploadedByWander The West1478184268.810964.jpg ImageUploadedByWander The West1478184298.359369.jpg

Time to inspect again, and make sure everything looks good. You can see what I mean about my liner being maybe a tad too loose, as there's a little puckering happening already, but I really couldn't adjust that now, as described above. The front corner's sheetmetal radius was done originally at the factory, by numerous snips and folding the pieces down over the edge of the corner. This is another place of potential water leak, without routine maintenance and inspection of sealant. By tucking the liner material up under this, it should help prevent that to some degree, but sealant failure is always going to be a risk here.

Time to install the top trim ring. Sure glad I took the time to paint this white during the summer, as I just had to grab it and I tall now, and I used non-self drilling white, square hole screws for fasteners. I really like the square hole screws, as they really don't strip much like Phillips head to. I used duct tape to hold the trim in place until I could get around and place the screws, as I didn't have a helper.

ImageUploadedByWander The West1478184999.673671.jpg


Sent from my iPad using Wander The West
  • 1

1999 F250 crew cab SRW, 7.3 Powerstroke TD

1981 Grandby shortened to a Hawk

Build thread / https://www.wanderth...by-into-a-hawk/


#148 PokyBro

PokyBro

    Senior Member

  • Members
  • 467 posts
  • LocationLas Vegas, Nevada

Posted 03 November 2016 - 03:12 PM

ImageUploadedByWander The West1478185137.050564.jpg ImageUploadedByWander The West1478185193.163608.jpg ImageUploadedByWander The West1478185222.558840.jpg

I put a screw in every foot,or so at first, again to make sure it was lining up properly, then later went back and put in the rest. The screws should fit back in the original holes if you get things lined back up accurately.

Letting the side liner droop down naturally with the roof raised, it was time to install the bottom trim rings. My camper had two inches of aluminum tubing added to the top of the camper wall, so there were no old screw holes to try and match. Also, though I tried to get the measurements as exact as possible, I found out at the this point they were off a little as the trim pieces didn't come together at each end as they should have. So be careful here if you were to make such a change to the camper body, as I did, and are attempting to reuse the trim pieces. Also, there is a topside, and bottom side to this trim material if you look closely.

ImageUploadedByWander The West1478185845.519378.jpg ImageUploadedByWander The West1478185873.875465.jpg ImageUploadedByWander The West1478185906.136866.jpg


Sent from my iPad using Wander The West
  • 0

1999 F250 crew cab SRW, 7.3 Powerstroke TD

1981 Grandby shortened to a Hawk

Build thread / https://www.wanderth...by-into-a-hawk/


#149 PokyBro

PokyBro

    Senior Member

  • Members
  • 467 posts
  • LocationLas Vegas, Nevada

Posted 03 November 2016 - 03:26 PM

ImageUploadedByWander The West1478185987.159774.jpg ImageUploadedByWander The West1478186035.744220.jpg ImageUploadedByWander The West1478186093.337639.jpg ImageUploadedByWander The West1478186125.591377.jpg

It's a good idea to stand back and, with light shadows, see if there are any areas that need adjustment to try and work out any puckering or uneven stretching of the material. This is easily accomplished by loosening or removing several screws. Also take the time to go around and see if you got this bottom trim piece flush with the top of the camper wall. This is by touch or feeling through the fab I side liner, as you can't visually see if they are flush.

ImageUploadedByWander The West1478186233.148819.jpg

If it all looks good go around adding the remains screws to fasten down the trim piece. You can again pull the material under the trim as you go for snugness, and try to keep the liner from bunching as much as possible, but there will likely be some no matter what you do.


Sent from my iPad using Wander The West

Edited by PokyBro, 06 November 2016 - 03:58 AM.

  • 0

1999 F250 crew cab SRW, 7.3 Powerstroke TD

1981 Grandby shortened to a Hawk

Build thread / https://www.wanderth...by-into-a-hawk/


#150 Sock Puppet

Sock Puppet

    Member

  • Members
  • PipPip
  • 10 posts
  • LocationNew Mexico

Posted 03 November 2016 - 05:02 PM

Uber build!  Hats off to your incredible work!


  • 0

2007 F-350 CCSB 4X4 PSD with ZF6, 2007 Sun Valley Eagle SB


0 user(s) are reading this topic

0 members, 0 guests, 0 anonymous users