Hey there, super green to this forum so please let me know if I’m doing something wrong.
I have a 2004 Hawk that I primary use for winter camping for snowboarding and lake camping during the summer. In the winter I just use my furnace, lights and water pump if needed. We’re primarily hooked up to shore power, but wanted to not rely on that. Summer time is where I use more power, fan, water pump and lights more consistently with no shore power ever. As of now all I have is a West Marine 12v 79aH 20hr rate battery . I would like to install solar to give some piece of mine while camping. I have a kit picked out that I’m ready to purchase. Obviously I want it to go onto my roof, just skeptical about drilling hose into my roof. Especially because I don’t want to take apart the interior roof material or have wires exposed inside the camper.
Any tricks or ideas on where to drill the holes? Or any ideas on how to get the wires interior without holes? Thanks I’m advance.
-Dave
Establishing holes for roof solar panels
Started by
dHART
, Feb 16 2022 11:56 PM
Solar Wiring Roof racks Drilling holes Solar install Hawk solar
8 replies to this topic
#2

BillTheHiker
-

- Members
- 307 posts
Senior Member
- LocationBoise, ID
Posted 17 February 2022 - 01:03 AM
I used rocker mounts that use 3M adhesive tape and no holes in roof. Have now put 46k miles on it including some very rough back roads and two cross-usa trips with no problems. these mounts elevate the panels over 1" which is good for air flow/cooling beneath.
https://www.wanderth...rs-rocker-feet/
#3
Vic Harder
-

- Site Team
- 4,968 posts
Doctor Electric
- LocationCalgary, Alberta
Posted 17 February 2022 - 05:17 AM
Bill, do you have a newer seamless flat roof? I bet the OP has a corrugated roof, and the tape solution won't be good for that kind of surface.
Dave, is your camper not pre-wired for solar? To find out, remove the forward push panel from the ceiling. On the driver's side of where that board was you might find a hole or some wiring already in place. My Puma was not prewired, so when I did my build, I used a Solar Entry Gland like this one - Amazon.com: Link Solar Weatherproof ABS Solar Double Cable Entry Gland,Curved Cable Connector for All Cable Types 2mm² to 6mm² for Rv, Campervan, Boat (Black) : Patio, Lawn & Garden
I put that as far forward as I could and still mount & seal it. To find where to make a hole, take a look at your lift panels at the front. The factory wires come down behind the lift panel. I couldn't do that, so I came in just to the (driver's) side of the panel. The wooden strips on the ceiling give you clear indication of where the support structure is. Feel for the side to side structural member at the very front of the camper, and back off 4" or so for your hole. The actual hole can be as big as you want to, as long as your solar gland can cover it up and seal well.
Once inside, the wires quickly tuck in behind the lift panels. Keep them in place with strong Duct Tape. They then run along the driver's side of the cab over area. That 4" high panel that is the length of the bed is held in by only a few screws. Remove those and that panel and you will find some wires already there. Those are for the overhead lights, and fan. Run your new wires alongside those until they dive down into the cabinetry at the front of the camper. From there it goes to where you are mounting your MPPT solar controller.
I hope that helps. Pictures in my Puma build thread, linked in my signature block.
2015 Silverado 3500 crew cab 8' bed Diesel
2012 ATC Puma Shell build - https://www.wanderth...012-puma-build/
Power considerations thread - https://www.wanderth...e-power-scotty/
Building out an electrical system - So, you want to setup a good electrical system in your camper? - Electrical, Charging, Solar, Batteries and Generators - Wander the West
#4
BillTheHiker
-
- Members
- 307 posts
Senior Member
- LocationBoise, ID
Posted 17 February 2022 - 05:12 PM
I do have the newer one piece roof. It is flat and very smooth. Each foot of these mounts is about 1.5" x 1" rectangle. Would that fit on a flat area in the grooves? It might be worthwhile to ask Amsolar. I have found their tech support to be excellent and responsive. Being in Oregon for over 20 years they should be familiar with FWC campers.
#5
dHART
-
- Members
-

- 4 posts
Newbie
- LocationSan Diego
Posted 18 February 2022 - 02:11 AM
 IMG_5061.jpeg 116.34K
27 downloads
FullSizeRender.jpeg 171.9K
28 downloads
IMG_5054.jpeg 115.23K
21 downloads
IMG_5061.jpeg 116.34K
27 downloads
FullSizeRender.jpeg 171.9K
28 downloads
IMG_5054.jpeg 115.23K
21 downloads
Bill, do you have a newer seamless flat roof? I bet the OP has a corrugated roof, and the tape solution won't be good for that kind of surface.
Dave, is your camper not pre-wired for solar? To find out, remove the forward push panel from the ceiling. On the driver's side of where that board was you might find a hole or some wiring already in place. My Puma was not prewired, so when I did my build, I used a Solar Entry Gland like this one - Amazon.com: Link Solar Weatherproof ABS Solar Double Cable Entry Gland,Curved Cable Connector for All Cable Types 2mm² to 6mm² for Rv, Campervan, Boat (Black) : Patio, Lawn & Garden
I put that as far forward as I could and still mount & seal it. To find where to make a hole, take a look at your lift panels at the front. The factory wires come down behind the lift panel. I couldn't do that, so I came in just to the (driver's) side of the panel. The wooden strips on the ceiling give you clear indication of where the support structure is. Feel for the side to side structural member at the very front of the camper, and back off 4" or so for your hole. The actual hole can be as big as you want to, as long as your solar gland can cover it up and seal well.
Once inside, the wires quickly tuck in behind the lift panels. Keep them in place with strong Duct Tape. They then run along the driver's side of the cab over area. That 4" high panel that is the length of the bed is held in by only a few screws. Remove those and that panel and you will find some wires already there. Those are for the overhead lights, and fan. Run your new wires alongside those until they dive down into the cabinetry at the front of the camper. From there it goes to where you are mounting your MPPT solar controller.
I hope that helps. Pictures in my Puma build thread, linked in my signature block.
Vic,
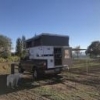
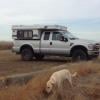
Just wanted to start out and thank you for a informative response. I went ahead and checked out what you described. Im not sure how to remove the push panel from the ceiling as it is attached through rivets. I was able to peak my head around the push panel on the driver side. There are wires and a port above the ceiling material. Im assuming those wires go to the overhead lights, unless that is the pre-solar wiring you described. If not, Ill have to drill a hole. If so, Im wondering if I can drill near that port on the driver side, from the top of the roof all the way past the ceiling roof material (carefully). Without damaging anything. Im really trying to avoid detaching the ceiling material as Im not too comfortable with that process. Ive attached some photos of the wires, my roof material and roof racks for reference. Thanks again.
#6
Vic Harder
-
- Site Team
- 4,968 posts
Doctor Electric
- LocationCalgary, Alberta
Posted 18 February 2022 - 03:10 AM
Rivets? Really? That is odd, I think.
Not sure what those wires are. I have not seen a factory install that looks like that. Perhaps others here can chime in?
If you are drilling holes, I would be inclined to see if there is room inside that existing port for another 2 10awg wires, and if you can feel the ceiling with your finger or a screwdriver. If so, use a sharp punch or other tool to make a small hole going from the inside up.
Did you find the wires behind the 4" high side panel of the cabover area?
2015 Silverado 3500 crew cab 8' bed Diesel
2012 ATC Puma Shell build - https://www.wanderth...012-puma-build/
Power considerations thread - https://www.wanderth...e-power-scotty/
Building out an electrical system - So, you want to setup a good electrical system in your camper? - Electrical, Charging, Solar, Batteries and Generators - Wander the West
2012 ATC Puma Shell build - https://www.wanderth...012-puma-build/
Power considerations thread - https://www.wanderth...e-power-scotty/
Building out an electrical system - So, you want to setup a good electrical system in your camper? - Electrical, Charging, Solar, Batteries and Generators - Wander the West
#7
Vic Harder
-
- Site Team
- 4,968 posts
Doctor Electric
- LocationCalgary, Alberta
Posted 18 February 2022 - 03:11 AM
As for the roof itself, you have a lot of stuff up there. Where are you going to put your solar panels?
2015 Silverado 3500 crew cab 8' bed Diesel
2012 ATC Puma Shell build - https://www.wanderth...012-puma-build/
Power considerations thread - https://www.wanderth...e-power-scotty/
Building out an electrical system - So, you want to setup a good electrical system in your camper? - Electrical, Charging, Solar, Batteries and Generators - Wander the West
2012 ATC Puma Shell build - https://www.wanderth...012-puma-build/
Power considerations thread - https://www.wanderth...e-power-scotty/
Building out an electrical system - So, you want to setup a good electrical system in your camper? - Electrical, Charging, Solar, Batteries and Generators - Wander the West
#8
PaulT
-

- Members
- 2,612 posts
Need gumbo
- LocationHillsboro, Oregon
Posted 18 February 2022 - 04:04 AM
As for the roof itself, you have a lot of stuff up there. Where are you going to put your solar panels?
That factory roof rack is rated for 200 lbs or so and works great for mounting solar panels. I have the rear roof rack on my hawk and mounted a panel on that. The aluminum tubing is 1/16" thin wall so it can't take a lot of squeezing by tightening screws. I solved that issue on mine by using Nylon nuts instead of lock washers. I mounted 1 1/2" by 1/8" angle aluminum to the thin wall tubing then mounted the solar panel onto angle aluminum. That provided a lot of stiffness and support for my 160 watt solar panel. Did not have to drill any holes in the roof to mount the panel.
Paul
I thought getting old would take longer.
#9
fuzzymarindave
-
- Members
- 255 posts
Senior Member
- LocationMarin County, CA
Posted 18 February 2022 - 11:26 PM
I attached the rear edge of solar panel to factory roof rack. Screws into panel frame go only through one wall of square tubing with screw head accessible by larger hole in opposite tubing wall. Front panel mounts are screwed through roof skin into frame. You could demo part of middle rack crossbar to accommodate solar panel.
Attached Files
-
97177636-2A7F-42D5-A53D-EF84EEBB027D.jpeg 79.94K
12 downloads
-
D4C3EB7A-2E64-4100-98B3-A69A76316BC2.jpeg 124.1K
13 downloads
2015 Hawk, Silver Spur Interior, Fiberglass siding. 2008 F250 4x4 Supercab


Also tagged with one or more of these keywords: Solar, Wiring, Roof racks, Drilling holes, Solar install, Hawk solar


0 user(s) are reading this topic
0 members, 0 guests, 0 anonymous users

