Jump to content


Photo
- - - - -

Had to reduce 1" to fit Silverado

Hawk rebuild

  • Please log in to reply
6 replies to this topic

#1 Scotten

Scotten

    Newbie

  • Members
  • Pip
  • 6 posts

Posted 19 February 2024 - 06:12 PM

This summer I bought a used Hawk in La Jolla, CA. Did not pay what person was asking but after all of my travails I my have overpaid, but, heh, I now have a Hawk!


Just as we were loading the camper the guy said, "oh, you have a Silverado (2014-2017) and I don't think these fit those beds. It was all ready to drop down so I figured I could figure out something and dropped it down. The wide part at the rear didn't make it past the tailgate so we tied it down the best we could and heading home.


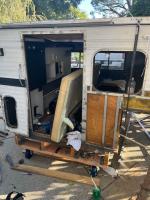
I decided to cut 1" off the frame on the passenger side. Took some time just looking over my options and then went for it.

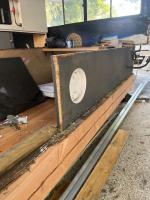
 I had a hard time finding this thin wall aluminum they use. This is a lighter gauge. Hope the plywood will do it's job. BTW tried to weld but too thin for a MIG so I just brazed it in.


Camper rear view cut 1%22.jpeg Camper rear upper 1%22 cut.jpeg

Top view.

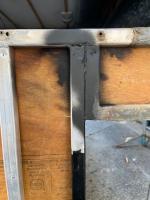
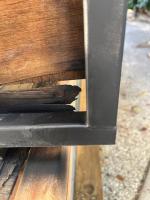
This is a view of the lower frame I cut 1" and welded a new post in place.


Camper rear upper 1%22 cut.jpeg

Attached Thumbnails

  • Camper rear lower 1%22.jpeg

Edited by Scotten, 19 February 2024 - 06:16 PM.

  • 0

#2 Scotten

Scotten

    Newbie

  • Members
  • Pip
  • 6 posts

Posted 19 February 2024 - 06:31 PM

Interior Front Closeup 1%22 cut jpeg.jpeg As you can see I'm trying learn the ins and out of posting here. 


After cutting the frame 1" front and back I had to replace the plywood frame. Guess I didn't take too many pics of that process.


This one shows the frame cut 1" (just the from middle portion. and some of the new panels I installed:


  • 0

#3 Scotten

Scotten

    Newbie

  • Members
  • Pip
  • 6 posts

Posted 19 February 2024 - 06:50 PM

Rebuild side framing 1.jpeg This is what I left of the side panel. Rebuilt around this existing panel. The picture in the above post shows how it was completed but I don't seem to have a better photo.


  • 0

#4 goinoregon

goinoregon

    Senior Member

  • Members
  • 520 posts
  • LocationPDX

Posted 20 February 2024 - 03:12 AM

thx for posting.  good luck with your project.


  • 0

Oregon


#5 trexoffroad

trexoffroad

    Newbie

  • Members
  • Pip
  • 6 posts

Posted 06 March 2024 - 02:46 PM

Interior Front Closeup 1%22 cut jpeg.jpegAs you can see I'm trying learn the ins and out of posting here.

After cutting the frame 1" front and back I had to replace the plywood frame. Guess I didn't take too many pics of that process.

This one shows the frame cut 1" (just the from middle portion. and some of the new panels I installed:

I’m curious about a couple things:
1) were you successful in finding the thin walled aluminum like they use? (I’m not finding it so will probably use the thicker walled I can find)
2) I see that you are replacing the insulation. Any specific reason why? I’ve thought of replacing mine while it’s apart so looking for the experience of others. (I dislike the squeakiness of the white stuff in my roof and wonder if the more dense stuff would be better for that too)
Thanks!
Aaron
  • 0

#6 Vic Harder

Vic Harder

    Doctor Electric

  • Site Team
  • 4,968 posts
  • LocationCalgary, Alberta

Posted 06 March 2024 - 04:44 PM

for my build I used rigid fiberglass, duct tape, reflectix.  I was at ATC recently and Marty has some new fluffy stuff that is R7 for the 1" thickness.  You could talk to him about buying some from him.


  • 0

#7 Scotten

Scotten

    Newbie

  • Members
  • Pip
  • 6 posts

Posted 07 March 2024 - 06:08 AM

I had a hard time finding the thin wall. I went to Industrial Metal before I actually cut the frame and picked up a 10' length of the thinnest wall (probably 1/8") figuring it may be that. However, when I cut the frame down and got a look I was surprised at how thin in was. I then went to looking for thin wall.


I found some  1" x 1" OD x .040" at Testrite.com. It was actually thinner than the aluminum on the camper but I was tired of looking so I used it. As I said, I had to braze it and had to be careful to not get it too hot. I figured the thicker 1/8" would be hard to braze to the thinner as the thicker would have to get too hot.


​I did a pretty good job on one joint and on another not the best. You can see in the picture where the tube was cut and I just put the new tube next to it and brazed them together. I did the same on the front of the camper.


The build is actually complete. I will post final pictures. I have used the camper at the beach and 2 ski trips so far. Hasn't fallen apart yet, ha!


As to the insulation, I have seen others replace it with rigid so I did so also. It had the yellow insulation from 2001 and it doesn't seem to have too high of an R value. Eventually, I will probably remodel the whole interior and at that time I will figure out what makes the most sense. I don't notice any sqeakiness.


  • 0


Also tagged with one or more of these keywords: Hawk, rebuild

0 user(s) are reading this topic

0 members, 0 guests, 0 anonymous users