That was one of the things I noticed too when trying to figure out for sure if it was a FWC. I couldn’t find any pictures online of other fWCs having 3 latches. Upon closer inspection I believe a previous owner added that. It’s not exactly the same as the others.


New to me FWC makeover
Started by
JakeSnapper
, Nov 26 2019 03:44 PM
61 replies to this topic
#32

Dobba84
-

- Members
-

- 32 posts
Advanced Member
Posted 27 November 2019 - 10:34 PM
Awesome! I am in the process of starting to do one too. Right now it’s just fix stuff to make it usable and then dive in.
#33
Old Crow
-

- Members
- 1,059 posts
Searching....
- LocationSouth Central PA
Posted 28 November 2019 - 01:22 AM
Blow up that photo and it is clear that the center latch is different. On my 83 Fleet there is a bit of a hump in the center of the roof on the front. I have considered a third latch, but there have been no issues as it is so I never bothered. Something I figured I'd look into if I ever got a notion to redo the top. I get the feeling that at some point someone had overly tight latches with something in the way of the top closing properly that created a couple of bent spots.
That was one of the things I noticed too when trying to figure out for sure if it was a FWC. I couldn’t find any pictures online of other fWCs having 3 latches. Upon closer inspection I believe a previous owner added that. It’s not exactly the same as the others.
Thanks, guys. I appreciate the explanations.
.
'01 FWC Hawk shell on a '13 Tundra Double-Cab + '19 Ford Transit van with Quigley 4x4 option
#34
JakeSnapper
-
- Members
-
- 53 posts
Advanced Member
Posted 28 November 2019 - 10:47 AM
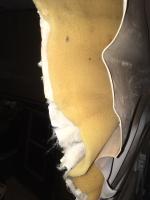
Has anyone seen a 3 ply sideliner like this before? If I wanted to replace just that side for now, would I have enough slack to work with by loosening the top and bottom trim on that side only? Otherwise I’ll do like Dobba84 and use 100 mph tape for now.
Happy Thanksgiving everyone.
#35
Sleddog
-

- Members
- 182 posts
Senior Member
- LocationIdaho
Posted 28 November 2019 - 01:56 PM
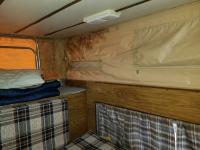
Mine had a similar liner when I got it, I believe it was meant to be a sort of arctic lining for cold weather. I saw where someone suggested cutting out the inner liner and the foam, so I did, and they were right. The two inner liners held moisture and were tough to get completely dry on the road. The interior liner was filthy and both of them were mostly rotten. I was glad to get rid of them, that and a little scrubbing on the remaining vinyl made it look a lot better inside.
If you decide to patch yours instead of replacing it for now, it will be easier if you cut out those two inner liners first.
Pretty easy to see where I left off cleaning after removing the liner, also easy to see where the extra liners trapped moisture against the front corners.
If you decide to patch yours instead of replacing it for now, it will be easier if you cut out those two inner liners first.
Pretty easy to see where I left off cleaning after removing the liner, also easy to see where the extra liners trapped moisture against the front corners.
Attached Thumbnails
#36
JakeSnapper
-
- Members
-
- 53 posts
Advanced Member
Posted 28 November 2019 - 02:15 PM
Good deal, I was hoping I could do that , also that someone tried it before me. Most of my camping will be in fairly warm weather anyways. In the long run I’d like to do screen all the way around with a roll up / drop down skirt style rain fly.
#37
JakeSnapper
-
- Members
-
- 53 posts
Advanced Member
Posted 03 December 2019 - 08:58 PM
I noticed today while making the new platform for the cabover that it is sagging a little and warped. 1 inch over the span of 40 inches on the passenger side and 1/2 an inch on the drivers side. I don’t see any obvious creases or bends in the cab over. Any insights on this?
#38
JakeSnapper
-
- Members
-
- 53 posts
Advanced Member
Posted 19 January 2020 - 09:47 PM
It’s been a while since I made any updates but progress is being made. The holidays and gathering materials kind of slowed my progress but I should have some picture worthy upgrades in the next few days. In the meantime, I found a videos of a rebuild in progress on the YouTube that I thought I’d share. The guy seems pretty handy so should turn out to be a good build.


0 user(s) are reading this topic
0 members, 0 guests, 0 anonymous users

