Jump to content


Photo
- - - - -

Installing Isotherm 65 in 2011 Eagle

DC fridge install

  • Please log in to reply
20 replies to this topic

#1 buckland

buckland

    Senior Member

  • Members
  • 3,080 posts
  • LocationNew England

Posted 02 April 2017 - 04:36 PM

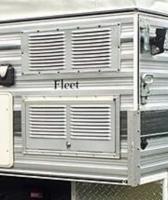
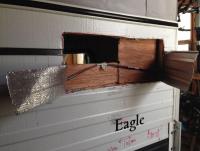
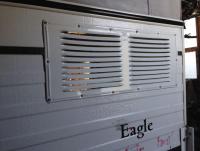
I have read what I think is all that I could find on fridges here but have not found some info needed. I contacted FWC and received an email back with approximate measures for cutting the two vent holes in the side (fridge back) wall. This is a slightly nerve wracking venture as the old saying goes measure twice cut once... more like 5 times measure!


One big question to start: As this is a DC fridge with the compressor on the top... should the vents be switched? Meaning the access vent on top and the non opening one on the bottom? Or does it matter. I bought the vents from FWC and was confused why I got one with access as it is for a DC fridge.


Has anyone put in a DC fridge after purchase (Shell) on top of the Propane box on the drivers side rear in either an Eagle or Fleet? If so any pointers/advice.


I am assuming   (? !) that the frame tubing for the camper models would be standard so that the fridges installed would be the same for installing the vents? I ask this for two reasons: as the access vent is a different dimension then the non-access vent ...I was not sure if the aluminum tube frame around these openings is set to fit that configuration or not.


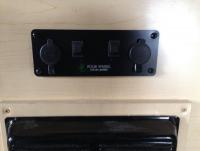
Presently (when I bought from FWC) I had an Engel 27 mounted on the top of the Propane box. Worked great (I recently sold it).  So the area is ready for me to build a cabinet/counter. The two electric outlets, one double DC sockets  and a 110 AC double plug. I plan on moving them to the front of the cabinet above the heater box (lots of room to mount) this is also beneath the sink These same plugs were beneath the sink on the side... not worried about water).    


Here is part of what FWC sent:


From the rear to center is 12”

From the bottom up to the center is 10”.

The opening is approx. 11”  tall by 20 ½” wide.

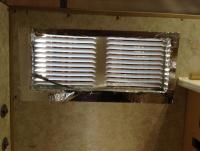
From the center of the bottom vent opening to the center of the top(if you choose to add the upper) is 14”.

The top opening is 8 ½” tall by 20 ½” wide.


Today is sun is out and 45º !!!! so I am jumping on this good work weather! 

Attached Thumbnails

  • Isotherm 65.jpg
  • Vent.jpg

  • 0

2016 Duramax 2.8 Diesel long bed Colorado 4WD with 2011 Eagle

Lordwoodcraft  instagram        Rob
The only people who ever get anyplace interesting are the people who get lost.
Henry David Thoreau
"Work to achieve not to acquire"


#2 Stalking Light

Stalking Light

    Feral Grandpa

  • Members
  • 1,481 posts
  • LocationLand of grits and gravy

Posted 02 April 2017 - 04:46 PM

My 2014 Eagle with Dometic 65 has the access vent on the bottom. FYI


  • 0
Charlie...
Stalking Light
2014 FWC Eagle on 2015 Tacoma Quad Cab Long Bed

#3 craig333

craig333

    Riley's Human

  • Members
  • 8,023 posts
  • LocationSacramento

Posted 02 April 2017 - 05:57 PM

Same as mine. Does it matter? Probably not. Other than wiring it up theres not much need to access the fridge. 


  • 0

Craig K6JGV_________________________ 2004 2500 CTD 4X4 FWC HAWK 1960 CJ5


#4 buckland

buckland

    Senior Member

  • Members
  • 3,080 posts
  • LocationNew England

Posted 02 April 2017 - 06:45 PM

Gotcha... so with no need to access the area just put them in as in photo above. Now then... them there wires in the below photo...taken under sink ..there is a coil of wire left at install ....I assume it was wired for a DC fridge? There are 3 wires... but and 2 black(?) ...but wouldn't ya know it the coil is screwed to the wall and the clip's screws are behind the gas pipe! Man plans God laughs. Y'all think those would be the DC fridge wires? Hate to bust some knuckles getting them loose and discover they aren't the ones! If they are the right ones I need to find out what ones is power, neg, ground. 

Attached Thumbnails

  • IMG_2017.jpg

Edited by buckland, 02 April 2017 - 06:50 PM.

  • 0

2016 Duramax 2.8 Diesel long bed Colorado 4WD with 2011 Eagle

Lordwoodcraft  instagram        Rob
The only people who ever get anyplace interesting are the people who get lost.
Henry David Thoreau
"Work to achieve not to acquire"


#5 craig333

craig333

    Riley's Human

  • Members
  • 8,023 posts
  • LocationSacramento

Posted 02 April 2017 - 10:37 PM

Most likely they are. Yep, just checked mine. Black is ground, blue positive but double check that.


  • 0

Craig K6JGV_________________________ 2004 2500 CTD 4X4 FWC HAWK 1960 CJ5


#6 Vic Harder

Vic Harder

    Doctor Electric

  • Site Team
  • 4,968 posts
  • LocationCalgary, Alberta

Posted 03 April 2017 - 03:34 AM

Check the wire color at the fuse panel.  That could be a nice confirmation if it is the same as the coiled wire.


I'm assuming your ISOTHERM is very similar to my TruckFridge130, except for size.  The compressor/fan is mounted top right when looking at it from the "where is the beer" position at the front of the fridge, right?


IF so, adding a second vent lower on the side won't help much.  On my TF, the fan blows the air INTO the camper, and it needs to find a way around the fridge to vent.  That's why the mounting instructions say to make sure there is room under the fridge for air to flow.


I went them one better, and installed a 140mm fan on the inside of the camper, pulling air across the coils.  


All this in a 2005 Hawk Shell.


You can see the inside fan in this pic

fridge
 
This is the side of the fridge before mounting into cabinet
How compressor bits on fridge fit new vent opening
 
And this is what that wall looked like before I cut a hole out for the vent
drivers wall rear
 
inside - edge of new fan vent
After cutting hole


I ended up just buying a cold air return vent from HomeDepot and cutting it in half.  8" x 8" 
Sorry, no pic right now of how that looks from the outside.


  • 0

#7 buckland

buckland

    Senior Member

  • Members
  • 3,080 posts
  • LocationNew England

Posted 03 April 2017 - 10:54 AM

Hey there Vic. Thank you for taking the time with the photos and suggesting looking in at the fuse box. I have been lucky and have had no electrical issues so haven't even looked at the fuse box yet!  When I asked FWC Terry said in his opinion he'd put both vents in. as you said for hot at top going out and cool air coming in bottom. I have the two so might as well. I won't add a fan (though I read the whole thread about adding two).. Like to learn stuff and I did appreciate how heater sealed the opening with aluminum tape and insulated the side for sound. I will do just that as well. 1" aluminum cover hard foam insulation should do the trick.  

It will be a nice day today (50!) so I will get out to the garage and start the project. I have both a jig saw with metal blade as well as a saws-all with same. I assume one cuts from the outside in to keep the aluminum siding from chattering? I will practice cut in the center first! 


  • 0

2016 Duramax 2.8 Diesel long bed Colorado 4WD with 2011 Eagle

Lordwoodcraft  instagram        Rob
The only people who ever get anyplace interesting are the people who get lost.
Henry David Thoreau
"Work to achieve not to acquire"


#8 Stalking Light

Stalking Light

    Feral Grandpa

  • Members
  • 1,481 posts
  • LocationLand of grits and gravy

Posted 03 April 2017 - 12:06 PM

Not sure you'd need a second fan with the Isotherm, it's supposedly more efficient than the power hog of a Dometic 65 that I have. ;)


  • 0
Charlie...
Stalking Light
2014 FWC Eagle on 2015 Tacoma Quad Cab Long Bed

#9 buckland

buckland

    Senior Member

  • Members
  • 3,080 posts
  • LocationNew England

Posted 03 April 2017 - 02:51 PM

I agree and if I ever felt a need to it can be done later. This morning I got at those rascal wires tucked in there. I am just capping the 110 AC wires as I already have another 2 plugs by the water tank light gauge. The DC sockets I moved to the front. Forstner bits are very nice for cutting holes if one knows the exact spots... less work than cutting a rectangular hole and it cuts with a smooth edge. So I traced the DC panel and found the centers of the 4 parts that needed to go through the cabinet and made a template with cardboard. Marked my spots and drilled. It worked... so mounted the plate and plugged in wires ...tested ok. Here's a few blurry shots of that. 

Attached Thumbnails

  • IMG_2023 (1).jpg
  • IMG_2025 (1).jpg
  • IMG_2026 (1).jpg

  • 0

2016 Duramax 2.8 Diesel long bed Colorado 4WD with 2011 Eagle

Lordwoodcraft  instagram        Rob
The only people who ever get anyplace interesting are the people who get lost.
Henry David Thoreau
"Work to achieve not to acquire"


#10 buckland

buckland

    Senior Member

  • Members
  • 3,080 posts
  • LocationNew England

Posted 03 April 2017 - 08:25 PM

A few more hours and one Ballentine Ale later..... I got into it after fussing as I do about thinking it through 3 times.... I decided to do the top first and then the bottom... the reason being I took a peek through the inside wall after taking off molding and screws for inside paneling just enough to get a light in there... sure enough there was no insulation there but there were three wires... to the life of me I can't figure out why they would be there as there is a 3" section between the upper and lower vent that would be perfect to run those wires.... Anyway it is what it is so... I had to make the cuts gingerly by taping the wires one way and cutting, then moving and re-taping etc... last cut in corner with a drywall saw and a tin snips. Not my prettiest work but once that was out I felt it was Ballentine Time to celebrate (stopped working as I never do beer and saws....bad idea) 

So the top one is done ...used aluminum tape as I learned from the other thread... and also butyl tape 1/2" around the outside vent when I screwed it in place. One down and one to go.

I am a tad concerned as I can not see into the lower area of the wall but I can see there is foam insulation which gives me hope there are no hidden wires through which I could saw. I will start again on Wednesday as the temps tomorrow are in the 30's with rain and back to 50 (hallelujah) Wed.  I will say I am sad that FWC put the "Eagle" sticker right where I have to cut for the lower..... maybe I can get them to send me old stock!

Attached Thumbnails

  • IMG_2027.jpg
  • IMG_2028.jpg
  • IMG_2029.jpg

Edited by buckland, 03 April 2017 - 08:30 PM.

  • 0

2016 Duramax 2.8 Diesel long bed Colorado 4WD with 2011 Eagle

Lordwoodcraft  instagram        Rob
The only people who ever get anyplace interesting are the people who get lost.
Henry David Thoreau
"Work to achieve not to acquire"


0 user(s) are reading this topic

0 members, 0 guests, 0 anonymous users